Generating Custom Reports with MATLAB Report Generator
By Thomas Deck, MathWorks
Reports are required in virtually every engineering domain, either to document systems, meet requirements, or produce artifacts for certification. Creating reports for large, complex systems manually can be difficult and time-consuming. The challenge is compounded when the report has to follow a specific corporate layout or use special formatting.
With MATLAB Report Generator™ you can quickly produce a templated report—and with the DOM API1 you can generate a tailor-made report for any kind of application in Microsoft® Word, PowerPoint®, PDF, or HTML.
Using a Microsoft Word document as an example, this article explains how to use the DOM API to generate both a simple report and a more complex and customized one.
The code used in this example is available for download.
Creating a Template
To generate a report using the DOM API, we first create a template document. The template includes fixed content, such as headers or footers, and holes—the part of the document that gets dynamically filled by a MATLAB® function.
In this example we start with a Word template. To create the template, we navigate to the SimpleReport directory in the downloadable file provided with this article and execute the script copyTemplate. The script copies an empty template from the MATLAB installation folder to our current folder and renames it to myTemplate.dotx. We open the file myTemplate.dotx in Word.
Once the document has opened, we go to the Developer tab and select Design Mode. The Developer tab is disabled by default. To enable it, we do the following:
- Click the File tab and choose Options—Customize Ribbon.
- Choose Main Tabs and the Developer check box.
Design Mode helps us distinguish holes from fixed content by highlighting the holes.
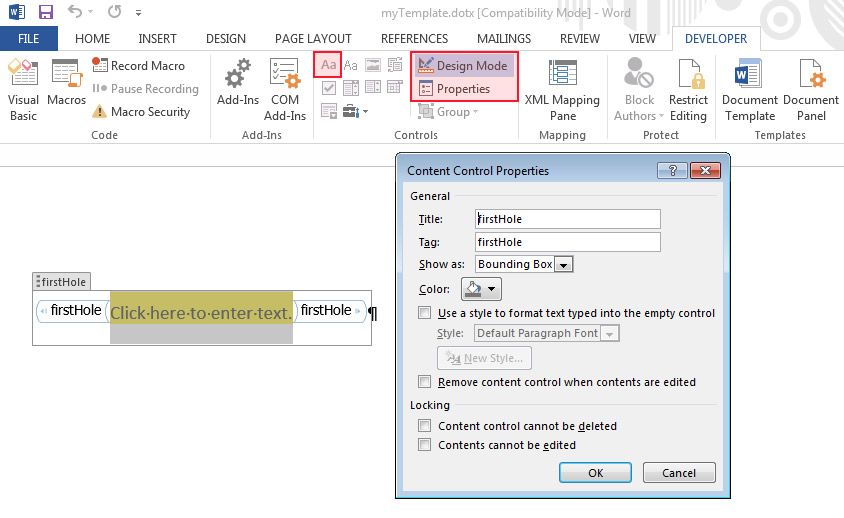
We add a new hole by positioning the cursor where the hole should be created and pressing the Rich Text Content Control button (“Aa”). Press the Properties button to modify the hole’s properties (Figure 1). There is no need to enter text into the hole, but adding text indicating the hole’s purpose will make the template more comprehensible. This text will not show up in the final report.
We open the Content Control Properties windows to specify a Title and a Tag (these must be identical). We close the dialog box and save and close the template.
Filling the Hole
We execute the MATLAB fillFirstHole function to generate a new document.
function fillFirstHole
% This function fills the hole "firstHole" in myTemplate.dotx
     import mlreportgen.dom.*;

     doc = Document('firstDocument', 'docx', 'myTemplate');
     holeId = moveToNextHole(doc);
     fprintf('Current hole ID: %s\n', holeId);
     textObj = Text('Hello World');
     append(doc, textObj);
     close(doc);

     rptview('firstDocument', 'docx');

end
The new document, firstDocument, is type docx and based on myTemplate(.dotx). We instruct the DOM API to move to the first hole, and then create an object of class Text, which contains the string “Hello World.” We append this object to the document, close the document, and open firstDocument.docx for review.
Tip: If you receive an error message when running the fillFirstHole-function, make sure that both myTemplate.dotx and firstDocument.docx are closed.
Block-Level and Inline Holes
In Microsoft Word we can create two types of holes: inline and block-level (Figure 2). An inline hole occurs in a paragraph, and can accept only content that can occur in a paragraph, such as text, images, and hyperlinks. A block-level hole can contain any kind of content, including other paragraphs.

To create an inline hole, place the cursor anywhere in your template and press the Rich Text Content Control button. Mark an empty paragraph and press the button for a block-level hole.
Tip: To place an inline hole directly in front of a paragraph, add a space before the paragraph, otherwise Word might create a block-level hole. You can remove the space afterwards.
Adding Styles
Now we want to modify the way the text is displayed in our generated report. In the previous step, we appended a text object to the document. We have several options for modifying the appearance of the text object.
function fillFirstHoleWithStyle
% This function fills the hole "firstHole" in myTemplate.dotx
   import mlreportgen.dom.*;

   doc = Document('firstDocument', 'docx', 'myTemplate');
   holeId = moveToNextHole(doc);
   fprintf('Current hole ID: %s\n', holeId);
   textObj = Text('Hello World', 'Heading 1');
   textObj.Bold = true;
   append(doc, textObj);
   close(doc);

   rptview('firstDocument', 'docx');

end
You can modify individual properties, such as Bold or Color, or use the StyleName property to define the appearance. The StyleName property applies a Word style to the object, which means that the object’s appearance is controlled by the style defined in your template.
If no StyleName is provided, the style is inherited from the paragraph in the template.
To customize the appearance of your report in Word, you can either create your own style definitions or use built-in styles.
The DOM API can only use the styles defined in your template. Commonly used styles are built into the template provided. To copy different built-in styles to the template, apply the new style to dummy text and then delete the text.
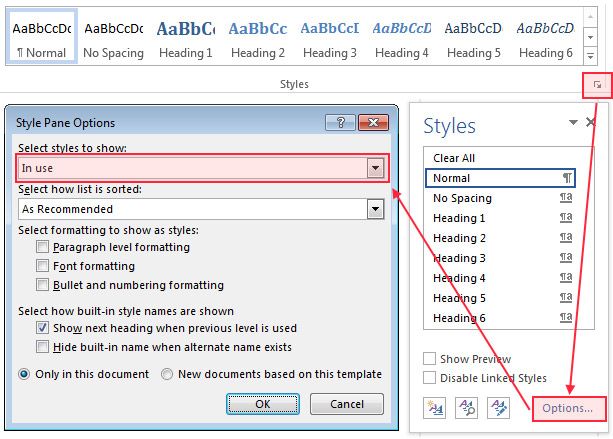
We do not recommend modifying or applying Word's built-in styles in your template. The internal names for built-in styles, which you must use in your report function, can differ from those in Word. Use the Word editor to create a new style based on the built-in style and use the name of the new style in your report function instead. Figure 3 shows how to set up Word to show the used styles.
The decision whether to define or modify a style in Word or to control the appearance with the DOM API depends on the task: If you use a specific format or pattern frequently, consider defining a Word style. Note that Word gives you the option to set up table and list styles. If you just need to modify a specific section of your document, it might be more effective to control the appearance with your MATLAB function.
Tip: All styles are based on Word’s Normal style. If you modify or use this style, you limit your customization options. For example, modifying its font will prevent you from using a different font in table styles.
Generating an Advanced Report
The extensive class library in the DOM API enables you to add many different kinds of objects to your report, such as text, images, links, and tables. Before you begin creating a report containing multiple objects, define an interface between the function that creates the report and the function that acquires the data shown in your report.
The easiest way to do this is to have the name of each structure field correspond to the name of a hole. The code in the MATLAB function required to fill the holes can then be a simple while-loop.
Adding Images and Tables
We start by collecting the data in the function getAdvancedReportData in the AdvancedReport folder. This function defines the interface between the report and the data. Some elements, such as Title, are static text. Others, such as Author, depend on the system’s environment variables. Both tables are filled with a random sentence generated by the MATLAB function why.
Next, we prepare the template according to our design requirements and the holes defined by our interface. These items have already been defined in the AdvancedReportTemplate.dotx:
-
The Word styles we want to use:
- AR_Heading1-3 for customized chapter headings (Chapter headings are used to create the table of contents).
- AR_Title and AR_SubTitle for the inline holes on the title page.
- AR_Image and AR_Caption for centered images and numbered image captions.
- AR_Normal for text with a font different from the Normal-style.
- AR_Table for a modified appearance of a simple table.
-
The desired styles of paragraphs and the holes
-
A static header with a company logo and an empty footer showing the page numbers
-
A table of contents and a table of figures
-
A skeleton structure defined by static chapter and subchapter heading
Finally, we create the report with the MATLAB function createAdvancedReport. We process all holes in a while loop. A switch in the loop decides between the following cases:
“Standard” holes. In the ‘otherwise’ switch case, these holes just get their text assigned. The graphical representation is decided by Word according to the applied style.
Image. In this case our reportData structure contains the path to an image that will be added to the report. In the function processImage the image-object is added to a paragraph with the style AR_Image. The style has a center alignment, so the image is centered too. The image caption is added with another paragraph of style AR_Caption. This style provides automatic figure numbering, and is used to create the table of figures.
SimpleTable. In the function processSimpleTable we create a complete sub-chapter in a block-level hole. Before adding the table, we append a new paragraph of style AR_Heading2, to add a new level 2 heading to the report. We create a simple table with the Table-class. Only the table data and the table-style AR_Table are needed. The table style in Word is responsible for drawing and formatting the table.
AdvancedTable. In processAdvancedTable we use another block-level hole to create a new sub-chapter and another table—this time with the FormalTable class. This class allows us to build a complete table from scratch. We need to add every table cell, but we have full control of the appearance. To demonstrate this, we fill the background-color of every cell with a random color.
We are now ready to execute createAdvancedReport and generate the advanced report.
In this example, we created a simple infrastructure that can easily be enhanced to cover nearly every documentation requirement. The resulting document can be used for requirements management or certification, and it can be processed further—for example, it can be stored and archived as a PDF file for ease of portability, word independence, and protection against modification.
1 The DOM (document object model) API creates a representation of a report in your system's memory.
Published 2016 - 92989v00

