Filter and Sort Results in Polyspace Platform User Interface
You can open the results of a Polyspace® analysis in the Dashboard or Review perspective of the Polyspace Platform user interface.
Use the Review perspective to see result details and review individual results.
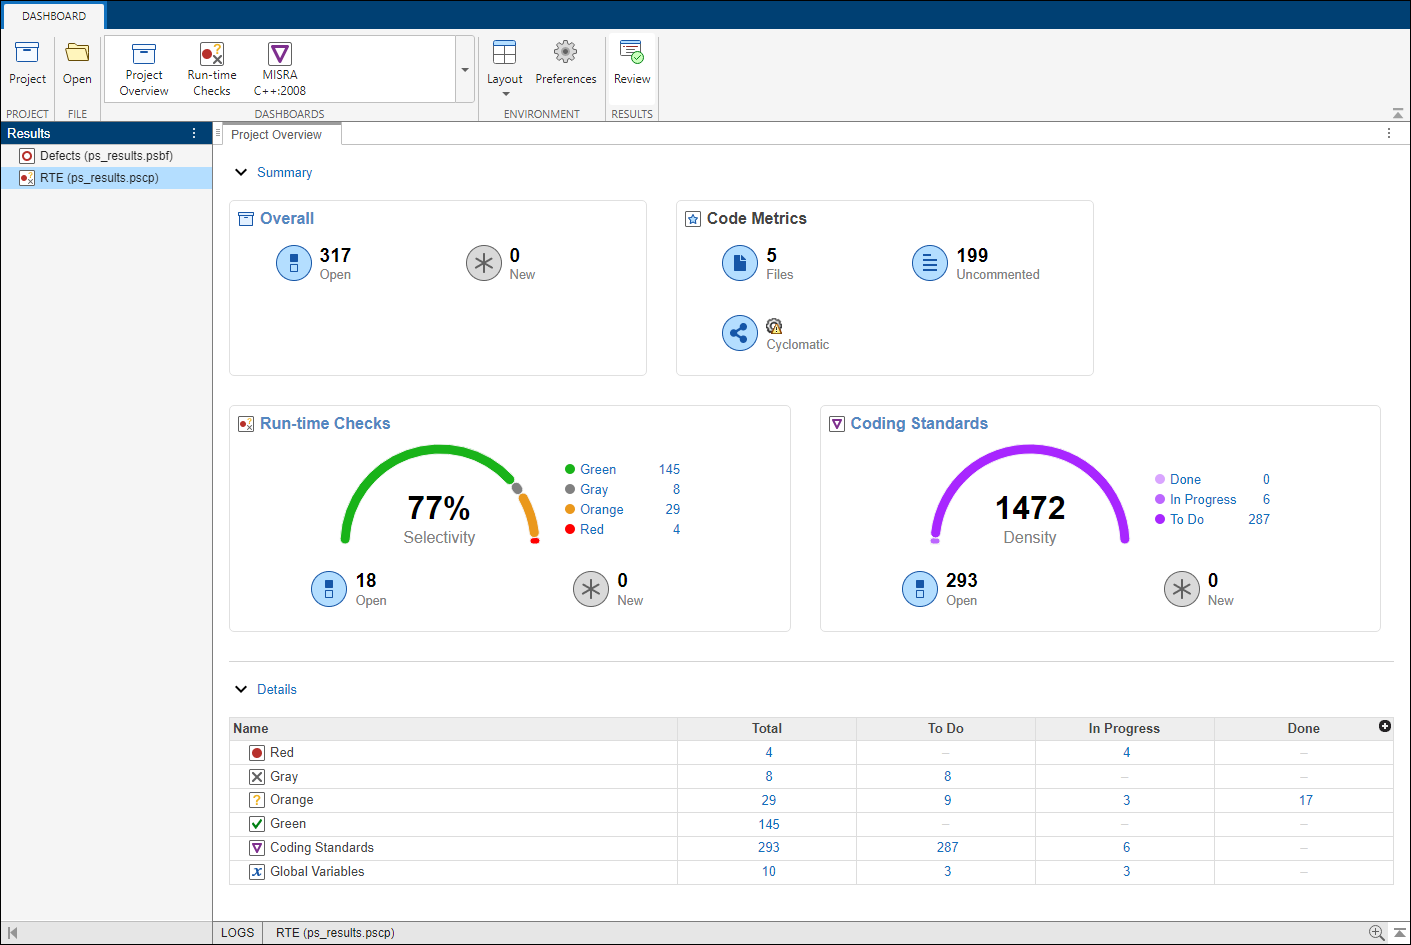
Use the Dashboard perspective to see statistics about your project as a whole in the Project Overview dashboard. To organize your review, you can narrow down the list or group results by file or result type.

You can use filtering to display:
Only certain types of defects or run-time checks.
For instance, for a Bug Finder analysis, you can display only high-impact defects.
Only new results found since the last analysis or since a previous analysis.
Only the results that you have not justified. Results that are not justified are considered Open. They are results with a status of
Unreviewed,To Investigate,To Fix, orOther.For information on justification, see Address Results in Polyspace Platform User Interface Through Bug Fixes or Justifications.
Filter Results
You can filter results by selecting a set of results in the Dashboard perspective or using the toolstrip filters in the Review perspective.
Filter Using Dashboard Perspective
In the Dashboard perspective, you can:
Click a section of an arc diagram or an arc diagram legend on the Project Overview dashboard to see the corresponding set of results.
Open dashboards for different families of results, then click a number to open a list filtered to the corresponding set of results. For instance:
To see only high-impact defects that are still Open in a Bug Finder analysis, click the corresponding number in the Summary section of the Defects dashboard. Open results have a status of
Unreviewed,To Investigate,To Fix, orOther.To see only red checks that are Done in a Code Prover analysis, click the corresponding number in the Summary section of the Run-time Checks dashboard. Done results have a status of
Justified,No Action Planned, orNot A Defect.To see violations of the MISRA C:2012 coding standards in a particular file, use the table in the Details section of the MISRA C:2012 dashboard.
Filter Using Review Perspective

In the Review perspective, you can filter results by families of Polyspace results (Family Filters), by result review progress (Filters) or by type of finding (Spotlight Filters):
To see Polyspace Bug Finder™ defects only, select the Defects filter in the Family Filters group.
To see only results that are not justified, select the Open filter in the Filters group.
To see Polyspace Code Prover™ results from orange sources or critical results only, select Orange Sources and/or Critical Checks in the Spotlight Filters group. For more information, see Sources of Orange Checks (Polyspace Code Prover) and Critical Orange Checks in Polyspace Code Prover (Polyspace Code Prover).
The filter bar underneath the toolstrip shows how many findings are displayed out of the total findings, along with which filters are currently applied.
The buttons in the Filters section of the toolstrip are global. They apply to all families of findings.
To filter results by specific content, such as a function name, use the
Show only or Filter out text
filters. These filters match the text you enter against the content of all the
columns in the Results List pane. For instance, if you
enter foo in the Filter out filter, the
Results List pane hides all the results that contain
foo.
You can also filter results by right-clicking the content of a column in the
Results List pane. This action is equivalent to
entering the content directly in the Show only or
Filter out text filters. For instance, if you
right-click foo in the Function column,
the filter applies to all results that contain foo.
Filters you apply do not carry over to the next analysis.
Create Custom Filters
When you review results in the Results List, you can apply filters from the Family Filters section of the toolstrip to focus your review on specific Polyspace families of results, such as:
Bug Finder Defects.
Code Prover Run-Time Checks (Polyspace Code Prover) and Global Variables (Polyspace Code Prover).
Coding Standards violations.
Code Metrics (Polyspace Code Prover).
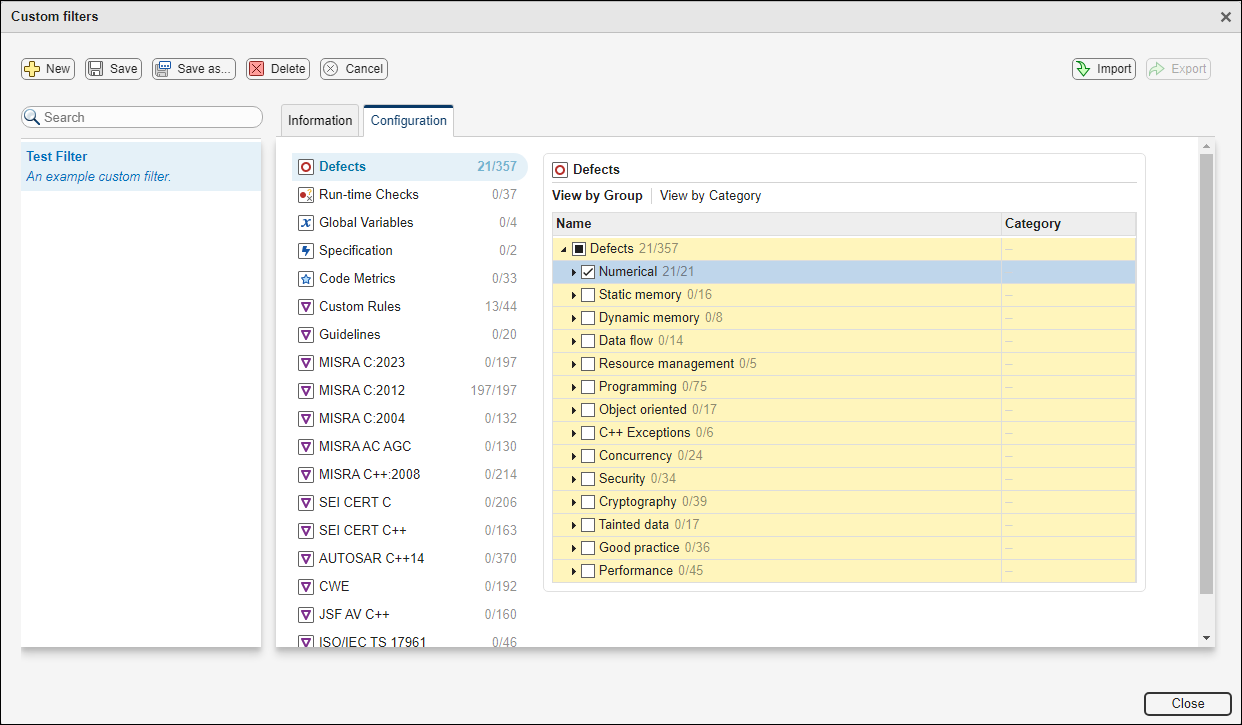
Define custom filters to narrow the scope of your review to only findings that are relevant to your project or organization. For instance, you might be interested in reviewing only Numerical Bug Finder defects and violations of Mandatory MISRA C™:2012 rules.
To create or edit a custom filter in the user interface, first open a Polyspace Bug Finder or Polyspace Code Prover result in the Review perspective. Then:
Click Apply/Manage > Manage filters in the toolstrip.
Click New and then enter the filter name in the New Custom Filter pop up window.
Edit the filter selection on the Configuration tab. Select a Polyspace results family, for instance MISRA C:2012, and then select a node or expand the node to select individual results.
Click Save or Save as to save the filter selection.

To make changes to a filter name or description, go to the Information tab.
Use the Export button to save your custom filter to a file. You can share your filter file with others or import your filter in Polyspace Access™ by using the Import button in the Polyspace Access web user interface.
Apply custom filters by selecting the appropriate filter from Apply/Manage > Filters. You can apply more than one custom filter at a time. Custom filter do not apply to the Dashboard perspective.