Create Polyspace Projects from Visual Studio Build
This topic shows how to create a Polyspace® project for use with the Polyspace desktop products. If using the Polyspace as You Code plugin for single-file analysis in Visual Studio®, see Run Polyspace as You Code in Visual Studio and Review Results.
If you develop in the Visual Studio IDE, you can trace the commands running underneath your Visual Studio build and create a Polyspace project. This method of creating a project automatically adds source files and compilation options from the Visual Studio project to the Polyspace project.
Note that to accurately reflect your Visual Studio project, you must run a complete build of your project and not an incremental build. An incremental build only rebuilds sources that changed since the previous build and might lead to incomplete Polyspace projects.
You can create a Polyspace project by tracing a Visual Studio build at the command line or within an IDE. Although the latter approach might be simpler, building within an IDE introduces additional complications when tracing the build. Therefore, calling the build command directly at the command line is the recommended approach.
Create Polyspace Project from Build in Visual Studio Developer Command Prompt
To create a Polyspace project, you simply have to prepend
polyspace-configure to your regular build command. For
instance, suppose you have a Visual Studio project TestProject.vcxproj. To create a
Polyspace project:
Open the Visual Studio developer command prompt. For instance, in Windows®, start typing
Developer Command Prompt for VS 2017.This command prompt is similar to a regular command prompt but with all Visual Studio environment variables appropriately set up.
Perform a full build of your Visual Studio project: at the command prompt:
This step is optional. Ensuring that the build completes successfully by itself allows you to create a Polyspace project from an error-free build.msbuild TestProject.vcxproj /t:Rebuild
Run the complete build command from the previous step but prepended with the
polyspace-configurecommand:For the above command to work, add the pathpolyspace-configure msbuild TestProject.vcxproj /t:Rebuild
polyspaceroot\polyspace\binPathenvironment variable in Windows. Here,polyspacerootC:\Program Files\Polyspace\R2025b.
Instead of a project, you can also run polyspace-configure on
the full build of a solution. However, a solution consists of multiple projects,
each of which might generate a separate executable. In this situation,
polyspace-configure generates a project that mixes source
files contributing to separate executables. To avoid the issue:
If all projects in the solution generate a single process, for instance, when the solution generates an executable for a GUI app and a DLL containing the engine for the app, you can run
polyspace-configureon the full build of the solution. In all other cases, runpolyspace-configureon specific projects in the solution.For instance, if a solution
ExampleProjectcontains two projectsAProjectandAnotherProject, you can runpolyspace-configurefrom the folder containing the solution as follows:These commands generate two Polyspace projects,polyspace-configure -prog AProject msbuild AProject/AProject.vcxproj /t:Rebuild polyspace-configure -prog AnotherProject msbuild AnotherProject/AnotherProject.vcxproj /t:Rebuild
AProject.psprjandAnotherProject.psprj.Instead of creating a Polyspace project to run analysis, you can run the analysis using options files. See also Options Files for Polyspace Analysis. If you take the options file approach to run Polyspace, you can first run
polyspace-configureon a Visual Studio solution to generate one options file per project in the solution.For instance, if a solution
ExampleProjectcontains two projectsAProjectandAnotherProject, you can runpolyspace-configureas follows:polyspace-configure -module -output-options-path . msbuild ExampleProject.sln /t:Rebuild
This command generates two options files,
AProject_exe.psoptsandAnotherProject_exe.psopts. You can continue the analysis using these options files.
Create Polyspace Project from Build in Visual Studio IDE
To create a Polyspace project, you can also open the Visual Studio IDE from within Polyspace and perform a full build within the IDE.
In the Polyspace interface, select File > New Project.
In the Project – Properties window, under Project Configuration, select Create from build command and click Next.

In the field Specify command used for building your source files, enter the full path to the Visual Studio executable. For instance,
"C:\Program Files (x86)\Microsoft Visual Studio 10.0\Common7\IDE\devenv.exe".In the field Specify working directory for running build command, enter a folder to which you have write access, for instance,
C:\temp\Polyspace. Click .
.This action opens the Visual Studio environment.
In the Visual Studio environment, create and build a Visual Studio project.
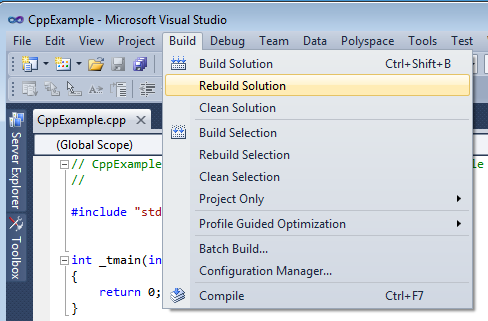
If you already have a Visual Studio project, open the existing project and build a clean solution. For instance, to build a clean solution in Visual Studio 2012, select BUILD > Rebuild Solution.

After the project builds, close Visual Studio.
Polyspace traces your Visual Studio build and creates a Polyspace project.
The Polyspace project contains the source files from your Visual Studio build and the relevant Target & Compiler options.
If you update your Visual Studio project, to update the corresponding Polyspace project, on the Project Browser, right-click the project name and select Update Project.