Airplane Tracking Using ADS-B Signals with Raspberry Pi and RTL-SDR
This example shows you how to create a remote sensing station that tracks planes using a Raspberry Pi® and RTL-SDR radio. You will learn how to deploy a Simulink® model that processes Automatic Dependent Surveillance-Broadcast (ADS-B) signals and sends the demodulated data to a host PC using UDP packets for visualization.
Required Hardware and Software
To run this example, you need the following hardware:
RTL-SDR radio
Raspberry Pi
and the following software
Optionally, Mapping Toolbox™ (to track planes on a map)
For a full list of Communications Toolbox™ supported SDR platforms, refer to Supported Hardware section of Software Defined Radio (SDR) discovery page.
Introduction
For an introduction on implementing a ADS-B receiver in Simulink, refer to the Airplane Tracking Using ADS-B Signals in Simulink example, pictured below. We also recommend completing Getting Started with MATLAB Support Package for Raspberry Pi Hardware example.
![]()
Remote ADS-B Receiver with Raspberry Pi
You can set up a remote sensing station for airplane tracking using the Raspberry Pi hardware with an RTL-SDR radio attached to it. You can run the PHY Layer block of the ADS-B receiver on the Raspberry Pi and send the received data over the Internet using UDP packets. You can receive these UDP packets on your local computer and run the Message Parser and Data Viewer blocks to visualize the results. The following is the modified remote ADS-B receiver model that runs on Raspberry Pi.
![]()
Run ADS-B Receiver Model on Raspberry Pi Hardware
Follow the following steps to run the ADS-B receiver model on the Raspberry Pi hardware.
1. Attach an RTL-SDR radio to one of the USB ports of the Raspberry Pi hardware
2. Open the Tracking Airplanes Using ADS-B Signals with Raspberry Pi - Sensor model
3. Double-click on the UDP Send block. Open the block mask and enter the IP address of your host computer in the Remote IP address edit box. For example, if the IP address of your host computer is 10.10.10.1, enter '10.10.10.1' in the block mask. Do not change the Remote IP port parameter. Click OK to save and close the block mask.
4. In your Simulink model, click the Deploy To Hardware button on the toolbar.

5. The model running on Raspberry Pi hardware will start sending UDP packets to port 25000 of your host computer.
Run ADS-B Aggregator Model on the Host Computer
Follow the following steps to run the host model that receives the UDP packets sent by the model running on Raspberry Pi hardware.
1. Open the Tracking Airplanes Using ADS-B Signals - Aggregator. This model has a UDP Receive block that is configured to receive UDP packets sent by the model running on Raspberry Pi hardware. Double-click on the UDP Receive block mask. Note that the Local IP port is set to 25000, and the output data type is set to "uint8".
2. Click the Play button to start the model.
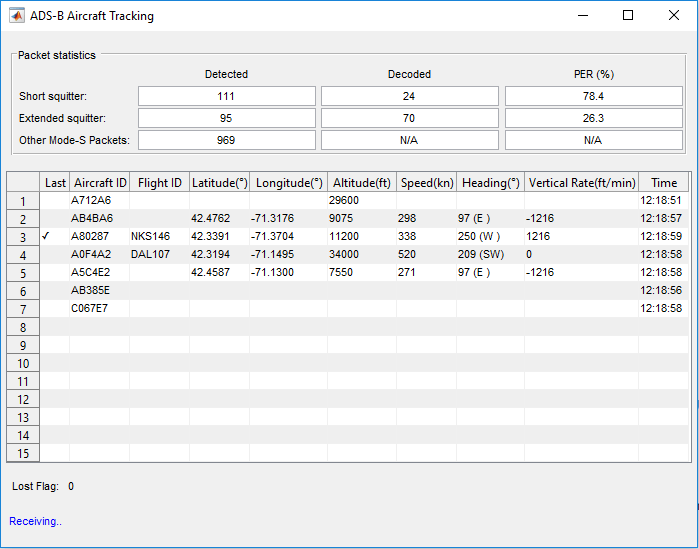
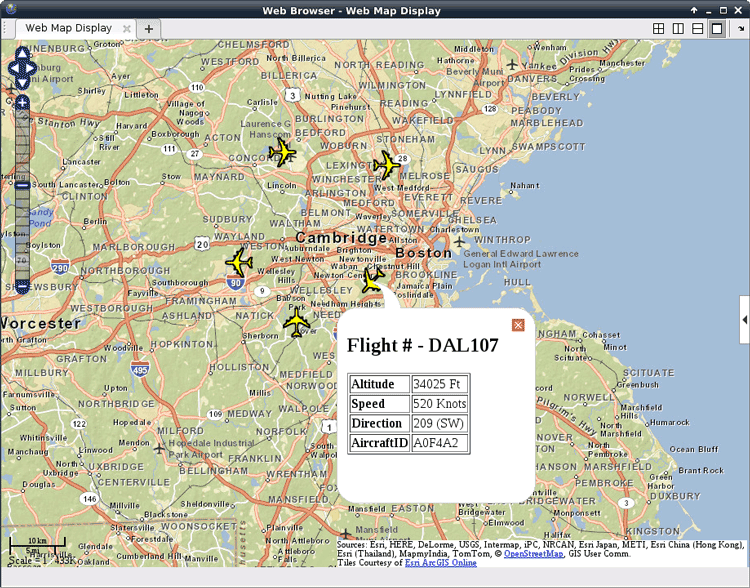
![]()
The following figures illustrate how the application tracks and lists flight details and displays them on a map.
Stop the Model Running on Raspberry Pi Hardware
When you want to stop the model running on Raspberry Pi, execute the following on MATLAB® command line.
rPi = raspberrypi;
stop(rPi,'ADSBRaspberryPiSimulinkExample');
Troubleshooting
If you cannot receive any data on the host model, make sure that the Raspberry Pi and your host computer are on the same local area network. In other words, make sure that the first three numbers of the IP addresses are the same.
Also, make sure that your Internet security software allows the transmission and reception of UDP packets on port 25000.