在 .NET 应用程序中指定 Parallel Computing Toolbox 配置文件
此示例说明如何使用 MATLAB® Runtime 用户数据接口指定 .NET 应用程序中 Parallel Computing Toolbox™ 集群的配置文件。
有关详细信息,请参阅使用 MATLAB Runtime 用户数据接口。
步骤 1:编写 Parallel Computing Toolbox 代码
在 MATLAB 中创建
sample_pct.m。此示例代码使用 Parallel Computing Toolbox 默认配置文件中定义的集群。
function speedup = sample_pct (n)
warning off all;
tic
if(ischar(n))
    n=str2double(n);
end
for ii = 1:n
   (cov(sin(magic(n)+rand(n,n))));
end
time1 =toc;
parpool;
tic
parfor ii = 1:n
   (cov(sin(magic(n)+rand(n,n))));
end
time2 =toc;
disp(['Normal loop time: ' num2str(time1) ...
    ', parallel loop time: ' num2str(time2) ]);
disp(['parallel speedup: ' num2str(1/(time2/time1)) ...
    ' times faster than normal']);
delete(gcp);
disp('done');
speedup = (time1/time2);
使用输入
400运行该函数。a = sample_pct(400)
以下是输出的示例,假设默认配置文件设置为
local:Starting parallel pool (parpool) using the 'local' profile ... Connected to the parallel pool (number of workers: 6). Normal loop time: 2.5651, parallel loop time: 1.6371 parallel speedup: 1.5668 times faster than normal Parallel pool using the 'local' profile is shutting down. done ans = 1.5668
步骤 2:设置 Parallel Computing Toolbox 配置文件
要使用通过 MATLAB Compiler SDK™ 构建的 .NET 组件访问 MATLAB Runtime 用户数据接口,您必须直接从 MATLAB 设置 mcruserdata。没有 Java® API 来访问 mcruserdata,因为有使用 MATLAB Compiler SDK 构建的 C 和 C++ 应用程序。
要从 MATLAB 设置 mcruserdata,请创建一个 init 函数。这个单独的 MATLAB 函数使用 setmcruserdata 来设置一次 Parallel Computing Toolbox 文件。然后调用其他函数来利用 Parallel Computing Toolbox。
创建以下 init_sample_pct 函数:
function init_sample_pct
% Set the Parallel Computing Toolbox Profile:
if(isdeployed)
    % Let the USER select the cluster profile.
    [profile, profpath] = uigetfile('*.mlsettings');
    setmcruserdata('ParallelProfile', fullfile(profpath, profile));
end
要将现有配置文件导出到 .mlsettings 文件,请使用 parallel.exportProfile (Parallel Computing Toolbox) 函数。例如,
parallel.exportProfile('local','mylocalsettings');
提示
如果您需要在应用程序中更改配置文件,请使用 parallel.importProfile (Parallel Computing Toolbox) 和 parallel.defaultClusterProfile (Parallel Computing Toolbox)。有关详细信息,请参阅发现集群并使用集群配置文件 (Parallel Computing Toolbox)。
步骤 3:编译您的函数
使用以下信息,使用 .NET 程序集编译器或 compiler.build.dotNETAssembly 构建 .NET 组件:
| 字段 | 值 |
|---|---|
| 库名称 | netPctComp |
| 类名 | NetPctClass |
| 要编译的文件 | sample_pct.m 和 init_sample_pct.m |
例如,如果您使用的是 compiler.build.dotNETAssembly,请输入:
buildResults = compiler.build.dotNETAssembly( ...
{'sample_pct.m','init_sample_pct.m'}, ...
'AssemblyName','netPctComp', ...
'ClassName','NetPctClass');
有关详细信息,请参阅生成 .NET 程序集并编译 .NET 应用程序中的说明。
注意
如果您正在使用 Parallel Computing Toolbox 的 GPU 功能,则必须手动添加 PTX 和 CU 文件。
如果您使用的是编译器,请点击自定义需求部分中的添加文件。
如果您正在使用
compiler.build函数,请使用AdditionalFiles选项。如果您使用
mcc命令,请使用-a选项。
步骤 4:构建并运行 .NET 应用程序
打开 Microsoft® Visual Studio® 并创建一个名为 DotNETPCT 的 C# Console App。
为访问 MATLAB 函数的 .NET 应用程序编写源代码。
下面提供了此示例的示例 C# 应用程序。
using System;
using MathWorks.MATLAB.NET.Utility;
using MathWorks.MATLAB.NET.Arrays;
using netPctComp;
namespace PctNet
{
    class Program
    {
        static void Main(string[] args)
        {
            try
            {
                NetPctClass A = new NetPctClass();
                // Initialize the PCT setup
                A.init_sample_pct();
                double var = 400;
                MWNumericArray out1;
                MWNumericArray in1 = new MWNumericArray(var);
                out1 = (MWNumericArray)A.sample_pct(in1);
                Console.WriteLine("The speedup is {0}", out1);
                Console.ReadLine();
                        // Wait for user to exit application
            }
            catch (Exception exception)
            {
                Console.WriteLine("Error: {0}", exception);
            }

        }
    }
}
注意
此示例代码是使用 Microsoft Visual Studio 2019 编写的。
在 Visual Studio 中,添加对程序集文件 netPctComp.dll 的引用,该文件位于生成或安装程序集的文件夹中。
添加对 MWArray API 的引用。
| 如果您的系统上安装了 MATLAB | |
| 如果您的系统上安装了 MATLAB Runtime | |
在 Visual Studio 中构建并运行 DotNETPCT 应用程序。
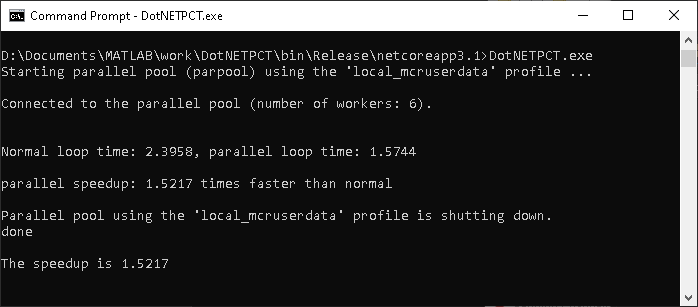
DotNETPCT 应用程序提示您选择要使用的集群配置文件。选择 .mlsettings 文件后,应用程序将显示类似以下内容的输出:

另请参阅
getmcruserdata | setmcruserdata
主题
- 使用 MATLAB Runtime 用户数据接口
- 发现集群并使用集群配置文件 (Parallel Computing Toolbox)