Configure FPGA Boards
Prepare your target FPGA boards for deploying a deep learning network by configuring them to connect to your host computer.
Xilinx Zynq-7000 ZC706 Evaluation Board
To set up the board:
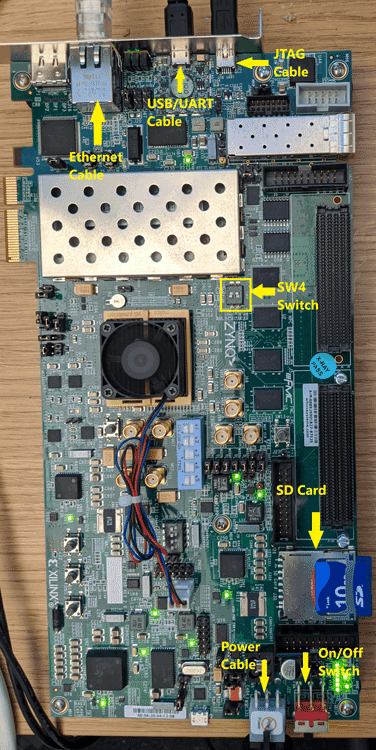
Plug in the power cord, and then connect the host computer to the FPGA board by using a JTAG cable.
Specify the
SW4switch settings to use the Digilent USB-TO-JTAG interface.Configuration Source SW4switch 1SW4switch 2None 0 0 Cable Connector J3 1 0 Digilent USB-TO-JTAG Interface 0 1 JTAG (flying lead) Header J62 1 1
This graphic shows the configuration settings for the Xilinx® Zynq®-7000 ZC706 Evaluation Board.
To learn more about the board configuration, see the Xilinx ZC706 Evaluation Board User Guide.
Intel Arria 10 SoC Development Kit
Deep Learning HDL Toolbox™ supports the Intel® Arria® 10 SoC development kit up to Revision C. To set up the board:
Plug in the power cord, and then connect the host computer to the FPGA board by using a JTAG cable.
Specify the SW3 switch settings.
Bit 1 Bit 2 Bit 3 Bit 4 Bit 5 Bit 6 Bit 7 Bit 8 Off On On On On Off Off Off Connect two DDR4 plugin boards to the memory plugin slot.
This graphic shows the configuration settings for the Intel Arria 10 SoC development kit.

To learn more about the board configuration, see the Arria 10 SoC Development Kit User Guide.
Xilinx Zynq UltraScale+ MPSoC ZCU102 FPGA Development Board
To set up the board:
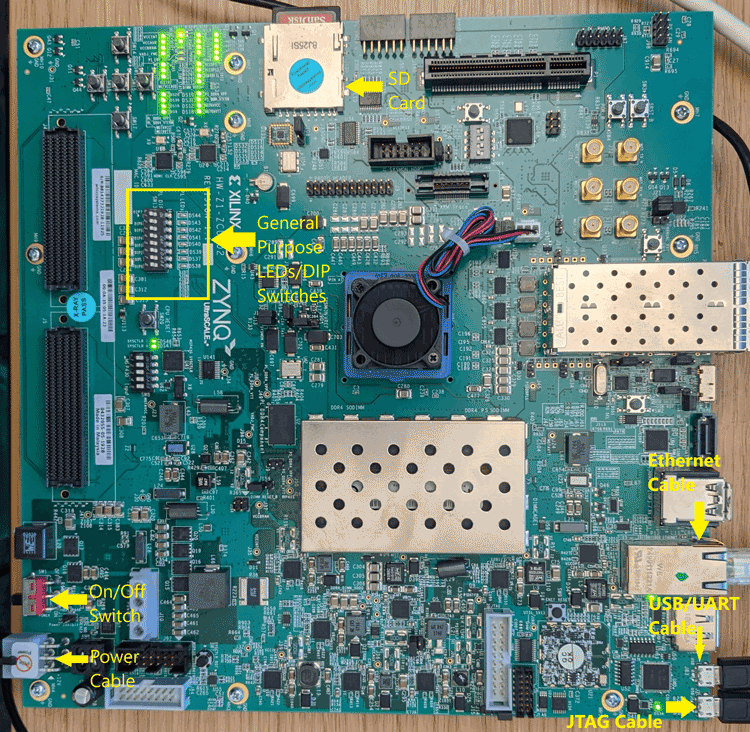
Plug in the power cord. If using JTAG, connect the FPGA board to the host computer by using a JTAG cable. If using Ethernet, connect the FPGA board to the host computer by using an Ethernet cable.
Configure the
SW6switch.Boot Mode Mode Pins [3:0] SW6Switch Position [3:0]JTAG0, 0, 0, 0 on, on, on, on QSPI320, 0, 1, 0 on, on, off, on SD1, 1, 1, 0 off, off, off, on Ethernet1,1,1,0 off,off,off,on The
SW6default position isQSPI32. For theSW6DIP switch, moving the switch towards theONlabel is 0.This graphic shows the location of the
SW6switch.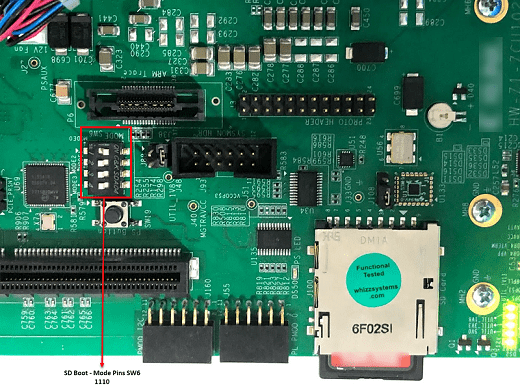
This graphic shows the configuration settings for the Xilinx Zynq UltraScale+™ MPSoC ZCU102 FPGA development board.
To learn more about the ZCU102 hardware setup, refer to the Xilinx documentation.