Configure STM32 Processor-Based Boards using STM32CubeMX with Simulink
You can configure the STM32 Processor-Based Boards to use the STM32CubeMX project with Simulink® to generate code and deploy the code to the hardware.
STM32CubeMX is a graphical tool used to:
Configure the system clock and other clocks to peripherals.
Configure peripherals of STM32 processors.
Generate peripheral initialization code for the selected STM32 processors.
If you have already installed the support package, you can start the hardware setup by using the Add-On Manager. Alternatively you can run the following command to launch the setup from MATLAB® Command window. stm32cube.tools.launchHardwareSetup There are two options to add support for your STM32 Processor-Based Board in Simulink. You can create a new STM32CubeMX project from Simulink, or select an existing STM32CubeMX project. You can then launch the project from your Simulink model. This tutorial shows how to add support for a STM32F4xx Based Boards. For other supported boards such as STM32F3xx, STM32G4xx, STM32H7xx and so on, follow the similar approach. For a list of supported hardware, see Supported STM32 Processor Based Boards.
If you are new to STM32CubeMX tool, see https://www.st.com/en/development-tools/stm32cubemx.html
Once you have installed the support package, perform the hardware board setup process to register the STMicroelectronics software tools required to generate code and deploy code to the connected STMicroelectronics STM32 hardware boards. For more information, see Install Support for STMicroelectronics STM32 Processors.
If you have already installed the support package, you can start the hardware setup by
using the Add-On Manager
. Alternatively you can run the following command
to launch the setup from MATLAB® Command
window.
stm32cube.tools.launchHardwareSetup
There are two options to add support for your STM32 Processor-Based Board in Simulink. You can create a new STM32CubeMX project from Simulink, or select an existing STM32CubeMX project. This section shows how to add support for a STM32F4xx Based Boards. For other supported boards, follow the similar approach. For a list of supported hardware, see Supported STM32 Processor Based Boards
Create STM32CubeMX project using Simulink
You can create a new STM32CubeMX project or select an existing STM32CubeMX project using Simulink. You can launch the project from your Simulink model.
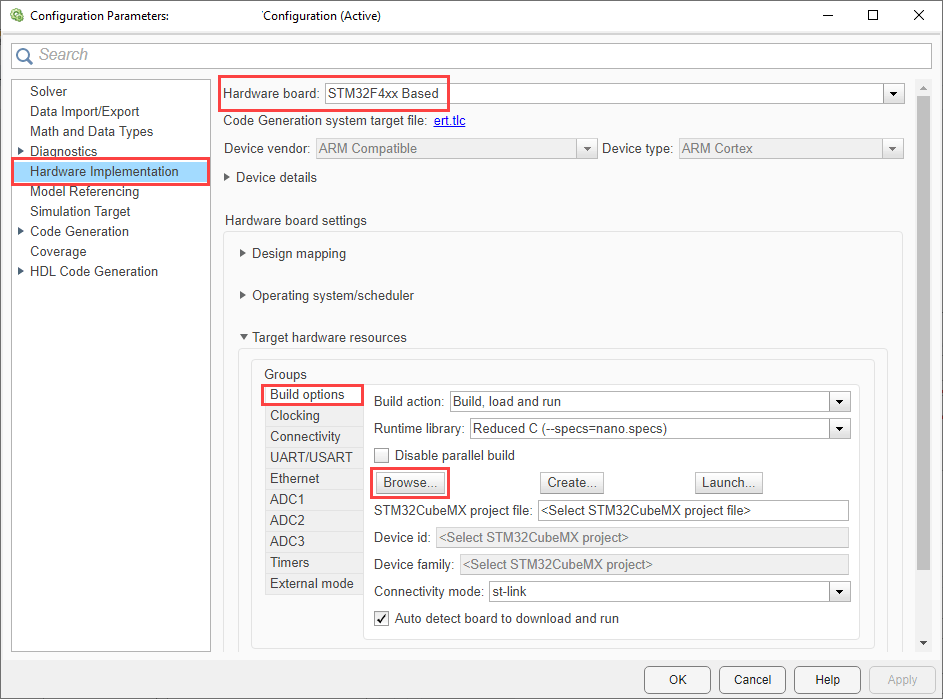
Press CTRL+E to open the Configuration Parameters dialog box. Go to Hardware Implementation > Hardware board.
Select any STM32xx based hardware board.
Go to Build options and click Browse to select an existing STM32CubeMX project file.
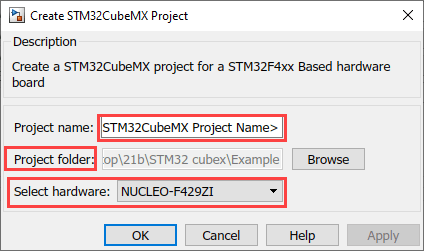
Click Create to create a new STM32CubeMX project file.
Provide a project name with an
.ioc
extension.Browse to the desired folder location and save the project.
Select the STM32 hardware and click Apply and OK.
You can also create a new project by selecting custom STM32F4xx Based hardware.
Click Launch to open the selected STM32CubeMX project in STM32CubeMX tool.
In the STM32CubeMX tool, you can configure the peripherals for the selected STM32 processors.
Generate and Deploy the Code
You can generate the code from your Simulink model. Build the generated code and deploy the code to your connected STM32F4xx based board.
In your Simulink model, press CTRL+B or go to Hardware tab and select Build, Deploy & Start or Build.
Once you select Build, Deploy & Start or Build, it generates the code for selected STM32CubeMX project in the model using STM32CubeMX tool.
If you select Build, Deploy & Start, it downloads the generated executable to the connected STM32F4xx Based hardware.
See Also
Serial Configuration for Monitor & Tune and PIL for STM32 Processor-Based Boards | Supported STM32 Processor Based Boards