Configure C Entry-Point Function Interfaces for Simulink Function and Function Caller Blocks
With Embedded Coder®, you can customize the generated C function interfaces for Simulink Function and Function Caller blocks. Function code interface configuration supports easier integration of generated code with functions or function calls in external code and customizations for coding standards or design requirements.
By opening a dialog box from a Simulink Function or Function Caller block, you can customize the function prototype for that block. Your changes for the block also update other corresponding Simulink Function and Function Caller blocks in the model. The function visibility, global or scoped, set in the function Trigger Port block determines which function attributes you can modify:
For a global Simulink® function, you can change the function name, and the names, type qualifiers, and order of function arguments.
For an exported scoped Simulink function, you can change the argument type qualifiers and the order of arguments. You cannot change the function and argument names for individual functions.
For more information, see Scoped, Global, and Port-Scoped Simulink Function Blocks Overview.
You can customize generated C function interfaces for:
Global Simulink functions
Exported scoped Simulink functions
However, you cannot customize the generated function interface for a scoped Simulink Function block that is not located at the root level of a model.
Your changes do not graphically alter the model and do not affect the Simulink function prototype defined in the block.
You can customize the generated function interface to reuse arguments as input and output using Simulink functions. Doing so eliminates extra memory allocations and data copies involving variables representing the function output, and can potentially improve performance. This procedure requires you to modify the Simulink function prototype defined in the block.
Embedded Coder supports Simulink function code interface configuration for models configured with ERT-based system target files, except for AUTOSAR system target files.
Configure Generated C Function Interface for Global Simulink Function Block
This example shows how to customize the C function interface that the code generator produces for a global Simulink Function block.
Open Example Model
Open example model SimulinkFunctions.
model = "SimulinkFunctions";
open_system(model);
Open Configure C/C++ Function Interface Dialog Box
In the apps gallery, open the Embedded Coder app.
On the C Code tab, select Code Interface > Individual Element Code Mappings.
In the Code Mappings editor, click the Functions tab.
In the row for Simulink Function:f3, click the function preview hyperlink. The Configure C/C++ Function Interface dialog box shows Simulink function prototype as y = f3(u) and the C/C++ function prototype as void f3(rtu_u,* rty_y). The preview for C/C++ function prototype is updated as you make changes.

Configure Simulink Function Prototype
Configure the function name and arguments.
Modify the function and argument identifier names. Model configuration parameter Subsystem method arguments defines the default naming rule for Simulink Function arguments. Changes that you make in the C/C++ Function Interface dialog box override the default naming rule. In the C/C++ function name field, and in the C/C++ Identifier Name column for each Simulink function argument, you can enter a custom name or naming rule. Specify valid C-identifier characters, identifier format macros, or a combination of characters and macros. To see tips about available macros, place your cursor over C/C++ function name and C/C++ Identifier Name. For more information about identifier naming rules, see Identifier Format Control.
For argument u, set C/C++ Type Qualifier to Pointer to const.
Optionally, you can change C/C++ return argument from void to y. In that case, the C function prototype is y = f3(const * rtu_u).
Reorder the arguments by dragging them to a new location.
Verify your changes by checking the function prototype preview.
Click Apply. Your modifications, whether made to a Simulink Function block or a Function Caller block, affect code generation for the Simulink Function block and corresponding Function Caller blocks in the model.
Alternatively, call the setFunction function with the desired function prototype.
coderMapObj = coder.mapping.utils.create(model);
fcnPrototype = "(const *u, *y)";
setFunction(coderMapObj,"SimulinkFunction:f3",Arguments=fcnPrototype)
Save your changes by clicking OK. Then, save the model.
Generate and Review Code
Generate code for the model.
evalc("slbuild(model)");In the Code view, open the generated file SimulinkFunctions.c and search for f3. The generated function code reflects the changes to the generated C function prototype.
file = fullfile("SimulinkFunctions_ert_rtw","SimulinkFunctions.c");
coder.example.extractLines(file,"void f3(const real_T *u, real_T *y)",...
    "/* Model initialize function */",1,0);
void f3(const real_T *u, real_T *y)
{
  int8_T rtb_Gain;

  /* Outputs for Function Call SubSystem: '<Root>/f3' */
  /* Outport: '<Root>/TicToc10' incorporates:
   *  UnitDelay: '<S5>/Delay'
   */
  rtY.TicToc10 = rtDWork.Delay_DSTATE;

  /* Gain: '<S5>/Gain' incorporates:
   *  Outport: '<Root>/TicToc10'
   */
  rtb_Gain = (int8_T)-rtY.TicToc10;

  /* FunctionCaller: '<S5>/Function Caller' incorporates:
   *  Inport: '<Root>/U2'
   *  SignalConversion generated from: '<S5>/In1'
   */
  adder(rtB.Subtract, rtU.U2, *u, &rtB.FunctionCaller);

  /* SignalConversion generated from: '<S5>/y' */
  *y = rtB.FunctionCaller;

  /* Update for UnitDelay: '<S5>/Delay' */
  rtDWork.Delay_DSTATE = rtb_Gain;

  /* End of Outputs for SubSystem: '<Root>/f3' */
}
Related Examples
More About
Configure Generated C Function Interface for Exported Scoped Simulink Function Block
This example shows how to customize the C function interface that the code generator produces for an exported, scoped Simulink Function block.
For an exported, scoped function, you can modify the generated return argument, the argument type qualifiers, and the order of arguments. You cannot change the generated function name and argument names for individual functions.
Open Example Model
Open example model SimulinkFunctions.
model = "SimulinkFunctions";
open_system(model);
Change Visibility of Simulink Function
Change the visibility of the global function f3 from global to scoped. Open the Simulink Function block f3. Inside the function block, double-click the Trigger Port block f3. In the block parameters dialog box, set Function visibility to scoped. Click Apply and OK.
Alternatively, set the function visibility at the MATLAB command prompt.
set_param("SimulinkFunctions/f3/f3",FunctionVisibility="scoped"); pause(1)
Open Configure C/C++ Function Interface Dialog Box
In the apps gallery, open the Embedded Coder app.
On the C Code tab, select Code Interface > Individual Element Code Mappings.
In the Code Mappings editor, click the Functions tab.
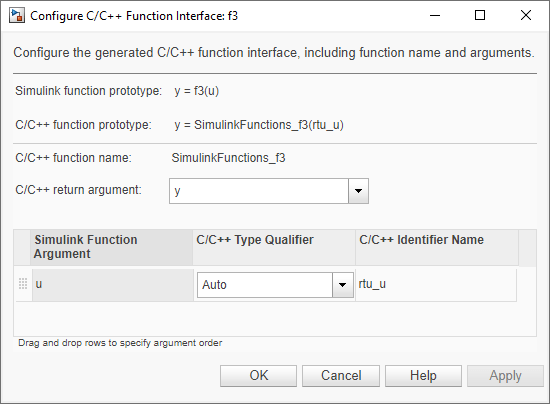
In the row for Simulink Function:f3, click the function preview hyperlink. The Configure C/C++ Function Interface dialog box shows Simulink function prototype as y = f3(u) and C/C++ function prototype as y = SimulinkFunctions_f3(rtu_u). The preview for C/C++ function prototype is updated as you make changes.
For models that you configure for C multi-instantiable code, the interface preview for scoped Simulink functions includes a self argument. The self argument is a pointer to a version of the real-time model (RT_MODEL) data structure that stores multi-instance data associated with reusable functions.
If model configuration parameter Code interface packaging is set to Reusable function and Total number of instances allowed per top model is set to Multiple, the argument appears as self, indicating that the code generator produces a self structure.
If model configuration parameter Code interface packaging is set to Reusable function or Total number of instances allowed per top model is set to Multiple, the argument appears as [self], indicating that the argument is optional. The code generator produces a self structure only if you use the model as a top model and Code interface packaging is set to Reusable function or if you use the model as a referenced model and Total number of instances allowed per top model is set to Multiple.
For more information about configuring a model for multi-instantiable code generation, see Generate Reentrant Code from Simulink Function Blocks.
Configure Simulink Function Prototype
Configure the function arguments. For this example, configure the u argument. Set C/C++ type Qualifier to Pointer to const.
Optionally, you can change C/C++ return argument from y to void. In that case, the C function prototype is void SimulinkFunctions_f3(* rty_y, const * rtu_u).
Reorder the arguments by dragging them to a new location.
Verify your changes by checking the function prototype preview.
Click Apply. Your modifications, whether made to a Simulink Function block or a Function Caller block, affect code generation for the Simulink Function block and corresponding Function Caller blocks in the model.
Alternatively, call the setFunction function with the desired function prototype.
coderMapObj = coder.mapping.utils.create(model);
fcnPrototype = "y = (const *u)";
setFunction(coderMapObj,"SimulinkFunction:f3",Arguments=fcnPrototype)
Save your changes by clicking OK. Then, save the model.
Generate and Review Code
Generate code for the model.
evalc("slbuild(model)");In the Code view, open the generated file SimulinkFunctions.c and search for SimulinkFunctions_f3. The generated function code reflects the changes to the generated C function prototype.
file = fullfile("SimulinkFunctions_ert_rtw","SimulinkFunctions.c");
coder.example.extractLines(file,"real_T SimulinkFunctions_f3(const real_T *rtu_u)",...
    "/* Model initialize function */",1,0);
real_T SimulinkFunctions_f3(const real_T *rtu_u)
{
  real_T rty_y_0;
  int8_T rtb_Gain;

  /* Outputs for Function Call SubSystem: '<Root>/f3' */
  /* Outport: '<Root>/TicToc10' incorporates:
   *  UnitDelay: '<S5>/Delay'
   */
  rtY.TicToc10 = rtDWork.Delay_DSTATE;

  /* Gain: '<S5>/Gain' incorporates:
   *  Outport: '<Root>/TicToc10'
   */
  rtb_Gain = (int8_T)-rtY.TicToc10;

  /* FunctionCaller: '<S5>/Function Caller' incorporates:
   *  Inport: '<Root>/U2'
   *  SignalConversion generated from: '<S5>/In1'
   */
  adder(rtB.Subtract, rtU.U2, *rtu_u, &rtB.FunctionCaller);

  /* SignalConversion generated from: '<S5>/y' */
  rty_y_0 = rtB.FunctionCaller;

  /* Update for UnitDelay: '<S5>/Delay' */
  rtDWork.Delay_DSTATE = rtb_Gain;

  /* End of Outputs for SubSystem: '<Root>/f3' */
  return rty_y_0;
}
Related Examples
More About
Customize Generated C Function Interface to Reuse I/O Using Simulink Function Block
This example shows how to customize the C function interface to reuse arguments as input and output using a Simulink Function block.
Open Example Model
Open example model SimulinkFunctions.
model = "SimulinkFunctions";
open_system(model);
Configure Simulink Function to Reuse I/O
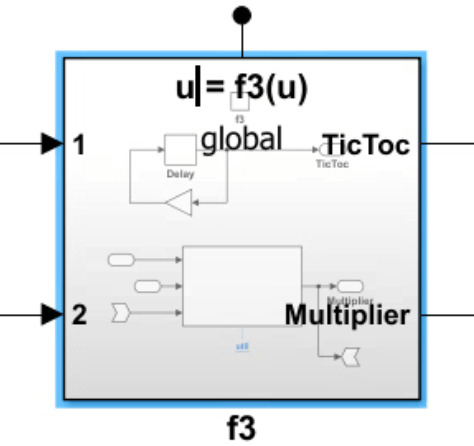
Click the text displaying the function interface of the Simulink Function block f3. Edit the text to reuse input value u as output.
Alternatively, configure the function interface at the MATLAB command prompt.
set_param("SimulinkFunctions/f3",FunctionPrototype="u=f3(u)");
To verify the function interface in the generated code, in the apps gallery, open the Embedded Coder app.
On the C Code tab, select Code Interface > Individual Element Code Mappings.
In the Code Mappings editor, click the Functions tab.
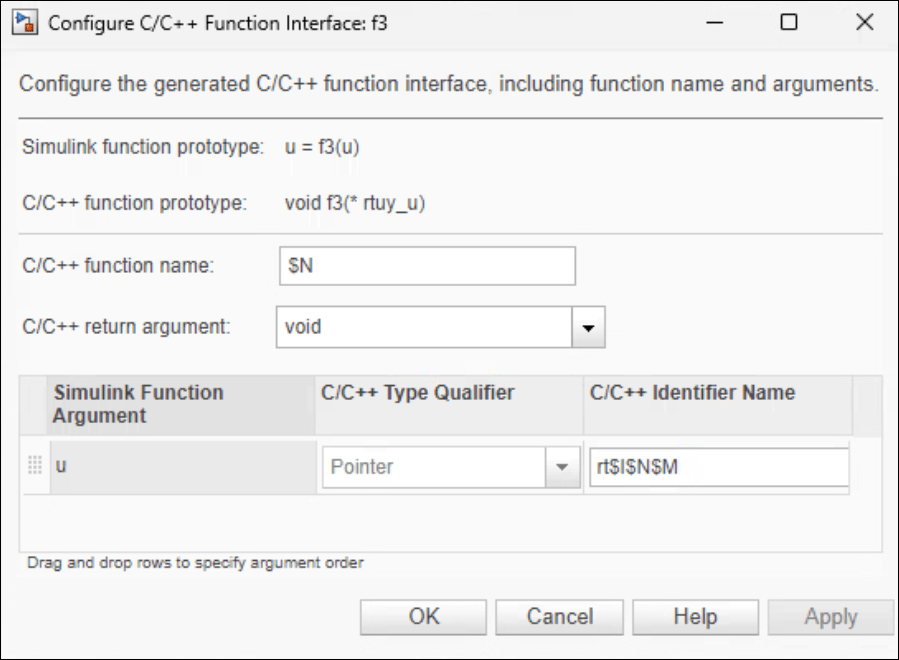
In the row for Simulink Function:f3, click the function preview hyperlink. The Configure C/C++ Function Interface dialog box shows Simulink function prototype as u = f3(u) and C/C++ function prototype as void f3(* rtuy_u).
Generate and Review Code
Generate code for the model.
evalc("slbuild(model)");In the Code view, open the generated file SimulinkFunctions.c and search for f3. The generated code for function f3 reuses the argument rtuy_u as both input and output.
file = fullfile("SimulinkFunctions_ert_rtw","SimulinkFunctions.c");
coder.example.extractLines(file,"void f3(real_T *rtuy_u)",...
    "/* Model initialize function */",1,0);
void f3(real_T *rtuy_u)
{
  int8_T rtb_Gain;

  /* Outputs for Function Call SubSystem: '<Root>/f3' */
  /* Outport: '<Root>/TicToc10' incorporates:
   *  UnitDelay: '<S5>/Delay'
   */
  rtY.TicToc10 = rtDWork.Delay_DSTATE;

  /* Gain: '<S5>/Gain' incorporates:
   *  Outport: '<Root>/TicToc10'
   */
  rtb_Gain = (int8_T)-rtY.TicToc10;

  /* FunctionCaller: '<S5>/Function Caller' incorporates:
   *  Inport: '<Root>/U2'
   *  SignalConversion generated from: '<S5>/In1'
   */
  adder(rtB.Subtract, rtU.U2, *rtuy_u, &rtB.FunctionCaller);

  /* SignalConversion generated from: '<S5>/u~' */
  *rtuy_u = rtB.FunctionCaller;

  /* Update for UnitDelay: '<S5>/Delay' */
  rtDWork.Delay_DSTATE = rtb_Gain;

  /* End of Outputs for SubSystem: '<Root>/f3' */
}
More About
Simulink Function Code Interface Limitations
Simulink function code interface configuration does not support Simulink functions and function callers in Stateflow®.
The Argument Outport block cannot be a return argument for a Simulink function when its data type is set to one of the following types:
Complex types
Bus types
Image types
Nonscalar types
Multiword types
If your model contains a Function Caller block without a Simulink Function block, and you modify only the C/C++ Identifier Name setting of the function prototype of the caller block, regenerating code does not update the function prototype in the generated code. To update the function prototype, follow these steps:
Modify the function prototype in the Configure C/C++ Function interface dialog box.
Delete the
simulinkfunction.hcodeGenFolder/slprj/folder.target/_sharedutilsRegenerate code.