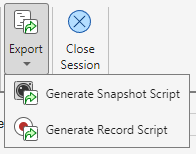
Export Code from Image Acquisition Explorer
The Image Acquisition Explorer app allows you to generate a
MATLAB® live script that includes the device and acquisition
configurations that you currently have in the app. Click the
Export button in the app toolstrip to select
Generate Snapshot Script or
Generate Record Script. Both these
options create and open a live script that contains code for the current
device configuration in the
app.
You can edit and save the generated live script as necessary for your
application.

The
Generate Snapshot Scriptoption creates and opens a live script that contains code for connecting to your device, configuring its properties, capturing a single frame, and viewing a snapshot of the captured image.The
Generate Record Scriptoption creates and opens a live script that contains code for connecting to your device, configuring its properties, recording frames, and viewing the recorded video.
Connect and Configure
The generated live script contains the following sections for connection and configuration, with code similar to the following examples.
Connect to Device — Creates a connection to the selected device and specified Video Format using the
videoinputfunction.v = videoinput("winvideo", 1, "YUY2_1280x720");
Configure Device Properties — Defines device properties that you select in the app, including Color Space, Sensor Alignment, and Region of Interest. If you do not edit any of these parameters, this section is not in the live script.
v.ReturnedColorspace = "rgb";Configure Device-Specific Properties — Defines device-specific properties that you specified in the Device Properties panel of the app. If you do not make any changes to these parameters, this section is not in the live script.
src = getselectedsource(v);
src.Exposure = 1;
If you execute a GigE Vision® or GenICam™ GenTL command from the Device Properties panel of the app, this section also generates the code for the command selection and execution.
src = getselectedsource(v);
src.SequencerConfigurationMode = "On";
src.SequencerFeatureSelector = "ExposureTime";
executeCommand(src,"sequenceSetSave");
Generate Snapshot Script
If you select Generate Snapshot Script, the
live script contains the following additional sections, with
examples of code.
Capture Image — Captures a single frame and saves it to the workspace as the variable specified in the Logging section. If you selected File in the Logging section, this section also does the following:
Defines the file name to save as and location to save to.
Saves the captured frame to a file using the
imwritefunction.Specifies the image file configuration settings that you set in Logging, such as file format and quality, as name-value arguments in
imwrite.
image1 = getsnapshot(v);

% Set the desired file location and name.
filelocation = "C:\Users\user";
filename = "snapshot1.jpg";
fullFilename = fullfile(filelocation, filename);

% Write image data to file.
imwrite(image1, fullFilename, "jpg", "Quality", 25, "BitDepth", 12);
View Snapshot — Displays the captured image using the
imshowfunction.imageData = imread(fullFilename); f = figure; ax = axes(f); imshow(imageData, "Parent", ax);
Generate Record Script
If you select Generate Record Script the
live script contains the following additional sections, with
examples of code.
Configure File Logging — Specifies video file logging settings by doing the following:
Defines the file name to save as and location to save to.
Specifies the video file configuration settings that you set in Logging, such as file format and quality, using
VideoWriter.Configures the
videoinputobject to log to disk.
If you do not select File in Logging, this section is not in the live script.
filelocation = "C:\Users\user";
filename = "recording1.mp4";
fullFilename = fullfile(filelocation, filename);

% Create and configure the video writer
logfile = VideoWriter(fullFilename, "MPEG-4");
logfile.FrameRate = 15;
logfile.Quality = 25;

% Configure the device to log to disk using the video writer
v.LoggingMode = "disk";
v.DiskLogger = logfile;
Configure Triggering — Specifies the hardware trigger settings Number of Triggers, Frames per Trigger, Trigger Source, and Trigger Condition that you set in the Hardware Trigger panel. If you do not select Hardware Trigger in Record, this section is not in the live script.
framesPerTrigger = 4;
numTriggers = 2;
triggerCondition = "risingEdge";
triggerSource = "TTL";

triggerconfig(v, "hardware", triggerCondition, triggerSource);
v.FramesPerTrigger = framesPerTrigger;
v.TriggerRepeat = numTriggers - 1;
Record — Records image data based on the recording mode selected in the Record section and saves it using the settings specified in the Logging section.
If you select Finite and
frame(s), this section is called Record Video for Set Number of Frames and records image data for the specified number of frames.numFrames = 10; v.FramesPerTrigger = numFrames; start(v); wait(v); stop(v); recording1 = getdata(v, numFrames);
If you select Finite and
second(s), this section is called Record Video for Set Number of Seconds and records image data for the specified number of seconds.numSeconds = 10; v.FramesPerTrigger = Inf; start(v); pause(numSeconds); stop(v); recording1 = getdata(v, v.FramesAvailable);
If you select Continuous, this section is called Record Continuous Video Data and records image data continuously and requires you to press Enter to stop recording.
v.FramesPerTrigger = Inf;
start(v);

% Use INPUT to pause before ending acquisition.
input("Press ENTER to end acquisition.");
stop(v);
recording1 = getdata(v, v.FramesAvailable);
If you select Hardware Trigger, this section is called Record with Hardware Trigger and records image data using a hardware trigger.
start(v);
wait(v);
stop(v);
recording1 = getdata(v, framesPerTrigger * numTriggers);
Show Recording — Displays the recorded video using the
implayfunction.reader = VideoReader(fullFilename); videoData = read(reader); implay(videoData);
Clean Up
The generated live script contains the following section related to cleaning up the workspace.
Clean Up — Disconnects from the device and clears it from the workspace by using the
deleteandclearfunctions.delete(v) clear src v