使用 MATLAB Course Designer 创建 MATLAB 练习
此示例说明如何在 MATLAB® Course Designer™ 中向课程添加 MATLAB 练习。
在 MATLAB 练习中,学生提交任务答案后,将收到自动评判和反馈。有关 MATLAB 练习的示例,请参阅 MATLAB 入门之旅等课程。
有关 MATLAB Course Designer 的详细信息,请参阅使用 MATLAB Course Designer 创建课程。
创建课程
通过学习管理系统 (LMS) 或在 course-designer.mathworks.com 上打开 MATLAB and Simulink® Online™ Courses。有关如何将 MATLAB and Simulink Online Courses 集成到您的 LMS 中的信息,请参阅将 MATLAB and Simulink Online Courses 与学习管理系统 (LMS) 集成。
要从 LMS 打开 MATLAB Course Designer,请点击启动 Course Designer。
通过点击创建课程来创建新课程。选择课程标题。

创建练习
要添加 MATLAB 练习,请按照以下步骤操作。
点击添加模块,添加一个课程模块。
展开模块窗格。
点击添加学习活动 > MATLAB 练习,在模块中添加 MATLAB 练习。
点击无标题 MATLAB 练习旁边的编辑,编辑该练习。

添加标题
练习标题设定了练习对学生的期望。好的练习标题应当界定学习活动的范围,特别是在模块标题和模块内其他学习活动的上下文中。
要添加标题,请点击编辑练习窗口的左侧导航窗格中的标题。标题窗格随即打开。在练习标题文本框中,输入练习的标题。

添加背景
任务背景用于设定学生完成练习必须执行的任务的上下文。您可以使用任务背景来说明学习目标,并提供学生完成任务所需了解的概要信息。
在左侧导航窗格中,点击背景。背景窗格随即打开。在文本框中输入任务背景。

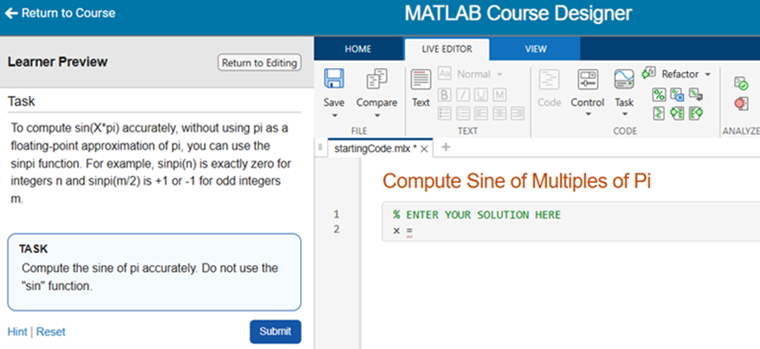
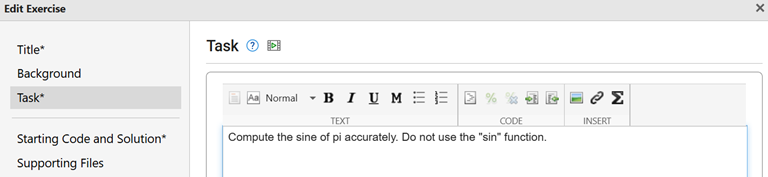
添加任务描述
任务描述用于提供学生完成任务时需要遵循的说明。请提供具体说明,例如使用哪些函数以及使用哪些变量名称。
在左侧导航窗格中,点击任务。任务窗格随即打开。在文本框中输入任务描述。
要在任务面板中预览标题、背景文本和任务,请点击刷新预览。
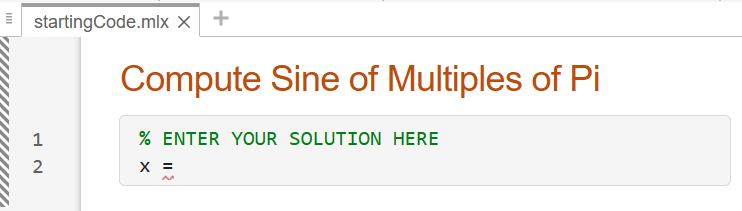
添加起始代码
在左侧导航窗格中,点击起始代码和答案。
起始代码是一个 MLX (*.mlx) 文件,包含学生打开练习时看到的代码片段。
练习可以从空白起始代码文件开始,也可以通过点击上传来上传一个 MLX (*.mlx) 文件。要编辑该文件,请关闭编辑练习窗口,然后向起始代码文件 startingCode.mlx 添加内容。
保存该文件。要重新打开编辑练习窗口,请点击左侧任务窗格中的编辑练习。
添加答案
在左侧导航窗格中,点击起始代码和答案。
答案是一个 MLX (*.mlx) 文件,包含相应任务的答案。您可以通过添加测试,利用该答案来评判学生的答案。您也可以在左侧导航窗格中选择学生可以查看答案,让学生能够访问答案。
练习可以从空白答案文件开始,也可以通过点击上传来上传一个 MLX (*.mlx) 文件。要编辑该文件,请关闭编辑练习窗口,然后在答案文件 solution.mlx 中添加内容。

保存该文件。要重新打开编辑练习窗口,请点击左侧任务窗格中的编辑练习。
添加支持文件
在左侧导航窗格中,点击支持文件。要添加支持文件,请点击上传。学生答案和参考答案都可以访问这些支持文件。
不支持以下文件格式:
EXE (*.exe)
SH (*.sh)
JS (*.js)
添加评判
您可以使用评判来检查学生答案是否得出正确结果。您还可以检查学生答案是包括还是不包括特定关键字或函数。
在左侧导航窗格中,点击评判。
要添加评判,您必须具有参考答案。点击运行答案,生成测试可以访问的工作区变量。您可以随时重新运行答案,以重新生成工作区变量。
首先,添加一项检查学生答案是否使用了 sin 函数的测试。从测试列表中选择函数/关键字是否缺失?,然后点击添加。在函数/关键字是否缺失? 文本框中,输入 sin。
然后,添加一项检查 x 的值是否正确的测试。从测试列表中选择变量是否正确?,然后点击添加。从变量是否正确? 列表中,选择 x。
sinpi 函数针对整数输入返回整数结果。展开容差窗格,并将相对容差和绝对容差均设置为零。软件使用的容差计算公式为:
|xlearner-xsolution| ≤ max( (absolute tolerance), (relative tolerance) × max(xlearner,xsolution) ),
其中 xlearner 是学生答案创建的变量,xsolution 是参考答案创建的同一变量。

有关 MATLAB Course Designer 中测试的详细信息,请参阅MATLAB Course Designer 中的 MATLAB 练习评判测试。
添加提示
您可以提供提示,来帮助学生完成任务。好的提示可以提供额外的参考信息,指出常见错误以及向学生提示重要细节(例如要使用的函数)。
当学生处理任务时,该任务的提示会隐藏起来,直到其点击提示超链接才会显示出来。
在左侧导航窗格中,点击提示。提示窗格随即打开。在文本框中输入提示。

预览练习
要从学生的角度预览练习,请关闭编辑练习窗口,然后点击学生预览。

后续步骤
要返回编辑练习窗口,请点击返回编辑。要返回您的课程,请点击返回课程。
您可以在您的课程中添加额外的模块和学习活动。当您的课程准备就绪时,点击发布。然后,您可以通过 LMS 将课程分配给学生。有关如何分配课程的详细信息,请参阅向 LMS 课程中添加 MATLAB and Simulink Online Courses。