HTML
HTML UI 组件
说明
借助 HTML UI 组件,您可以将 HTML、JavaScript® 或 CSS 嵌入到您的 App 以及对接第三方 JavaScript 库。在创建 HTML UI 组件后,使用 HTML 对象修改其外观和行为。
创建对象
使用 uihtml 函数在 App 中创建一个 HTML UI 组件。
属性
HTML
HTML 标记或文件,指定为字符向量或字符串标量,包含 HTML 文本或 HTML 文件的路径。所有 HTML 标记和文件必须采用正确格式。如果指定的字符向量或字符串标量以 .html 结尾,则它假定为 HTML 文件的路径。
下表提供了有关每个选项的详细信息。
| HTML 源 | 示例 | 详细信息 |
|---|---|---|
| HTML 标记 | h = uihtml("HTMLSource","<p>This is <span style='color:red'>red</span> text.</p>") | 如果您的内容只包含简单的格式化文本而没有任何 JavaScript 代码,请指定 HTML 标记。 当您嵌入 HTML 标记时,不需要指定 |
| HTML 文件 | h = uihtml("HTMLSource","CustomCharts.html") | 如果您的 HTML 内容包含以下任何属性,请指定 HTML 文件:
HTML 文件必须位于本地文件系统可以访问的位置。任何支持文件都必须位于包含您为 |
MATLAB 数据,指定为任何 MATLAB 数据类型。当 HTMLSource 的值是定义 JavaScript 对象的 HTML 文件的路径时,请使用此参量。然后,这些数据可以在 MATLAB HTML UI 组件和 JavaScript 对象之间同步。
要在 MATLAB 和您正在 App 中嵌入的第三方内容之间同步 Data 属性的值,请在一个 HTML 文件中创建一个 setup 函数,它将名为 htmlComponent 的 JavaScript 对象连接到 MATLAB 中的 HTML UI 组件。然后,将 HTMLSource 属性值设置为该文件的路径。
Data 属性值的更改只会单向触发回调事件。具体而言,
当在 MATLAB 中设置
Data属性时,htmlComponentJavaScript 对象的Data属性也会更新并触发'DataChanged'事件的 JavaScript 事件侦听程序。当在 JavaScript 中设置
htmlComponent.Data时,MATLAB 中的 HTML UI 组件的Data属性也会更新并触发DataChangedFcn回调。
如果您有嵌套元胞数组、结构体数组或 MATLAB 表数组数据等数据,您可能需要有关数据如何在 MATLAB 和 JavaScript 之间转换的更多信息。当在 MATLAB 中设置 HTML UI 组件的 Data 属性时,数据将使用 jsonencode 函数进行转换,与 JavaScript 同步,使用 JSON.parse() 进行解析,最后设置为 htmlComponent JavaScript 对象的 Data 属性。通过 JSON.stringify() 和 jsondecode 函数,也可以进行反向转换。Data 属性是唯一与 JavaScript 同步的属性。
有关它支持的数据类型的详细信息,请参考 jsonencode 函数。如果 jsonencode 函数不支持您的数据类型,请使用数据类型转换函数(如 num2str)将您的数据转换为支持的类型。然后,将其设置为 Data 属性的值。
有关如何编写支持数据同步的 HTML 文件以及 htmlComponent JavaScript 对象的属性的详细信息,请参阅Create HTML Content in Apps。
交互性
工具提示,指定为字符向量、字符向量元胞数组、字符串数组或一维分类数组。如果使用此属性,则在运行时当用户将指针悬停在组件上时,将显示消息。即使禁用组件,工具提示也会显示。要显示多行文本,请指定字符向量元胞数组或字符串数组。数组中的每个元素变为一行文本。如果将此属性指定为分类数组,MATLAB 将使用数组中的值,而不是完整的类别集。
上下文菜单,指定为使用 uicontextmenu 函数创建的 ContextMenu 对象。
注意
当设置 HTML UI 组件的 HTMLSource 属性时,此属性不起作用。要在用户右键点击组件时显示上下文菜单,请检测事件并编写代码,以编程方式在预期位置打开上下文菜单。
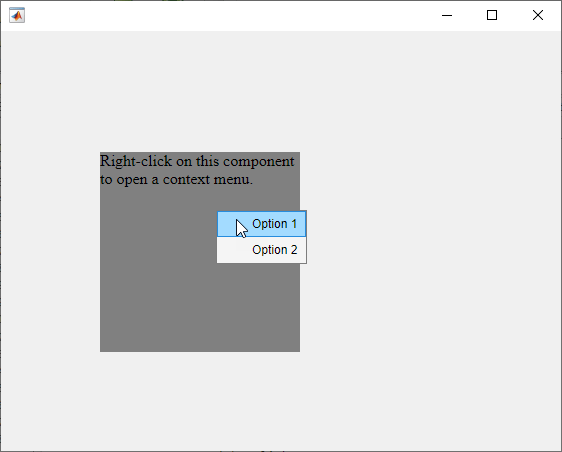
示例:打开 HTML UI 组件的上下文菜单
创建一个名为 cmexample.html 的 HTML 文件。在该文件中:
创建一个构成组件外观的
<div>元素。编写一个
setup函数,以将htmlComponentJavaScript 对象连接到 MATLAB 中的 HTML UI 组件。在
setup函数中添加一个事件侦听程序,用于侦听 JavaScript 对象上的contextmenu事件(如右键点击)并创建一个侦听程序回调函数。当contextmenu事件发生时,该侦听程序回调设置htmlComponent对象的Data属性,以存储触发事件的操作和事件触发的位置。然后,可以从关联的 MATLAB HTML UI 组件中获得这些数据。
<!DOCTYPE html>
<html>
<body>

<div id="contextMenuTarget" style="background-color:gray;width:200px;height:200px;">
    Right-click on this component to open a context menu.
</div>

<script type="text/javascript">
    function setup(htmlComponent) {
        document.getElementById("contextMenuTarget").addEventListener("contextmenu", function(event) {
            htmlComponent.Data = {Action:"showContextMenu", PosData:[event.clientX, event.clientY]};
        });
    }
</script>

</body>
</html>
在 MATLAB 脚本中,在 UI 图窗中创建一个 HTML UI 组件和一个上下文菜单对象。将 cmexample.html 文件指定为 HTML UI 组件的 HTMLSource 属性。然后,定义一个名为 openContextMenu 的回调函数,该回调函数将上下文菜单作为输入,并且在 HTML UI 组件的 Data 属性发生更改时执行。在该回调函数中,检查触发回调执行的事件是否为上下文菜单事件。如果是,则检索事件的位置,并使用它在图窗中的预期位置打开上下文菜单。
fig = uifigure;

h = uihtml(fig,"HTMLSource","cmexample.html");
h.Position = [100 100 200 200];

cm = uicontextmenu(fig);
m1 = uimenu(cm,"Text","Option 1");
m2 = uimenu(cm,"Text","Option 2");
h.ContextMenu = cm;

h.DataChangedFcn = {@openContextMenu,cm};

function openContextMenu(src,event,cm)
    switch src.Data.Action
        case "showContextMenu"
            p = getpixelposition(src,true);
            xClick = src.Data.PosData(1);
            yClick = src.Data.PosData(2);
            xOpen = p(1)+xClick;
            yOpen = p(2)+p(4)-yClick;
            open(cm,xOpen,yOpen);
    end
end
运行脚本并右键点击 HTML UI 组件以打开上下文菜单。
位置
HTML UI 组件相对于父容器的位置和大小,指定为 [left bottom width height] 形式的四元素向量。此表介绍该向量中的每个元素。
| 元素 | 描述 |
|---|---|
left | 父容器的内部左边缘与 HTML UI 组件的外部左边缘之间的距离 |
bottom | 父容器的内部下边缘与 HTML UI 组件的外部下边缘之间的距离 |
width | HTML UI 组件的左右外部边缘之间的距离 |
height | HTML UI 组件的上下外部边缘之间的距离 |
Position 值相对于父容器的可绘制区域。可绘制区域是指容器边框内的区域,不包括装饰元素(如菜单栏或标题)所占的区域。
所有测量值都以像素为单位。
HTML UI 组件的内部位置和大小,指定为 [left bottom width height] 形式的四元素向量。所有测量值都以像素为单位。此属性值等同于 Position 属性值。
此 属性 为只读。
HTML UI 组件的外部位置和大小,以 [left bottom width height] 形式的四元素向量形式返回。所有测量值都以像素为单位。此属性值等同于 Position 属性值。
布局选项,指定为 GridLayoutOptions 对象。此属性为网格布局容器的子级组件指定选项。如果组件不是网格布局容器的子级(例如,它是图窗或面板的子级),则此属性为空且不起作用。但是,如果组件是网格布局容器的子级,则可以通过设置 GridLayoutOptions 对象的 Row 和 Column 属性,将组件放置在网格的所需行和列中。
例如,以下代码将一个 HTML UI 组件放置在其父网格的第三行第二列中。
g = uigridlayout([4 3]);
h = uihtml(g);
h.HTMLSource = '<body style="background-color:powderblue;"><p>Hello World!</p></body>';
h.Layout.Row = 3;
h.Layout.Column = 2;
要使 HTML UI 组件占据连续的行或列,请将 Row 或 Column 属性指定为二元素向量。例如,以下 HTML UI 组件占据第 2 到第 3 列。
h.Layout.Column = [2 3];
回调
在数据更改时执行的回调,指定为下列值之一:
函数句柄。
第一个元素是函数句柄的元胞数组。元胞数组中的后续元素是传递到回调函数的参量。
包含有效 MATLAB 表达式的字符向量(不推荐)。MATLAB 在基础工作区计算此表达式。
当 htmlComponent JavaScript 对象中的 Data 属性的值发生变化时,将更新 MATLAB HTML UI 组件的 Data 属性,并执行此回调。
此回调函数可以访问关于 JavaScript 对象中数据更改的特定信息。MATLAB 将 DataChangedData 对象中的信息作为第二个参量传递给回调函数。在 App 设计工具中,该参量名为 event。您可以使用圆点表示法查询 DataChangedData 对象属性。例如,event.PreviousData 返回上次更新或更改前 Data 的先前值。DataChangedData 对象不可用于指定为字符向量的回调函数。
下表列出了 DataChangedData 对象的属性。
| 属性 | 描述 |
|---|---|
Data | 上次 DataChanged 事件产生的最新数据 |
PreviousData | 上次 DataChanged 事件前的数据 |
Source | 执行回调的 MATLAB HTML UI 组件 |
EventName | 'DataChanged' |
有关编写回调的详细信息,请参阅App 设计工具中的回调。
自 R2023a 起
从 HTML 源代码接收到事件时回调,指定为以下值之一:
函数句柄。
第一个元素是函数句柄的元胞数组。元胞数组中的后续元素是传递到回调函数的参量。
包含有效 MATLAB 表达式的字符串标量或字符向量(不推荐)。MATLAB 在基础工作区计算此表达式。
当通过对 JavaScript htmlComponent 对象调用 sendEventToMATLAB 函数将事件从 JavaScript 发送到 MATLAB 时,将执行此回调。使用此回调编写 MATLAB 代码,以响应用户交互或 HTML 组件中的更改,如点击按钮 HTML 元素。有关详细信息,请参阅Create HTML Content in Apps。
此回调函数可以访问关于 JavaScript 对象发送的事件的特定信息。MATLAB 将 HTMLEventReceivedData 对象中的信息作为第二个参量传递给回调函数。在 App 设计工具中,该参量名为 event。使用圆点表示法查询 HTMLEventReceivedData 对象属性。例如,event.HTMLEventName 返回由 JavaScript 对象指定的事件的名称。HTMLEventReceivedData 对象不可用于指定为字符串标量或字符向量的回调函数。
下表列出了 HTMLEventReceivedData 对象的属性。
| 属性 | 描述 |
|---|---|
HTMLEventName | 由 JavaScript 代码中调用的 sendEventToMATLAB 函数指定的事件的名称 |
HTMLEventData | 由 JavaScript 代码中调用的 sendEventToMATLAB 函数指定的事件数据 |
Source | 执行回调的 MATLAB HTML UI 组件 |
EventName | 'HTMLEventReceived' |
有关编写回调的详细信息,请参阅Create Callbacks for Apps Created Programmatically。
回调执行控件
父级/子级
父容器,指定为 Figure 对象或其子容器之一:Tab、Panel、ButtonGroup 或 GridLayout。如果未指定容器,MATLAB 将调用 uifigure 函数以创建一个新 Figure 对象来充当父容器。
标识符
此 属性 为只读。
图形对象的类型,以 'uihtml' 形式返回。
对象函数
sendEventToHTMLSource | Send HTML UI component event from MATLAB to JavaScript |
示例
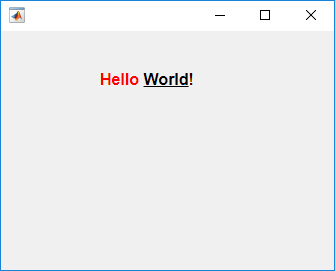
创建一个 HTML 组件,并使用 HTML 文本在其中显示格式化文本。
fig = uifigure('Position',[561 497 333 239]);
h = uihtml(fig);
h.HTMLSource = '<p style="font-family:arial;"><b><span style="color:red;">Hello</span> <u>World</u>!</b></p>';
创建一个 HTML 文件,以在您的 App 中嵌入音频和视频元素并引用媒体源文件。
首先,在图窗中创建一个空的 HTML UI 组件。
fig = uifigure;
fig.Position = [500 500 380 445];

h = uihtml(fig);
h.Position = [10 10 360 420];

然后,创建一个名为 audio_videoplayers.html 的 HTML 文件。在该文件中,添加音频和视频元素,并指定它们相对于 HTML 文件路径的文件源。在此示例中,媒体文件与 HTML 文件在同一个目录中。
最好为每个元素指定多个文件源,因为并非所有上下文都支持相同的文件类型。例如,MATLAB 桌面中的 HTML 组件不支持 MP4 视频,但 MATLAB Online™ 支持。在视频元素中,将 OGA 文件指定为 App 尝试播放的第一个视频。然后,如果不支持第一个文件,则退而求其次,指定 MP4 文件。
<!DOCTYPE html>
<html>
	<body style="background-color:white;font-family:arial;">
		<p style="padding-left:20px">
		Play audio file:
		</p>

		<audio controls style="padding-left:20px">
			<source src="./handel_audio.wav" type="audio/wav">
			<source src="./handel_audio.oga" type="audio/ogg">
			Your browser does not support the audio tag.
		</audio>

		<p style="padding-left:20px">
		Play video file:
		</p>

		<video width="320" height="240" controls style="padding-left:20px">
                        <source src="./xylophone_video.oga" type="video/ogg">
			<source src="./xylophone_video.mp4" type="video/mp4">
			Your browser does not support the video tag.
		</video>

	</body>
</html>
现在,通过将 HTMLSource 属性设置为文件的完整路径,将 HTML 文件嵌入到您的 App 中。
h.HTMLSource = fullfile(pwd,'audio_videoplayers.html');
创建一个 htmlComponent JavaScript® 对象,该对象显示 MATLAB® 中 HTML UI 组件上设置的数据。
首先,创建一个空的 HTML UI 组件,并将其置于图窗中的某位置。
fig = uifigure;
fig.Position = [500 500 490 180];

h = uihtml(fig);
h.Position = [20 20 450 130];
然后,创建一个名为 displayDataFromMATLAB.html 的 HTML 文件。在该文件中,
使用
style标记为显示文本的<div>元素定义内部 CSS 样式。在
<script>标记内编写一个setup函数,将您的 JavaScript 对象(称为htmlComponent)连接到您在 MATLAB 中创建的 HTML UI 组件。在
setup函数中添加一个事件侦听程序。事件侦听程序侦听htmlComponentJavaScript 对象上的"DataChanged"事件,并创建一个侦听程序回调函数。当"DataChanged"事件发生时,侦听程序回调函数会用在 MATLAB 中为Data属性设置的值更新"dataDisplay"<div> element。
<!DOCTYPE html>
<html>
<head>
<style>
#prompt {
  font-family: sans-serif;
  text-align:center;
  border-radius: 5px;
  background-color: lightblue;
  padding: 20px;
}

#dataDisplay {
  border-radius: 5px;
  height: 10vh;
  padding: 12px 20px;
}
</style>

<script type="text/javascript">

        function setup(htmlComponent) {

            htmlComponent.addEventListener("DataChanged", function(event) {
            document.getElementById("dataDisplay").innerHTML = htmlComponent.Data;
            });
        }
</script>
</head>

<body>
     <div id="prompt">

	<span><label for="prompt"><strong>Data from MATLAB will display here:</strong></label></span>
	<br/><br/>
	<div id ="dataDisplay">
	Please set data in MATLAB...
	</div>

     </div>
</body>

</html>
现在,在 MATLAB 中,将 HTMLSource 属性的值设置为指向该 HTML 文件的路径。
h.HTMLSource = fullfile(pwd,'displayDataFromMATLAB.html');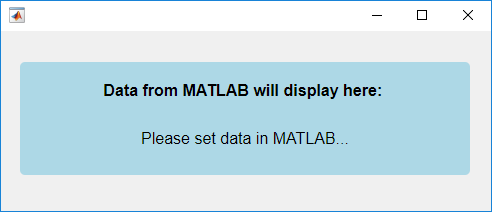
为 HTML UI 组件的 Data 属性设置值。请注意 htmlComponent JavaScript 对象如何在您的 HTML UI 组件中更新。
h.Data = "Hello World!";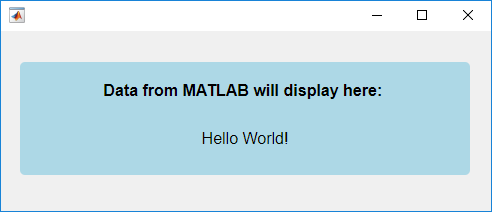
创建一个显示按钮和进度条的 JavaScript htmlComponent 对象,它会在进度更改时在 MATLAB 命令行窗口中显示当前进度。
首先,创建一个空的 HTML UI 组件,并将其置于图窗中的某位置。
fig = uifigure("Position",[500 500 350 150]);
h = uihtml(fig,"Position",[50 40 250 70]);
然后,创建一个名为 progressBar.html 的 HTML 文件。在该文件中:
使用
<style>标记为按钮和进度条元素定义内部 CSS 样式。在
<script>标记内编写一个setup函数,将您的 JavaScript 对象(称为htmlComponent)连接到您在 MATLAB 中创建的 HTML UI 组件。在
setup函数中添加一个事件侦听程序。事件侦听程序侦听按钮上的"click"事件,并创建一个侦听程序回调函数。当用户点击下一步按钮时,侦听程序回调函数会更新进度条,并将htmlComponent的Data属性设置为新进度值。
<!DOCTYPE html>
<html>
<head>
<style>
body {
    text-align: center;
}
button {
    width: 43px;
    height: 20px;
}
progress {
    width: 90%;
    height: 20px;
}
</style>

<script type="text/javascript">
    function setup(htmlComponent) {
        let btn = document.getElementById("nextButton");
        htmlComponent.Data = 0;
        btn.addEventListener("click", function(event) {
            let progress = htmlComponent.Data;
            progress = Math.min(progress+25,100);
            document.getElementById("progressBar").value = progress;
            htmlComponent.Data = progress;
        });
    }
</script>
</head>

<body>
    <button id="nextButton">Next</button>
    <br>
    <progress id="progressBar" value="0" max="100"></progress>
</body>
</html>
在 MATLAB 中,将 HTMLSource 属性的值设置为该 HTML 文件的路径。创建一个 DataChangedFcn 回调函数,每当 Data 属性更改时,该函数都会显示更新后的进度。
h.HTMLSource = "progressBar.html";
h.DataChangedFcn = @(src,event)disp(event.Data);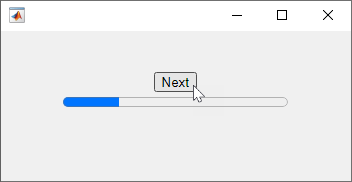
点击下一步按钮以更新进度条并更改 Data 属性。进度显示在 MATLAB 命令行窗口中。
自 R2023a 起
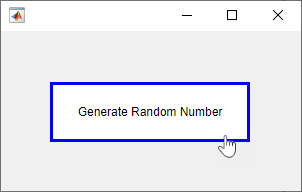
创建一个可在用户点击按钮时生成一个随机数的 JavaScript htmlComponent 对象,并在 MATLAB 中显示该数字。
首先,创建一个名为 myRandomNum.m 的新脚本。在脚本中,创建一个空的 HTML UI 组件,并将其置于图窗中的某位置。
fig = uifigure("Position",[100 100 300 160]);
h = uihtml(fig,"Position",[50 50 200 60]);
然后,创建一个名为 generateJSRandomNumber.html 的 HTML 文件。在该文件中:
使用
<style>标记为按钮元素定义内部 CSS 样式。在
<script>标记内编写一个setup函数,将您的 JavaScript 对象(称为htmlComponent)连接到您在 MATLAB 中创建的 HTML UI 组件。在
setup函数中添加一个事件侦听程序,用于侦听按钮上的"click"事件。当用户点击按钮时,首先生成一个随机数,然后发送事件来通知 MATLAB 发生该点击。将随机数作为事件数据传入,以便您可以在 MATLAB 中访问该数字。
<!DOCTYPE html>
<html>
<head>
<style>
body {
  height: 100%;
  text-align: center
}

button {
  width: 100%;
  height: 100%;
  background-color: white;
  color: black;
  border: 3px solid blue;
  font-size: 12px;
  cursor: pointer;
}
</style>

<script type="text/javascript">
   function setup(htmlComponent) {
       let button = document.getElementById("Button");
       button.addEventListener("click", function(event) {
           let num = Math.floor(Math.random() * 100) + 1;
           htmlComponent.sendEventToMATLAB("ButtonClicked",num);
       });
   }
</script>
</head>

<body>
   <button id="Button">Generate Random Number</button>
</body>
</html>
在 MATLAB 中,在 myRandomNum.m 脚本中将 HTMLSource 属性的值设置为 HTML 文件的路径。创建一个 HTMLEventReceivedFcn 回调函数,它在命令行窗口中显示生成的随机数。
h.HTMLSource = "generateJSRandomNumber.html";
h.HTMLEventReceivedFcn = @displayNumber;

function displayNumber(src,event)
name = event.HTMLEventName;
if strcmp(name,'ButtonClicked')
    number = event.HTMLEventData;
    disp(number);
end
end
运行脚本并点击按钮,以在 MATLAB 命令行窗口中生成并显示随机数。
自 R2023a 起
创建一个 JavaScript htmlComponent 对象,该对象会在用户与 MATLAB 旋钮组件交互时更新 HTML 元素样式。
首先,创建一个名为 myTemperature.m 的新脚本。在脚本中,在 UI 图窗中创建一个旋钮 UI 组件和一个空的 HTML UI 组件。
fig = uifigure;
k = uiknob(fig,"discrete", ...
    "Items",["Freezing","Cold","Warm","Hot"], ...
    "ItemsData",[0 1 2 3], ...
    "Value",0);
h = uihtml(fig,"Position",[230 60 40 150]);
然后,创建一个名为 thermometer.html 的 HTML 文件。在该文件中:
使用
<style>标记来定义温度计部件的内部 CSS 样式。在
<script>标记内编写一个setup函数,将您的 JavaScript 对象(称为htmlComponent)连接到您在 MATLAB 中创建的 HTML UI 组件。在
setup函数中添加一个事件侦听程序,用于侦听 MATLAB 中的"TemperatureChanged"事件。当htmlComponent对象收到温度已更改的通知时,会查询事件数据以获取新温度。然后,调整温度计的样式以反映新温度。
<!DOCTYPE html>
<html>
<head>
<style>
.bulb {
    width: 30px;
    height: 30px;
    border: 2px solid;
    border-radius: 50%;
    background-color: red;
}

.stem {
    width: 10px;
    height: 30px;
    border-top: 2px solid;
    border-left: 2px solid;
    border-right: 2px solid;
    position: relative;
    left: 10px;
    top: 4px;
    background-color: white;
}

.stem.hot {
    background-color: red;
}
</style>

<script type="text/javascript">
    function setup(htmlComponent) {
        htmlComponent.addEventListener("TemperatureChanged", function(event) {
            let stem1 = document.getElementById("Stem1");
            let stem2 = document.getElementById("Stem2");
            let stem3 = document.getElementById("Stem3");
            (event.Data > 0) ? stem1.classList.add("hot") : stem1.classList.remove("hot");
            (event.Data > 1) ? stem2.classList.add("hot") : stem2.classList.remove("hot");
            (event.Data > 2) ? stem3.classList.add("hot") : stem3.classList.remove("hot");
        });
    }
</script>
</head>

<body>
    <div id="Stem3" class="stem"></div>
    <div id="Stem2" class="stem"></div>
    <div id="Stem1" class="stem"></div>
    <div id="Bulb" class="bulb"></div>
</body>
</html>
在 MATLAB 中,在脚本中编写与 HTML 源通信的代码:
将 HTML UI 组件的
HTMLSource属性的值设置为 HTML 文件的路径。为旋钮编写
ValueChangedFcn回调函数,该函数在温度变化时向 HTML 源发送名为"TemperatureChanged"的事件。将新温度值作为事件数据传递。
h.HTMLSource = "thermometer.html";
k.ValueChangedFcn = @(src,event) handleKnobValueChanged(src,event,h);

function handleKnobValueChanged(src,event,h)
val = src.Value;
sendEventToHTMLSource(h,"TemperatureChanged",val);
end
运行脚本并与旋钮交互以更新温度计。

创建一个显示包含多个字段数据的 HTML UI 组件。
创建一个列出项目名称、价格和数量的项目卡组件。设计 HTML UI 组件,以在 MATLAB 中以 struct 形式接收项目数据。首先,检查在使用 jsonencode 函数将数据从 MATLAB 传输到 JavaScript 时 struct 数据如何编码。
matlabData = struct("ItemName","Apple","Price",2,"Quantity",10);
jsonencode(matlabData)
ans =
'{"ItemName":"Apple","Price":2,"Quantity":10}'
有关 HTML 组件如何在 MATLAB 和 JavaScript 之间传输数据的详细信息,请参阅Create HTML Content in Apps。
接下来,创建一个名为 itemCard.html 的 HTML 源文件,用它来创建和样式化项目卡 HTML 组件。在该文件中:
使用
<style>标记来定义项目卡的内部 CSS 样式。在
<script>标记内编写setup函数,以检测 MATLAB HTML UI 组件对象的Data属性何时更改,然后访问 JavaScripthtmlComponent对象的Data属性。数据编码为一个具有多个属性的 JavaScript 对象。访问这些属性来更新 HTML 组件的内容。使用
<body>标记创建主 HTML 文档内容。
<!DOCTYPE html>
<html>
<head>
<style>
    table {
        border: 2px solid;
        border-spacing: 0;
        text-align: center;
        position: absolute;
        width: 100%;
        height: 100%;
        margin: 0px;
        padding: 0px;
    }
    th {
        background-color: #097A7A;
        color: black;
        font-size: 24px;
        height: 40%;
    }
    tr {
        background-color: #98D6D6;
        color: gray;
        height: 30%;
    }
    td {
        padding: 5px;
    }
</style>

<script type="text/javascript">
    function setup(htmlComponent) {
        htmlComponent.addEventListener("DataChanged", function(event) {
            let table = document.getElementById("itemCard");
            table.rows[0].cells[0].innerHTML = htmlComponent.Data.ItemName;
            table.rows[1].cells[1].innerHTML = htmlComponent.Data.Price;
            table.rows[2].cells[1].innerHTML = htmlComponent.Data.Quantity;
        });
    }
</script>
</head>

<body>
    <div>
	<table id="itemCard">
            <tr>
                <th colspan="2">Item</th>
            </tr>
            <tr>
                <td>Price:</td>
                <td></td>
            </tr>
            <tr>
                <td>Quantity:</td>
                <td></td>
            </tr>
        </table>
    </div>
</body>
</html>
在 UI 图窗中创建一个 HTML 组件。将 itemCard.html 指定为 HTML 源,将项目数据 struct 指定为组件数据。
itemData = struct("ItemName","Apple","Price",2,"Quantity",10);
fig = uifigure;
c = uihtml(fig,"HTMLSource","itemCard.html","Data",itemData);
