Set Up and Configure ESP32 Hardware
Once you have installed the MATLAB® Support Package for Arduino® Hardware, as described in Install the Support Package. You can configure the host computer to communicate with the ESP32 board via USB, Wi-Fi®, or Bluetooth®.
Prepare ESP32 Board for Setup
Before configuring your ESP32 hardware for communication, set up the hardware:
For setting up ESP32 and associated libraries for the support package installed on Linux, ensure that you have logged in as root user. Also, ensure that you launch MATLAB as root user.
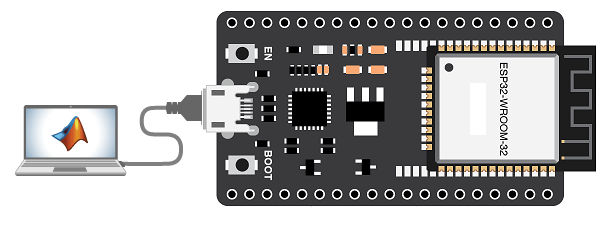
Connect the ESP32 board to the host computer using a USB cable. You must start the setup with a USB connection even if you plan to communicate with the ESP32 board using Bluetooth or Wi-Fi.
In MATLAB, open the Hardware Setup window by entering
arduinosetupat the command prompt.In the Select Board and Port screen, choose the board type and the port number from the Choose board and Choose port lists. Then, click Next.
The supported ESP32 boards are
ESP32-WROOM-DevKitC,ESP32-WROOM-DevKitV1,NanoESP32andESP32-S3-DevKitM.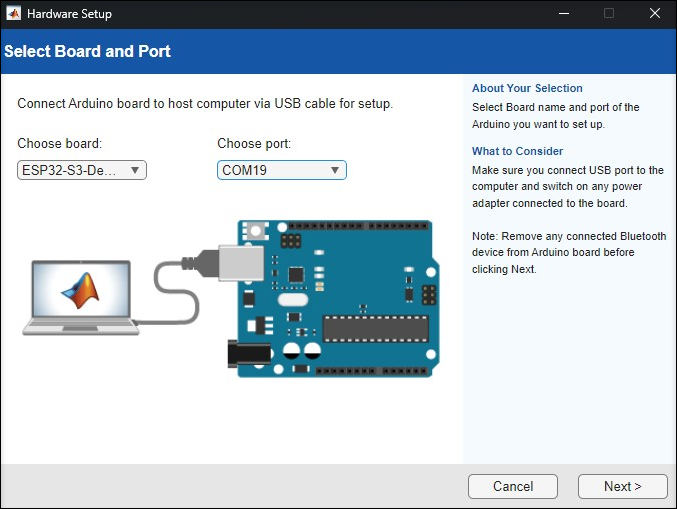
To configure your hardware for communication, choose your connection type.
The Choose Connection Type pane lists only the connection types supported for the board you selected in the previous step. Follow the steps in the section relevant to your connection type:
Connection over USB
Before you configure your ESP32 hardware for communication, you must prepare the hardware for setup. For more information, see Prepare ESP32 Board for Setup.
To configure your ESP32 hardware to communicate via USB:
Specify connection type as
USBand click Next.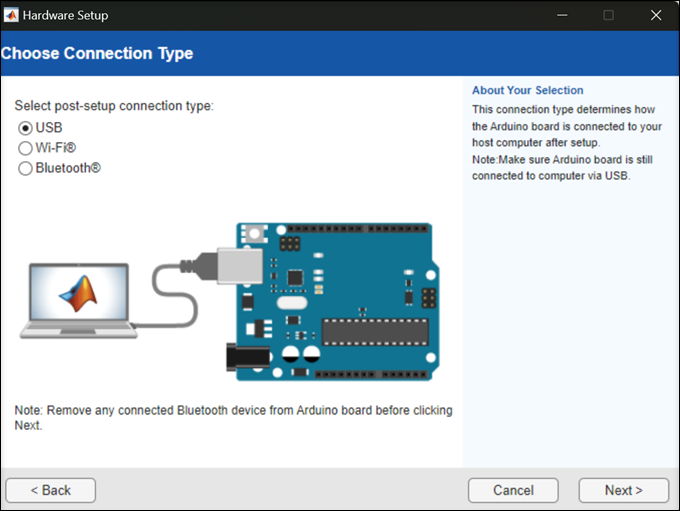
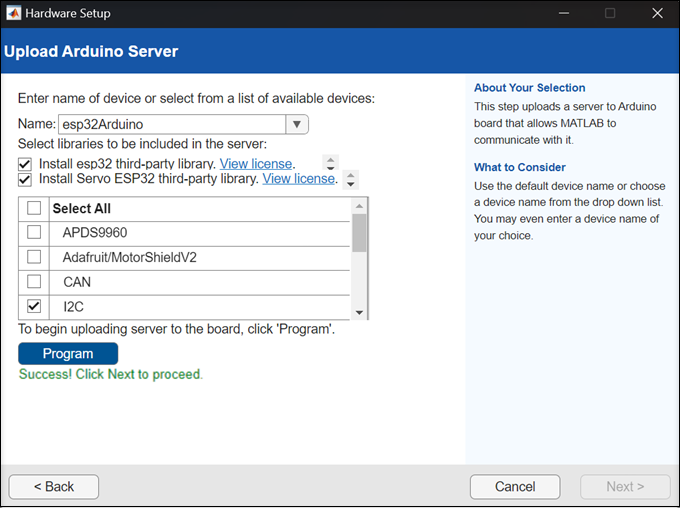
Select the libraries that you want to include in your ESP32 server, and then click Program to begin uploading the server to your ESP32 board. Selecting the Install ESP32 third-party library option is mandatory to work with ESP32 boards. This option appears in the screen only for the first time you select ESP32 board. When you open Hardware Setup again, the software checks for ESP32 library installation and displays the option only if the library is not available.
The
CANlibrary is not supported for ESP32 boards.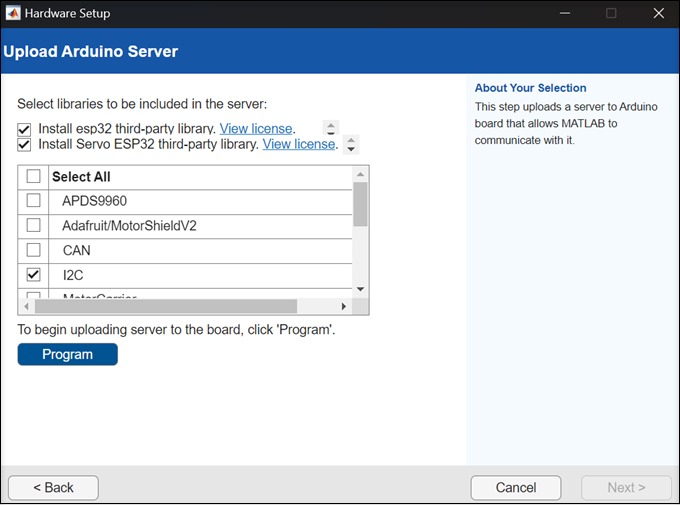
After the upload is successful, click Next to proceed.
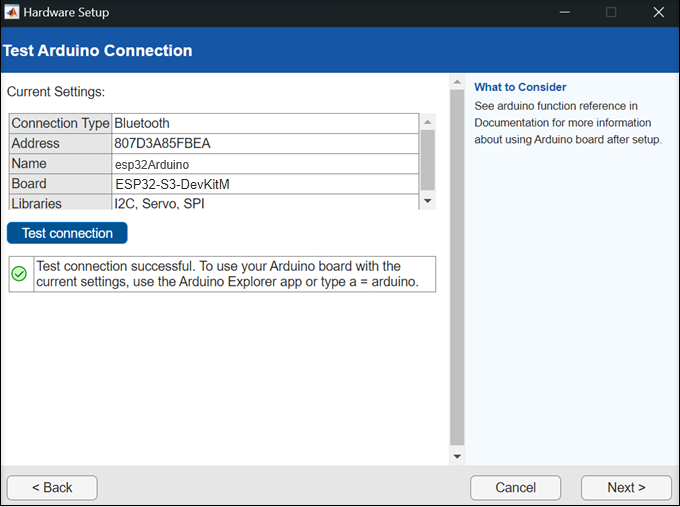
To test the connection between your host computer and the ESP32 board., click Test connection.
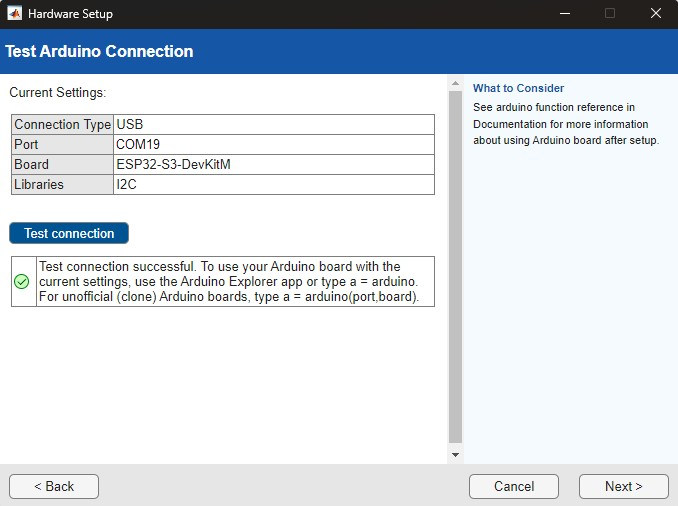
After the connection test is successful, click Next to proceed.
Click Finish to complete the hardware setup. To connect to your ESP32 board, see Connect to Arduino Hardware.

Connection over Wi-Fi
Before you configure your ESP32 hardware for communication, complete the steps described in Prepare ESP32 Board for Setup, and disconnect the USB..
To configure your ESP32 hardware to communicate via Wi-Fi:
Specify connection type
Wi-Fi.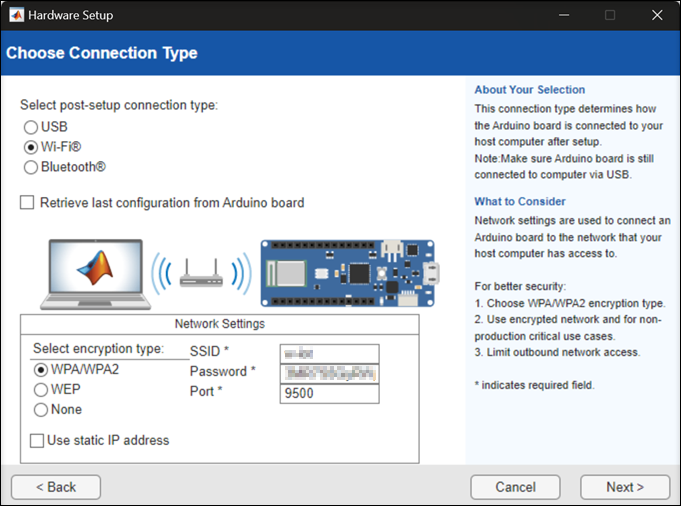
Choose the encryption type of your Wi-Fi network, enter the necessary credentials, and click Next. WEP encryption type is not supported for ESP32 boards.
If you have previously configured your ESP32 board in Hardware Setup to use Wi-Fi retrieve the credentials from your previous configuration by selecting Retrieve last configuration from Arduino board.
If you select Use static IP address, make sure that you use an available static IP address and that your router allows the usage of static IP. Ensure that the
Subnet Maskis255.255.255.0and theDefault Gatewayis the IP address of the network gateway.
In the Upload Arduino Server screen, select the libraries that you want to include in your ESP32 server. Click Program to begin uploading the server to your ESP32 board.
Selecting the Install ESP32 third-party library option is mandatory to work with ESP32 boards. This option appears in the screen only for the first time you select ESP32 board (the subsequent launch of Hardware Setup screen checks for ESP32 library installation and displays the option only if the library is not available).
The
CANlibrary is not supported for ESP32 board.After the upload is successful, click Next to proceed.
To test the connection between your host computer and the ESP32 board, click Test connection.
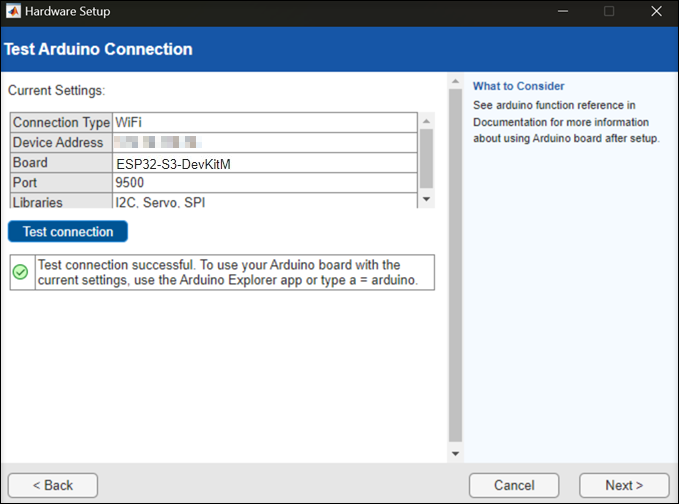
After the connection test is successful, click Next to proceed.
Click Finish to complete the hardware setup.
Connection over Bluetooth
Before you configure your ESP32 hardware for communication, complete the steps described in Prepare ESP32 Board for Setup, and disconnect the USB.
To configure your ESP32 hardware to communicate via Bluetooth:
Specify connection type
Bluetoothand click Next.
On the Upload Arduino Server screen:
Use the Name field to assign a new name to your ESP32 hardware or choose a device name from the list.
Select the libraries that you want to upload to your ESP32 hardware.
Click Program to complete uploading libraries to the ESP32 device and retrieve the Bluetooth Device address from the ESP32 board.
After the upload is successful, click Next to proceed.
If you are using a Windows® desktop computer, connect a Bluetooth dongle to your computer. You should use a dongle supporting Bluetooth 4.0 or higher to connect to the
ESP32-DevKitV1,ESP32-DevKitC,NanoESP32, orESP32-S3-DevKitMboard over Bluetooth.Click Test connection to test the connection between your host computer and the Arduino board and click Next.
After the connection test is successful, click Next to proceed.
Click Finish to complete the hardware setup.