Use BeagleBone Black PWM to Capture PWM Measurements
This example shows how to use the BeagleBone® Black PWM to generate a square wave of given frequency and duty cycle.
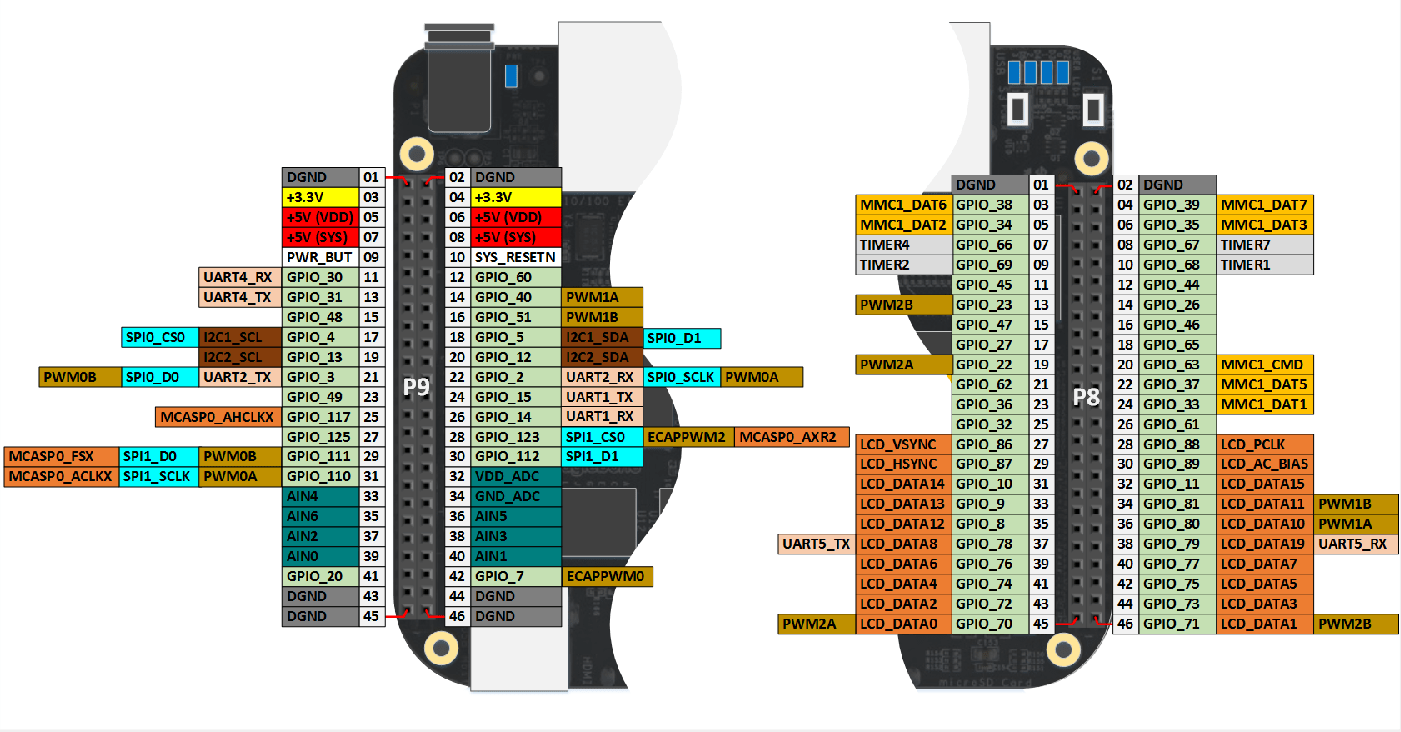
The BeagleBone Black board has eight pulse-width modulation (PWM) output pins. Each PWM pin outputs a square waveform with variable frequency and duty cycle.

In addition to your BeagleBone Black board and USB cable, you must have the following equipment:
LED
1 kΩ resistor
Breadboard and jumper cables
You will configure a GPIO pin (P9_14) as
a PWM pin (PWM1A).
Configure the BeagleBone Black hardware.
Using a white cable, connect
P9_14(PWM1A) to the 1 kΩ resistor.Using a white cable, connect the 1 kΩ resistor to the LED input.
Using a black cable, connect the LED output to
P9_01(DGND).
Start MATLAB®.
Connect the BeagleBone Black board to a host computer USB port and wait about 30 seconds for the board to start.
Connect the BeagleBone Black driver interface to the board.
bbb = beaglebone
bbb =

  beaglebone with properties:

           DeviceAddress: '192.168.7.2'
               BoardName: 'BeagleBone Black Rev 00C0'
           AvailableLEDs: {'USR0'  'USR1'  'USR2'  'USR3'}
    AvailableDigitalPins: {1x29 cell}
     AvailableAnalogPins: {'AIN0'  'AIN1'  'AIN2'  'AIN3'  'AIN4'  'AIN5'  'AIN6'}
        AvailablePWMPins: {}
    AvailableSPIChannels: {}
       AvailableI2CBuses: {'i2c-1'}
    AvailableSerialPorts: {}
        AvailableWebcams: {}
Enable pin
P9_14as a PWM pin.enablePWM(bbb, 'P4_14') bbb.AvailablePWMPinsans = 'P9_14'Set the frequency to
1000Hz and the voltage to1.5V.writePWMFrequency(bbb,'P9_21',1000); writePWMVoltage(bbb,'P9_21',1.5);
Loop the duty cycle from
0.0to1.0and back again, pausing between increments. Observe the resulting behavior.for dc = 0.0 : 0.1 : 1.0 writePWMDutyCycle(bbb,'P9_21',dc); pause(0.2) end for dc = 1.0 : -0.1 :0.0 writePWMDutyCycle(bbb,'P9_21',dc); pause(0.2) end
When you are finished using the PWM, restart the hardware to make additional GPIO pins available.