Main Content

Prepare Your Installation

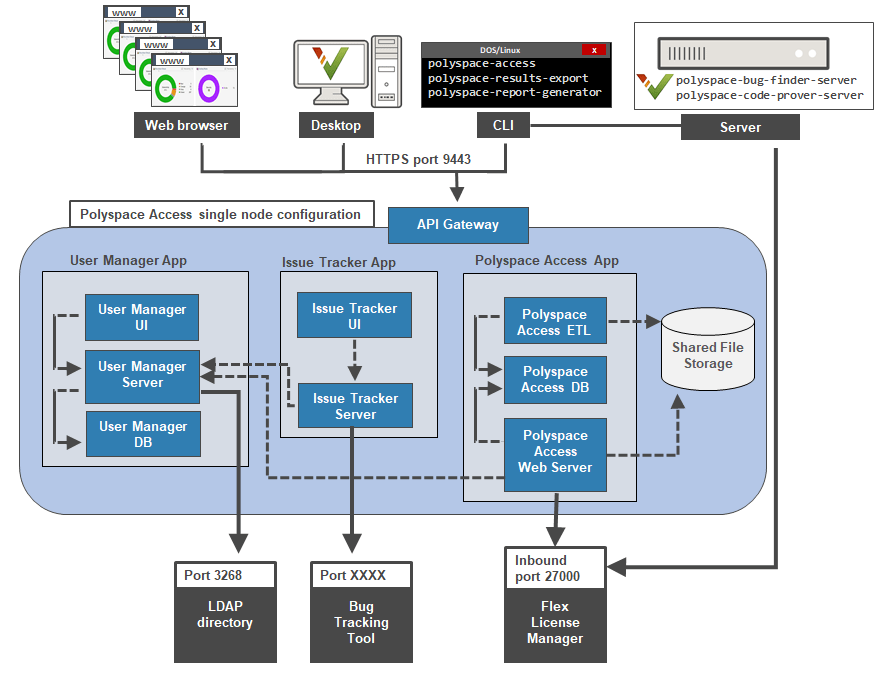
Polyspace® Access™ provides a web browser interface so that you can review Polyspace analysis results that are hosted on a centralized database. When you install Polyspace Access, you install these apps:

  • User Manager App: Authenticates user logins against your company Lightweight Directory Access Protocol (LDAP) or against a custom internal database of users. The app issues signed JSON Web Tokens to authenticated users and provides a user interface to manage the custom database of users.

  • Issue Tracker App: Manages the communication between Polyspace Access and your bug tracking tool (BTT) software and provides a user interface to create BTT tickets.

  • Polyspace Access App: Manages results uploads to the Polyspace Access database and results exports from that database, and provides a user web interface to review results.

    The Polyspace Access ETL (Extract-Transform-Load) service handles operations such as results uploads, results downloads, and updates to the data displayed in the user web interface.

Each app contains services that are deployed inside docker containers. A separate Gateway service handles communications between Polyspace Access and client machines.

Polyspace Access network diagram for single node configuration.

Before you begin your installation, decide whether to use the HTTPS protocol and how you to configure user authentication and bug tracking tool integration.

Tip

You can use Kubernetes® to deploy Polyspace Access. For more information, contact MathWorks Technical Support.

General Prerequisites

  • Install the required software and make sure that your system meets the minimum hardware requirements. See System Requirements for Polyspace Access.

  • Verify that you have enough data storage available and that the ports that you use are available and not blocked by your firewall. See Storage and Port Configuration.

  • Check that the license manager is installed and running, and that the license manager options file includes the users to whom you grant right-to-use privileges for Polyspace Access. See Manage Polyspace NNU Licenses.

  • To avoid any potential issues with license file operation, consider upgrading the network license manager software whenever you upgrade Polyspace Access. See Update Network License Manager Software.

  • Create and configure a Linux® virtual machine (VM) if you are installing Polyspace Access inside a Linux VM on Windows Server® 2016 or 2019. See Create a Linux Virtual Machine by Using Hyper-V.

  • If you enable HTTPS to encrypt communications between Polyspace Access and client machines, obtain an SSL private key and a signed certificate from a certificate authority or use self-signed certificates. See Choose Between HTTP and HTTPS Configuration for Polyspace Access

  • If you configure the Polyspace Access to use the HTTPS protocol, you must generate a Java® Key Store (JKS) file to enable communications between Polyspace Access and the Polyspace desktop interface, or the polyspace-results-export and polyspace-report-generator binaries. See Generate a Client Keystore.

  • Check that the docker network does not conflict with an existing network. For more information on docker networks, see Networking overview.

    To check if your docker network conflicts with an existing network, run this command:

    docker network inspect networkName
    and check that the IP range listed in the IPAM.Config node is not used by other services. You might need to contact your network administrator to determine if the IP range is used by other services.

    To find networkName, use the command docker network ls. If the command returns more than one network, inspect all the bridge networks (see the DRIVER column in the output).

    Create a network and specify the subnet and gateway to avoid conflicts with existing networks. See docker network create. To use the new network, use the --network-name option when you start the admin-docker-agent binary.

User Manager Prerequisites

  • The User Manager configuration requires the generation of an SSL private key file. See Configure User Manager. This private key must be different from the private key that you use for the HTTPS configurations.

  • If you use your company LDAP to authenticate user logins, contact your LDAP administrator to:

    • Obtain the LDAP URL and LDAP base that your organization uses.

    • Obtain LDAP login credentials if access to the LDAP server is password-protected.

    • Discuss an LDAP search filter that enables you to retrieve specific subsets of users from the LDAP database. See LDAP filters.

  • If you use LDAP configured over SSL (LDAPS), you must add the LDAP SSL certificate to the certificate trust store file that you use for Polyspace Access. See Configure the User Manager for LDAP over SSL.

Issue Tracker Prerequisites

  • The Issue Tracker configuration requires the URL that you use to connect to your BTT interface.

  • If you use the Jira software with the OAuth authentication method, you must first create an application link in Jira. See the first step on this page.

  • If you use the Redmine BTT, contact your Redmine administrator to obtain the Redmine API key.

  • If you use a BTT configured by using HTTPS, you must add the BTT SSL certificate to the certificate trust store file that you use for Polyspace Access. See Add BTT Instance Configured by Using HTTPS.

Polyspace Access Support on WSL

The installation of Polyspace Access on the Windows Subsystem for Linux (WSL) is not supported.

WSL is a Windows® feature that enables you to execute Linux command-line tools on a Linux file system from Windows while using fewer resources than a regular virtual machine (VM). While you can use WSL for development, this feature lacks some of the functionalities of a regular Linux operating system. See Can I use WSL for production scenarios?.

Note that WSL2 offers improved performance but relies on virtualized networking components and does not perform well across OS file systems. Both of these issues affect the performance of Polyspace Access. See Comparing WSL Versions.