Create Project and Write Tests for AUTOSAR Software Component Implementations
If you use the AUTOSAR methodology for software development, you can use Polyspace® Test™ to author tests for code implementation of AUTOSAR software components. Polyspace Test supports the AUTOSAR methodology directly with capabilities such as:
Creation of a single workspace with projects that correspond to AUTOSAR software component behaviors
AUTOSAR-aware smart stubbing with assessments that check whether run-time values conform to the design specifications in the software component definitions (specified as ARMXL files)
This topic shows how to create a Polyspace Platform project and author tests for functions that are part of the code implementation of AUTOSAR software components.
Example Files
To follow the steps in this tutorial, use the demo files in
polyspaceroot\polyspace\examples\doc_pstest\polyspace_autosarpolyspacerootC:\Program
Files\Polyspace\R2026a. This folder contains these files:
Spec.arxml– This ARXML file contains the design specifications for an AUTOSAR software componentswc001. This component has an internal behaviorbhv001with a runnable entityrunfoothat is implemented by a function in a C source file.src.c– This source file contains the functionrunfoo()implementing the runnable entity defined in the ARXML file. The function definition is the following and contains a single call to a Run-Time Environment (RTE) function:Std_ReturnType runfoo() { Int10to100 value; Std_ReturnType ret = Rte_Read_MyRead_int10to100(&value); if (ret == RTE_E_OK && value >= 20) { return E_OK; } return E_NOT_OK; }
Create Project and Parse Source Code
Create a Polyspace Platform workspace from the design specifications in the ARXML file and the source code implementation in the C file:
In the Polyspace Platform user interface, select New > Workspace From AUTOSAR.
In the Create workspace from AUTOSAR spec window, specify the following:
Workspace name – Enter
components(to reflect the name of the AUTOSAR package defined in the ARXML file).AUTOSAR ARXML folder – Enter the path to the folder containing
Spec.arxml.AUTOSAR source folders – Enter the path to the folder containing
src.c.Generate AUTOSAR headers – Select this option. You do not need this option if your provide your own headers containing declarations of RTE functions. For this tutorial, you can use the ones generated by Polyspace.
Click Start. Once the progress bar shows completion, click Open to open the newly created Polyspace Platform workspace with one project.
Select Parse Code to parse the source code in the project.
Instead of creating a workspace in the Polyspace Platform user interface, you could have also created the workspace by using the polyspace-autosar command. In either case, the AUTOSAR design specifications are read from the ARXML file provided and a workspace with one or more projects is created. Each project in the workspace corresponds to an internal behavior of a software component and contains the C or C++ source code implementing this behavior. In this example, there is only one internal
behavior, so the workspace created contains only a single project with the name in the format psar_, in this case, package_name.component_name.behavior_namepsar_components.swc001.bhv001. For more details on the command, see polyspace-autosar (Polyspace Code Prover).
Generate Stubs
The RTE API functions in the source code appear as undefined symbols after you parse the source in the project. You can generate AUTOSAR-aware stubs to stand in for these undefined symbols. The stub bodies contain:
Preconditions that test whether the function input values fall within the design range of their data types defined in the ARXML specifications.
Postconditions that test whether the function return values and potentially modified input values fall within the design range of their data types defined in the ARXML specifications.
To generate stubs for the RTE functions in this project:
Click
 on the Polyspace Platform toolstrip. On the Code pane, you see that the RTE function
 Rte_Read_swc001_MyRead_int10to100appears under the Undefined Symbols node. This name represents the functionRte_Read_MyRead_int10to100()in the source code above.To create all stubs at one time, right-click the Undefined Symbols node and select Generate All Stubs. For more information on stubbing, see Test Functions with Undefined Callees in Polyspace Platform User Interface.
The newly stubbed function now appears under a Stubbed Symbol node. You can also see the stub under the Test Artifacts node on the Projects pane (the stub has the same name as the original function being stubbed).
Note that the function stubs for AUTOSAR RTE functions export variables that allow you to control the stub behavior directly from the tests. You typically do not need to look into or modify the stub bodies to modify the stub behavior. For more information on the generated stubs, see Anatomy of Run-Time Environment Function Stubs Generated from AUTOSAR Design Specifications.
Author and Run Tests
Write the following three tests for the function runfoo in the file src.c. In the first test, you leverage the default stub behavior and modify only the inputs and assessments related to the code under test. You then modify the stub behavior in the second test using variables exported from the stubs. In the third test, you modify the test assessments to fail postcondition checks in the stub body and then investigate the test
failures.
Test Using Default Stub Behavior
By default, variables exported from the stubs have values that fall within the range of their data types. If you leave the default values of these variables in the tests, any test failure can be traced to assessments you added (and not the precondition and postcondition checks in the stubs).
Write a test that uses the default stub behavior:
On the Projects pane, right-click the function
runfooand select Add Test Case.Name the test
genericTestand set these values:In the Inputs section, leave the default entries of Value for
Rte_Read_swc001_MyRead_int10to100_aStatusandRte_Read_swc001_MyRead_int10to100_aData.The Scope column for these variables has the value mock to indicate that they are variables exported from the definition of the stub
Rte_Read_swc001_MyRead_int10to100().The variable ending with
_aStatusstands for the return value of the functionRte_Read_swc001_MyRead_int10to100().The variable ending with
_aDatastands for the output parameter of the functionRte_Read_swc001_MyRead_int10to100().
In the Assessments section, set Comparator for
pst_call_outto==and Value to:E_OK, if the default value ofRte_Read_swc001_MyRead_int10to100_aStatusisRTE_E_OKand the default value ofRte_Read_swc001_MyRead_int10to100_aDatais greater than or equal to20u.E_NOT_OKin all other cases.
Build and run this test to see passing test results. (You can modify the value of
pst_call_outin the Assessments section to see a failing test result that can be directly traced back to the assessment added in the test.)For more details on running tests, see Build and Run Tests in Polyspace Platform User Interface.
Test That Modifies Default Stub Behavior
To test various paths in your runnable entity, you can modify the behavior of the generated stubs using variables exported from the stub definitions.
Suppose the previous test had the return value of Rte_Read_swc001_MyRead_int10to100 set to RTE_E_OK (through the exported stub variable ending with _aStatus) and exercises the path through the if block in the function runfoo(). Write a second test that bypasses this path (or vice versa if the previous test bypassed the path).
On the Projects pane, right-click the test
genericTestand select Duplicate Test.Name the test
notOKTestand set these values:In the Inputs section of the test, change Value for the variable
Rte_Read_swc001_MyRead_int10to100_aStatustoRTE_E_INVALID.In the Assessments section, set Value for the variable
pst_call_outtoE_NOT_OK.
Build and run this test to see passing test results.
Test That Fails Checks in Stubs
To understand the preconditions and postcondition checks in the stub definitions, write a third test that triggers a failure of these checks and diagnose the test failure.
On the Projects pane, right-click the test
genericTestand select Duplicate Test.Name the test
failingPostConditionTestand set these values:In the Inputs section of the test, change Value for the variable
Rte_Read_swc001_MyRead_int10to100_aDatato200u.In the Assessments section, change Value for the variable
pst_call_outtoE_OK.
Build and run this test to see failing test results.
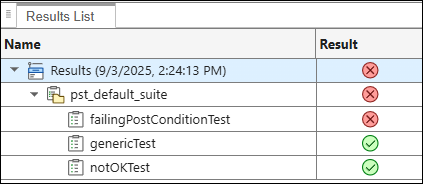
Once the test runs are complete, on the Results pane, right-click the Tests node and select Open Review. The Results List pane shows one failed test along with the two passing tests.
To further investigate the test failure, select the failing test name
failingPostConditionTeston the Results List pane. The Result Details pane shows one failing assessment where the Location column is nonempty. This assessment comes from a postcondition check in a stub body and the Location columns shows the location of the generated file containing the stub definition.Select the failing assessment on the Result Details pane. This opens a code view of a generated stub file with the failing assessment highlighted:
The check fails because the value of the variable pointed byPST_VERIFY_Int10to100Ref(aData);aDatadoes not fall within the range constraint [10, 100] that the assessmentPST_VERIFY_Int10to100Refchecks. As you can also see in the generated stub file, the value pointed byaDatacomes from the value200uthat was set in the test using the corresponding exported variableRte_Read_swc001_MyRead_int10to100_aData.The range constraint in the assessment definition comes from the design specifications in the ARXML file. To see this constraint, open the ARXML file in the software you typically use for managing the design specifications. Look for the
myReadport in the definition of the software componentswc001, which translates to the RTE functionRte_Read_swc001_MyRead_int10to100. You can see that there is a range constraint on the type of the data read by the port. This range constraint directly translates to the postcondition checkPST_VERIFY_Int10to100Refin the definition of the stub forRte_Read_swc001_MyRead_int10to100. For more information, see Anatomy of Run-Time Environment Function Stubs Generated from AUTOSAR Design Specifications.You can fix the test failure by either changing the value of the variable
Rte_Read_swc001_MyRead_int10to100_aDatain the test to a value in the range [10, 100] or change the range constraint itself in the ARXML.
See Also
polyspace-autosar (Polyspace Code Prover)