Run External C/C++ Tests in Polyspace Platform User Interface
You can import tests authored using GoogleTest or another external test authoring framework into a Polyspace® Platform project. Importing external tests allows you to:
Build these existing tests along with any new test you add to the project (graphical tests or tests authored using the Polyspace Test™ xUnit API).
Run these tests and review the test results in the Polyspace Platform user interface, just as you would run tests authored using Polyspace Test.
This topic shows how to run tests authored using a generic external test framework from within a Polyspace Platform project. The example uses a simple source and test file authored using the Boost C++ library. You can generalize the steps shown here to any other test authoring framework.
Note that this workflow requires some initial setup but can be applied to tests written using any external test format. For a simpler workflow that applies only to GoogleTest tests, see Run GoogleTest Tests Using Polyspace Platform Projects.
Example Files
The example uses a simple source and test file authored using the Boost C++ library (version 1.78.0). A sample XSLT file is provided to convert test results from the Boost XML format to the Polyspace Test XML format.
The example files are provided only for illustrative purposes to walk you through the steps. Depending on the Boost version you are using, you might have to adapt the XSLT file further for expected results.
Find the files for this tutorial in the folder polyspaceroot\polyspace\examples\doc_pstest\external_testspolyspacerootC:\Program Files\Polyspace\R2026a.
The example folder contains three files:
Source file
src.cppTest file
test.cppXSLT file
boostToPSTest.xslfor converting test results
Prerequisites
Before adding external tests to a Polyspace Platform project, make sure that the tests build and run to completion outside the Polyspace Platform context.
For instance, if you are using a GCC compiler:
Build the tests by entering the following at the command line:
Whereg++ src.cpp test.cpp -I pathToBoostHeaders -o testrunner
pathToBoostHeadersboostRootDir/include/boost-1_78/boostRootDirRun the tests to generate output in XML format. For instance, in Windows®, you can run the tests as follows:
testrunner.exe --log_format=JUNIT
Set Up Project for External Test Execution
In the Polyspace Platform user interface, create a new project and add the source file src.cpp to the project. After adding the source:
Add the test file
test.cppto your project:Right-click the project node and select Add External Test Files. Alternatively, with the project selected on the Projects pane, on the Polyspace Platform toolstrip, select Import Tests > Add External Test Files.
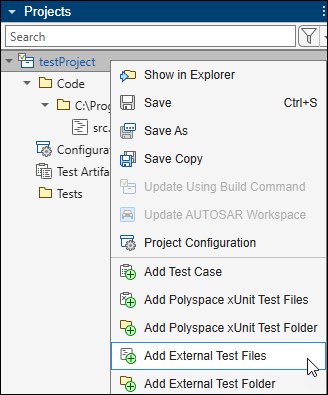
Instead of adding individual files, you can also add a folder containing test files by right-clicking the project node and selecting Add External Test Folder.
Navigate to the location of the test file
test.cppand add this file.
To see all test files and folders added to the project, select the Project tab of the Configuration pane. On this tab, you can see the test files and folders explicitly added to the project in the sections External test files and External test folders respectively.
Configure your project to run tests written using an external test framework. Double-click the Configuration node of the project, and then set these options:
On the External Tests node of the Project tab, set these options:
Option Value Use generic test framework Select this option. Test output options Enter the options you had used at the command line when executing the tests:
--log_format=JUNIT --log_sink=$(TESTOUTPUT)
The option
--log_format=JUNITgenerates output in JUnit-style XML and the option--log_sinkpipes the output to a specific file. For more information, see Boost C++ Documentation.The variable
$(TESTOUTPUT)allows you to avoid specifying an explicit output path so that the project is portable across different machines. For more information, seeTest output options.
Output file is in XML format Select this option. Transform output using XSLT Select this option. XSLT File Enter the path to the file
boostToPSTest.xsl. The XSLT file converts the test results XML output from the Boost format to a format supported with Polyspace Test.On the Build tab, set these options:
Option Value Source code language Select CPP.Extra flags for linking Enter any flag you normally use for linking to libraries during test build. On the Target & Compiler > External Tests node of the Build tab, specify the following options:
Option Value Include paths for external tests Add the path to Boost include folders, for instance,
pathToBoostHeadersLibrary paths for external tests Add the path to any library required for building the tests.
Libraries for external tests Add names of libraries that you want to link during building.
If you want coverage results along with test execution results, in the PROFILING section of the Polyspace Platform toolstrip, instead of No Profiling, select Code Coverage.
Run Tests and Review Results
After the initial setup, you are ready to build and run tests written using the Boost testing framework.
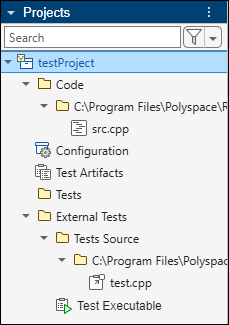
On the Projects pane, right-click the External Tests node and select Build Tests.
The sources and external tests are built along with the GoogleTest libraries. On the Projects pane, you see a Test Executable node below the External Tests node:
On the Projects pane, right-click the External Tests node and select Run Tests.
After the tests execute, on the Results pane, you see a new entry corresponding to the results of test execution.
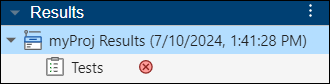
Right-click the Tests node and select Open Review.
On the Results List pane, select a test to see further details of the failing assessments on the Result Details pane.
If the XSLT transformation completes successfully, your results should look like the following:

Further Exploration
To apply this workflow to your use-case, you will need to adapt the XSLT transformation shown in this example. In particular, the XSLT transformation handles transformation of Boost test results for failed tests only. To see all test results including passing ones, you have to extend the XSLT transformation.
Explore XSLT Transformation Shown in Example
To understand the XSLT transformation that converted the Boost results in this example to the Polyspace Test format, open these files:
Test results in Boost XML format.
You can obtain this XML file by running the Boost tests on the command line. Alternatively, to obtain the Boost XML file after adding Boost tests to a project:
In your project configuration, on the External Tests node of the Project tab, instead of Transform output using XSLT, select XML uses Pst-xUnit format, do not use conversion.
Run the tests in the project.
In a
buildsubfolder of thepolyspace_artifactsfolder in your results folder, locate the XML output file.Save the XML output file with another name (this file will be overwritten when you regenerate test results to recover the Polyspace Test XML).
The XML output looks like the following:
Test results in Polyspace Test XML format.
To obtain this XML file:
In your project configuration, on the External Tests node of the Project tab, select Transform output using XSLT and provide the path to the file
boostToPSTest.xsl.Run the tests in the project.
In the same subfolder of the
polyspace_artifactsfolder as mentioned in the previous item, find the XML file with the output in the Polyspace Test format.
The XML output looks like the following:
XSLT transformation file
boostToPSTest.xsl
After opening the files:
Compare a section of the test results XML in Boost format with the corresponding section in the XML in Polyspace Test format.
Locate the transformation in the XSLT file that converted between the two XML formats.
For instance, the Boost XML format contains each test suite result in a testsuite element and each test case in a testcase element. The XSLT template below creates a Results node in the Polyspace
Test XML using information from the testsuite and testcase elements in the Boost XML:
    <xsl:template match="/">
        <Results
            suitesRequested="{count(testsuite)}"
            suitesPassed="{count(testsuite[@failures = 0 and @skipped = 0])}"
            suitesFailed="{count(testsuite[not(@failures = 0)])}"
            suitesIncomplete="{count(testsuite[not(@skipped = 0)])}"
            testsRequested="{count(testcase)}"
            testsPassed="{count(testcase[not(failure) and not(skipped)])}"
            testsFailed="{count(testcase[failure])}"
            testsIncomplete="{count(testcase[skipped])}">
            <xsl:apply-templates select="testsuite"/>
        </Results>
</xsl:template> Results node in the XML for Polyspace
Test with the following attributes:
| Attribute | Value |
|---|---|
suitesRequested | Number of children testsuite elements in the Boost results XML |
suitesPassed | Number of children testsuite elements with both the failure and skipped attribute equal to 0. |
suitesFailed | Number of children testsuite elements with the failure attribute not equal to 0. |
suitesIncomplete | Number of children testsuite elements with the skipped attribute not equal to 0. |
testsRequested | Number of children testcase elements in the Boost results XML |
testsPassed | Number of children testcase elements that do not have children failure or skipped elements. |
testsFailed | Number of children testcase elements that have children failure elements. |
testsIncomplete | Number of children testcase elements that have children skipped elements. |
Validate Test Results XML
Once you have written an XSLT transformation, you can validate the generated Polyspace
Test XML using the XSD file PolyspaceTestResults.xsd in polyspaceroot\polyspace\resources\polyspace_test_resultspolyspacerootC:\Program Files\Polyspace\R2026a.
You can also use the XSD for more guidance on the structure of the XML format required for Polyspace Test results.
See Also
Use generic test framework | Test output options | Output file is in XML format | Transform output using XSLT | XSLT File