Communicate Data Between Raspberry Pi and Sense HAT Using NNG Blocks
This example shows how to use the NNG Send and NNG Receive blocks from Raspberry Pi® Blockset to establish communication between the Raspberry Pi hardware and Sense HAT using the nanomsg next generation (NNG) library.
The NNG Send and NNG Receive blocks support the publish/subscribe protocol.
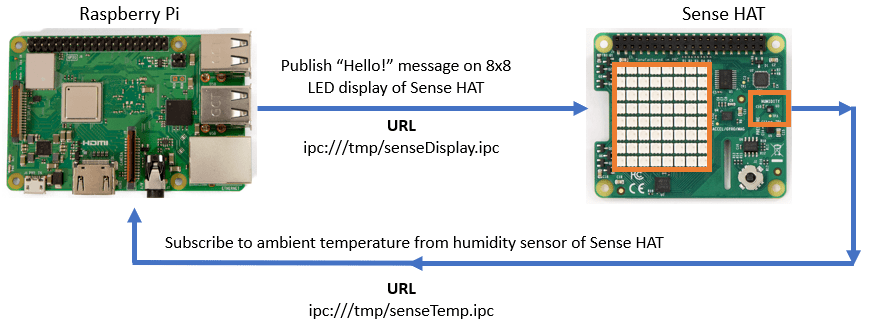
Consider Raspberry Pi acting as a subscriber and Sense HAT acting as a publisher. The HTS221 humidity sensor on the Sense HAT detects the ambient temperature. Raspberry Pi subscribes to the URL for displaying the ambient temperature on the Display block in the Simulink® model.
Consider Sense HAT acting as a subscriber while Raspberry Pi acting as a publisher. Raspberry Pi sends the message "Hello!" to Sense HAT. The Sense HAT subscribes to the URL for displaying the message on the 8x8 LED matrix display.
For more information on nanomsg next generation (NNG) library, refer to NNG: Lightweight Messaging Library.
Prerequisites
For more information on how to use Raspberry Pi Blockset to run a Simulink model on your Raspberry Pi hardware, see Build and Deploy Your First Simulink Model to Raspberry Pi.
Install Sense HAT hardware module and python interface to the NNG library.
Execute these commands on the Raspberry Pi terminal to install both the modules.
sudo python3 -m venv /opt/mw_example --system-site-packages
sudo chown -R pi:pi /opt/mw_example
source /opt/mw_example/bin/activate
pip3 install sense_hat pynng
The sense_hat module is used for hardware interaction (sensors and LED display) and the pynng module is used for inter-process communication between application components.
Required Hardware
Raspberry Pi hardware
Raspberry Pi Sense HAT
Micro USB cable
Connect Raspberry Pi to Sense HAT
Attach Sense HAT to the Raspberry Pi expansion header. Make sure that you power down your Raspberry Pi before attempting to attach the Sense HAT.
Configure Simulink Model and Calibrate Parameters
This example uses a pre-configured Simulink model from Raspberry Pi Blockset. To open the Simulink model, run this command in the MATLAB® Command Window.
Open the raspberrypi_nng_sensehat Simulink model.

In the NNG Send block, set the IPC name parameter to senseDisplay. In the NNG Receive block, set the IPC name parameter to senseTemp.
Execute Python Script to Start Publish/Subscribe Process
The senseDis.py Python® script establishes a connection between the Sense HAT and Raspberry Pi hardware board and starts a process to publish and subscribe data. In the script, ensure to configure the URL as displayed in the NNG Send and NNG Receive blocks.
Follow these steps to execute the Python script on your Raspberry Pi hardware.
1. Establish a connection with the Raspberry Pi board.
mypi = raspberrypi('ipaddress','username','password')2. Locate the full path of the senseDis.py file.
str = which('senseDis.py')3. Copy the senseDis.py file from your host computer to Raspberry Pi hardware.
putFile(mypi,str,'/home/username')
4. Execute senseDis.py file on your Raspberry Pi hardware.
sudo /opt/mw_example/bin/python3 /home/pi/senseDis.py
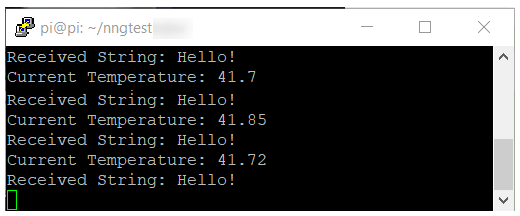
The terminal on the Raspberry Pi hardware displays the ambient temperature and the "Hello!" message continuously.
Run Simulink Model in External Mode (Monitor and Tune)
On the Hardware tab of the Simulink model, in the Mode section, select Run on board and then click Monitor & Tune. Observe the ambient temperature on the Display block in the Simulink model.
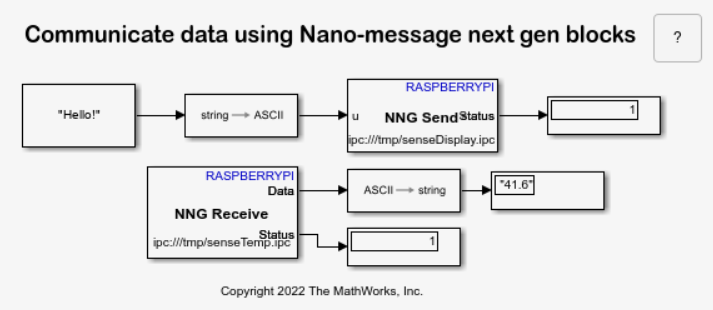
Observe the message "Hello!" on the 8x8 LED matrix on the Sense HAT.
