Specify LMIs with the LMI Editor GUI
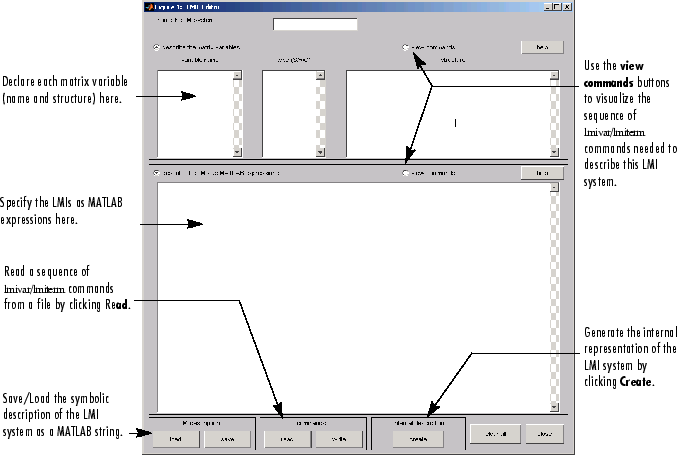
The LMI Editor is a graphical user interface (GUI) to specify LMI systems in a straightforward symbolic manner. Typing
lmiedit
calls up a window with several editable text areas and various buttons.

In more detail, to specify your LMI system,
Declare each matrix variable (name and structure) in the upper half of the worksheet. The structure is characterized by its type (
Sfor symmetric block diagonal,Rfor unstructured, andGfor other structures) and by an additional “ structure” matrix. This matrix contains specific information about the structure and corresponds to the second argument oflmivar.Please use one line per matrix variable in the text editing areas.
Specify the LMIs as MATLAB® expressions in the lower half of the worksheet. For instance, the LMI
is entered by typing
[a'*x+x*a x*b; b'*x -1] < 0
if
xis the name given to the matrix variable X in the upper half of the worksheet. The left- and right-hand sides of the LMIs should be valid MATLAB expressions.
Once the LMI system is fully specified, the following tasks can be performed by clicking the corresponding button:
Visualize the sequence of
lmivar/lmitermcommands needed to describe this LMI system (view commandsbutton). Conversely, the LMI system defined by a particular sequence oflmivar/lmitermcommands can be displayed as a MATLAB expression by clicking on the describe... buttons.Beginners can use this facility as a tutorial introduction to the
lmivarandlmitermcommands.Save the symbolic description of the LMI system (
savebutton). This description can be reloaded later on by clicking the load button.Read a sequence of
lmivar/lmitermcommands from a file (read button). You can then click on describe the matrix variables or describe the LMIs to visualize the symbolic expression of the LMI system specified by these commands. The file should describe a single LMI system but may otherwise contain any sequence of MATLAB commands.This feature is useful for code validation and debugging.
Write in a file the sequence of
lmivar/lmitermcommands needed to describe a particular LMI system (write button).This is helpful to develop code and prototype MATLAB functions based on the LMI Lab.
Generate the internal representation of the LMI system by clicking create. The result is written in a MATLAB variable named after the LMI system (if the “name of the LMI system” is set to
mylmi, the internal representation is written in the MATLAB variablemylmi). Note that all LMI-related data should be defined in the MATLAB workspace at this stage.The internal representation can be passed directly to the LMI solvers or any other LMI Lab function.
Keyboard Shortcuts
As with lmiterm, you can use various
shortcuts when entering LMI expressions at the keyboard. For instance, zero blocks
can be entered simply as 0 and need not be dimensioned.
Similarly, the identity matrix can be entered as 1 without
dimensioning. Finally, upper diagonal LMI blocks need not be
fully specified. Rather, you can just type (*) in place of each
such block.
Limitations
Though fairly general, LMI Editor is not as flexible as
lmiterm and the following
limitations should be kept in mind:
Parentheses cannot be used around matrix variables. For instance, the expression
(a*x+b)'*c + c'*(a*x+b)
is invalid when x is a variable name. By contrast,
(a+b)'*x + x'*(a+b)
is perfectly valid.
Loops and
ifstatements are ignored.When turning
lmitermcommands into a symbolic description of the LMI system, an error is issued if the first argument oflmitermcannot be evaluated. Use the LMI and variable identifiers supplied bynewlmiandlmivarto avoid such difficulties.
How lmivar and lmiterm Manage LMI Representation
Users familiar with MATLAB may wonder how lmivar and lmiterm physically update the
internal representation LMISYS since LMISYS is
not an argument to these functions. In fact, all updating is performed through
global variables for maximum speed. These global variables are initialized by
setlmis, cleared by getlmis, and are not visible in
the workspace. Even though this artifact is transparent from the user's viewpoint,
be sure to:
See Also
LMI Editor | lmivar | lmiterm