跨行和跨列创建表条目
这些示例显示了如何使表条目跨越行和列。
非正式表
此示例显示如何在 DOM 非正式表对象中使用行和列跨越来创建下表。

非正式表是不包括预定义的表头、表体和表脚的表。但是,您可以将非正式表的前几行格式化为标题,如本例所示。
导入 DOM 命名空间,这样您就不必使用长而完全限定的类名。
import mlreportgen.dom.*设置文档并添加标题来描述表。
% To create a PDF report, change the output type from "docx" to "pdf".
% To create an HTML report, change "docx" to "html" or "html-file" for
% a multifile or single-file report, respectively.
rpt = Document("myReport","docx");

h = Heading(1, ...
    "Multiple Row and Column Table Entries Using an Informal Table");
h.Style = [h.Style {HAlign("center")}];
append(rpt, h);
为不同文档组件要使用的样式创建元胞数组。包含的表跨越页面的宽度,并且各条目之间有实线分隔。主标题是钢蓝色,副标题是较浅的天蓝色。
tableStyle = ...
    {Width("100%"), ...
    Border("solid"), ...
    ColSep("solid"), ...
    RowSep("solid")};
mainHeaderRowStyle = ...
    {VAlign("middle"), ...
    InnerMargin("2pt", "2pt", "2pt", "2pt"), ...
    BackgroundColor("steelblue")};
mainHeaderTextStyle = ...
    {Bold, ...
    OuterMargin("0pt", "0pt", "0pt", "0pt"), ...
    FontFamily("Arial")};
subHeaderRowStyle = ...
    {VAlign("middle"), ...
    InnerMargin("2pt", "2pt", "2pt", "2pt"), ...
    BackgroundColor("skyblue")};
subHeaderTextStyle = ...
    {Bold, ...
    OuterMargin("0pt", "0pt", "0pt", "0pt"), ...
    FontFamily("Arial")};
bodyStyle = ...
    {OuterMargin("0pt", "0pt", "0pt", "0pt"), ...
    InnerMargin("2pt", "2pt", "2pt", "0pt")};
创建一些示例数据以包含在表中。然后,创建表对象。
data = {"John", "Smith", "Natick, MA";
    "Jane", "Doe", "Boston, MA"};

t = Table(3);
t.Style = [t.Style tableStyle];
为包含姓名和地址标题的表的第一行创建一个 TableRow 对象。名称标题有两个子标题,因此跨越两列。这是通过表条目的 ColSpan 属性设置的。地址标题没有任何子标题,因此它跨越两行。这是通过表条目的 RowSpan 属性设置的。
r = TableRow;
r.Style = [r.Style mainHeaderRowStyle];
p = Paragraph("Name");
p.Style = [p.Style mainHeaderTextStyle {HAlign("center")}];
te = TableEntry(p);
te.ColSpan = 2;
append(r, te);

p = Paragraph("Address");
p.Style = [p.Style mainHeaderTextStyle];
te = TableEntry(p);
te.RowSpan = 2;
append(r, te);
append(t, r);
在表中为姓名的第一个和最后一个子标题创建第二行。尽管表有三列宽,但第二行仅包含两个条目,因为地址字段跨越第一行和第二行。
r = TableRow;
r.Style = [r.Style subHeaderRowStyle];
p = Paragraph("First");
p.Style = [p.Style subHeaderTextStyle];
te = TableEntry(p);
append(r, te);

p = Paragraph("Last");
p.Style = [p.Style subHeaderTextStyle];
te = TableEntry(p);
append(r, te);
append(t, r);
循环遍历示例数据将其添加到表中。
for k = 1:size(data, 1)
    r = TableRow;
    r.Style = [r.Style bodyStyle];
    te = TableEntry(data{k,1});
    append(r, te);
    te = TableEntry(data{k,2});
    append(r, te);
    te = TableEntry(data{k,3});
    append(r, te);
    append(t, r);
end
将表添加到文档中。
append(rpt, t);
正式表
此示例显示如何在 DOM 正式表对象中使用行和列跨越来创建下表。

正式表是由三个子表组成的表,分别为表的表头、表体和表尾部分。使用正式表代替非正式表将需要特殊格式的表头与数据分开,数据可以直接传递给正式表构造函数以填充正文表。
导入 DOM 命名空间,这样您就不必使用长而完全限定的类名。
import mlreportgen.dom.*移动到现有文档中的新页面并添加标题来描述表。
br = PageBreak();
append(rpt, br);
h = Heading(1, ...
    "Multiple Row and Column Table Entries Using a Formal Table");
h.Style = [h.Style {HAlign("center")}];
append(rpt, h);
为不同文档组件要使用的样式创建元胞数组。包含的表跨越页面的宽度,并且各条目之间有实线分隔。主标题是钢蓝色,副标题是较浅的天蓝色。
tableStyle = {Width("100%"), ...
    Border("solid"), ...
    ColSep("solid"), ...
    RowSep("solid")};
mainHeaderRowStyle = {VAlign("middle"), ...
    InnerMargin("2pt", "2pt", "2pt", "2pt"), ...
    BackgroundColor("steelblue")};
mainHeaderTextStyle = {Bold, ...
    OuterMargin("0pt", "0pt", "0pt", "0pt"), ...
    FontFamily("Arial")};
subHeaderRowStyle = {VAlign("middle"), ...
    InnerMargin("2pt", "2pt", "2pt", "2pt"), ...
    BackgroundColor("skyblue")};
subHeaderTextStyle = {Bold, ...
    OuterMargin("0pt", "0pt", "0pt", "0pt"), ...
    FontFamily("Arial")};
bodyStyle = {OuterMargin("0pt", "0pt", "0pt", "0pt")};
创建一些示例数据以包含在表中。然后,使用 Body 部分中的示例数据创建一个 FormalTable 对象。
data = {"John", "Smith", "Natick, MA";
    "Jane", "Doe", "Boston, MA"};

t = FormalTable(data);
t.Style = [t.Style tableStyle];
t.Body.TableEntriesStyle = [t.Body.TableEntriesStyle, bodyStyle];
使用和上例同样的方法构造 FormalTable 对象的 Header 表。为包含姓名和地址标题的表的第一行创建一个 TableRow 对象。名称标题有两个子标题,因此跨越两列。这是通过表条目的 ColSpan 属性设置的。地址标题没有任何子标题,因此它跨越两行。这是通过表条目的 RowSpan 属性设置的。
r = TableRow;
r.Style = [r.Style mainHeaderRowStyle];
p = Paragraph("Name");
p.Style = [p.Style mainHeaderTextStyle {HAlign("center")}];
te = TableEntry(p);
te.Style = [te.Style mainHeaderTextStyle];
te.ColSpan = 2;
append(r, te);

p = Paragraph("Address");
p.Style = [p.Style mainHeaderTextStyle];
te = TableEntry(p);
te.Style = [te.Style mainHeaderTextStyle];
te.RowSpan = 2;
append(r, te);
append(t.Header, r);
在表中为姓名的第一个和最后一个子标题创建第二行。尽管表有三列宽,但第二行仅包含两个条目,因为地址字段跨越第一行和第二行。
r = TableRow;
r.Style = [r.Style subHeaderRowStyle];
p = Paragraph("First");
p.Style = [p.Style subHeaderTextStyle];
te = TableEntry(p);
append(r, te);

p = Paragraph("Last");
p.Style = [p.Style subHeaderTextStyle];
te = TableEntry(p);
append(r, te);
append(t.Header, r);
将表添加到文档中。
append(rpt, t);
页面布局表
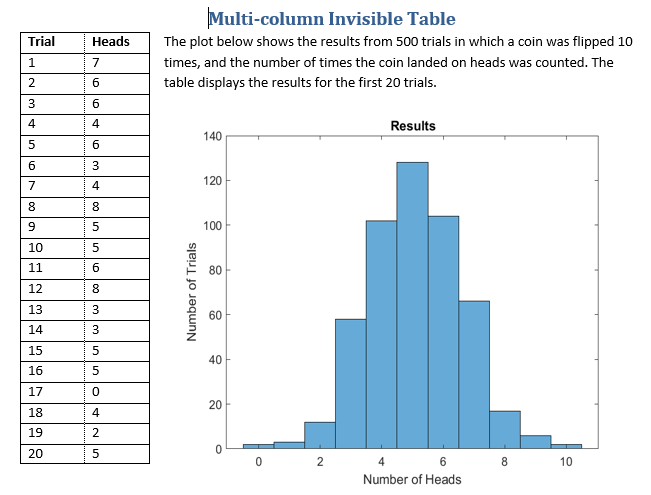
此示例显示如何使用行和列跨越为复杂布局创建不可见的页面布局表。

导入 DOM 命名空间,这样您就不必使用长而完全限定的类名。
import mlreportgen.dom.*移动到现有文档中的新页面并添加标题来描述表。
br = PageBreak();
append(rpt, br);
h = Heading(1, "Multi-column Invisible Table");
h.Style = [h.Style {HAlign("center")}];
append(rpt, h);
确定页面上不同组件的样式。主表是不可见的,因此它没有边框或分隔符。
mainTableStyle = {...
    Width("100%"), ...
    Border("none") ColSep("none"), ...
    RowSep("none")};
dataTableStyle = {Border("solid"), ...
    ColSep("dotted"), ...
    RowSep("solid"),...
    OuterMargin("0pt", "0pt", "0pt", "0pt")};
dataTableEntriesStyle = {...
    OuterMargin("0pt", "0pt", "0pt", "0pt"), ...
    VAlign("middle")};
histStyle = {InnerMargin("2pt", "2pt", "2pt", "2pt"), ...
    HAlign("center"), ...
    VAlign("bottom"), ...
    Width("5in"), ...
    Height("4in")};
创建代表 500 次随机抛硬币的示例数据。然后,创建 Text、FormalTable 和 Image 对象来显示有关数据的信息。
coinflips = randi(2, [500, 10]);
numHeads = sum(coinflips-1,2);

p = Text("The plot below shows the results from 500 trials" + ...
    "in which a coin was flipped 10 times, and the number of " + ...
    "times the coin landed on heads was counted. The table " + ...
    "displays the results for the first 20 trials.");

dataHeader = {"Trial", "Heads"};
dataBody = [(1:20)', numHeads(1:20)];
dataTable = FormalTable(dataHeader, dataBody);
dataTable.TableEntriesStyle = ...
    [dataTable.TableEntriesStyle dataTableEntriesStyle];
dataTable.Header.Style = [dataTable.Header.Style {Bold}];
dataTable.Style = [dataTable.Style dataTableStyle];

histogram(numHeads);
title("Results")
xlabel("Number of Heads")
ylabel("Number of Trials")
saveas(gcf,"histogram_img.png");
close(gcf)
h = Image("histogram_img.png");
创建不可见表并开始添加组件。将数据表添加到第一行,并指定跨越两行。
t = Table(2);
t.Style = [t.Style mainTableStyle];

row1 = TableRow;
row1.Style = [row1.Style {Width("100%")}];
entry1 = TableEntry;
append(entry1, dataTable);
entry1.RowSpan = 2;
entry1.Style = [entry1.Style {Width("40%")}];
append(row1, entry1);
将文本对象也添加到第一行,然后将该行追加到表中。
entry2 = TableEntry(p);
entry2.Style = [entry2.Style {Width("60%")}];
append(row1, entry2);

append(t, row1);
创建新行并添加直方图图像作为唯一条目。数据表已经填充了第一行和第二行的第一列,因此直方图将放在第二列。
row2 = TableRow;
entry3 = TableEntry;
h.Style = [h.Style histStyle];
append(entry3, h);
append(row2, entry3);
entry3.Style = [entry3.Style {Width("60%")}];

append(t,row2);
生成并显示报告。
append(rpt,t);
close(rpt);
rptview(rpt);