Read Acceleration Data from MMA8451Q 3-Axis Digital Accelerometer Using I2C
This example shows how to use Simulink® Coder™ Support Package for NXP™ FRDM-KL25Z Board to control the color of the RGB LED based on the orientation of the board.
Introduction
Simulink Coder Support Package for NXP FRDM-KL25Z Board enables you to create and run Simulink models on a FRDM-KL25Z Board.
In this example, you will learn how to communicate with the onboard MMA8451Q Digital accelerometer, which has an I2C interface with the NXP FRDM-KL25Z board. For more details about the sensor, refer to the MMA8451Q datasheet. This example shows how to program the FRDM-KL25Z board to control the color of the RGB LED based on the orientation of the board.
Prerequisites
We recommend completing Getting Started with Simulink Coder Support Package for NXP FRDM-KL25Z Board.
Required Hardware
To run this example you will need the following hardware:
NXP FRDM-KL25Z Board
Task - Configure and Run the I2C Based Accelerometer Model.
1. Plug in a Mini USB cable from a USB port on the host machine to the OpenSDA mini-B USB connector on the FRDM-KL25Z board.
2. Open the I2C based accelerometer model.
open_system('freedomboard_i2c');

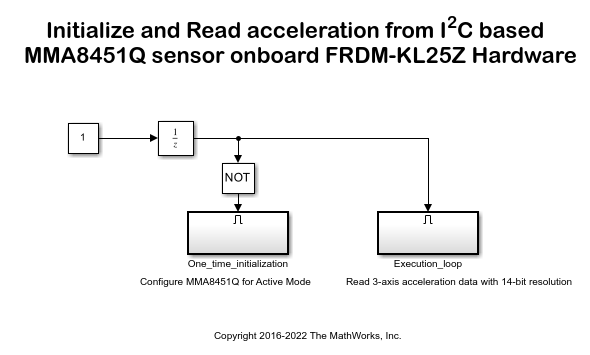
3. Notice the two subsystems in the model:
The One_time_initialization subsystem activates the MMA8451Q sensor.
The Execution_loop subsystem reads the 14-bit acceleration data and sets the color and intensity of the RGB led based on the orientation.
The One_time_initialization subsystem executes only once at the first step of the execution of the model. For the rest of the execution time, the Execution_loop subsystem runs. This selective execution of subsystems is handled using the Unit Delay and the Enabled Subsystem blocks from the Simulink library.
4. Configure the I2C Controller Write block:
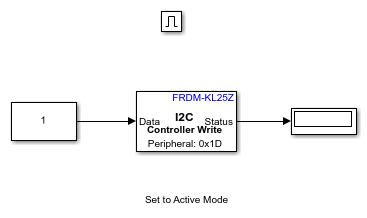
The sensor is set to active mode by setting the ACTIVE bit of CTRL_REG1 register to '1' according to MMA8451Q datasheet.
Open the One_time_initialization subsystem.
open_system('freedomboard_i2c/One_time_initialization')

Open the I2C ControllerWrite block.
The onboard MMA8451Q sensor is connected to the I2C Module of the processor via the pins PTE24 (SCL) and PTE25 (SDA). As seen in the FRDM KL25Z schematics that these pins belong to I2C module 0. Hence, set the I2C module to 0.
Notice that the Peripheral address is set to '0x1D' and Peripheral register address is set to '0x2A'. It can be seen in the MMA8451Q datasheet that '0x1D' is the peripheral address of the device and '0x2A' is the address of the register CTRL_REG1.
Set the Peripheral byte order to BigEndian.
Notice that the Constant block holds the value '1' to be written to the CTRL_REG1 register, which activates the sensor.
5. Configure I2C Module 0:
Choose the above SDA and SCL pins for the I2C module in Configuration Parameters > Hardware Implementation > Target Hardware Resources > I2C0 > SCL/SDA Pin.
6. Configure the I2C Controller Read block:
Open the Execution_loop subsystem.
open_system('freedomboard_i2c/Execution_loop')

In the Execution_loop subsystem, three I2C Controller Read blocks are used to read the data from the registers that contain the X-axis, Y-Axis and Z-axis output sample data.
Open any of the three I2C Controller Read blocks. As mentioned for the I2C Controller Write block, set the I2C module to 0 and Peripheral address to '0x1D'.
It can be seen in the MMA8451Q datasheet that '0x01', '0x03' and '0x05' are the register addresses of the X-axis, Y-axis and Z-axis MSB data. Notice that the Peripheral register address of the I2C Controller Read blocks is set to the above hex values respectively.
These registers, by default, output the left justified 14-bit output sample data in 2's complement form. The MMA8451Q sensor stores data in BigEndian format. Hence select the Peripheral byte order to 'BigEndian', Data size (N) to 1 and Data type to 'int16'. By setting the Sample time to 0.1 initiates an I2C read request every 0.1 second.
7. The x-accel2brightness inside the Execution_loop subsystem, takes the raw X-axis acceleration data from the I2C ControllerRead block as input, converts it and outputs an equivalent duty cycle for the Red Led. Similarly, the y-accel2brightness subsystem and the z-accel2brightness subsystem output the duty cycle for the Green and Blue LEDs.
8. In the Simulink model, click the Build Model button on the toolbar.

9. When the model starts running on the NXP FRDM-KL25Z board, observe that the color of the RGB LED varies according to the orientation of the board.
Other Things to Try
Experiment with other features of the MMA8451Q sensor. For example:
Set the Single, Double and Directional Tap registers appropriately to detect a tap on the accelerometer.
Use the Auto-WAKE/SLEEP detection modes of the sensor, to glow the LED only when the FRDM-KL25Z board is shaken.