App-Based Time-Varying Satellite Link Budget Analysis
This example shows how to analyze and visualize a time-varying satellite link budget, and export the results, using the Satellite Link Budget Analyzer app.
Open Satellite Link Budget Analyzer App
To open the Satellite Link Budget Analyzer app, on the Apps tab of the MATLAB® Toolstrip, under Wireless Communications, click the Satellite Link Budget Analyzer app icon. On the app toolstrip, select New Session to view the modes in which you can start a new session. You can choose one of these modes:
Static Link Budget Analyzer — Design and analyze the link budget for static satellites.
Time-Varying Link Budget Analyzer — Design and analyze the link budget for satellites moving in their orbits. In this mode, you can specify the start and stop time for the simulation. The app also enables you to add or remove satellites, ground stations, transmitters, receivers, or gimbals from the scenario, or import your own scenario.
Select Time-Varying Link Budget Analyzer.
Add Satellites and Ground Stations
To modify a default or custom scenario, use the buttons in the Edit Scenario section of the toolstrip.
Select Add to view the options for what you can add to the scenario, such as satellites or ground stations. Select Satellite.
Add Satellite
You can add satellites from a TLE file or by specifying their orbital elements.
By default, if you add a satellite by entering orbital elements in the Add Satellite dialog box, the app automatically creates:
A default transmitter mounted on a gimbal
A default receiver mounted on a gimbal
You can edit the parameters of the default transmitter, receiver, and gimbal in the Transmitter and Gimbal Properties and Receiver and Gimbal Properties sections of the Add Satellite dialog box during satellite creation.
Add Ground Station
In the Edit Scenario section of the toolstrip, select Add > Ground Station.
To add a ground station in the Add Ground Station dialog box, you must specify its latitude, longitude, and altitude. Similar to adding a satellite, the app automatically creates a default transmitter and receiver, both mounted on gimbals, by default.
Similarly to the transmitter, receiver, and gimbals of satellites, you can edit the parameters of these default elements for ground stations in the Add Ground Station dialog box during ground station creation.
To apply visibility mask constraints on ground stations for more precise analysis, configure MaskElevationAngle and MaskAzimuthEdges parameters in the dialog box.
Add Transmitters, Receivers, and Gimbals
In addition to adding transmitters, receivers, and gimbals during satellite and ground station creation, you can add them directly to the scenario. In the Edit Scenario section of the toolstrip, select Add, and then select either Transmitter or Receiver.
Add Transmitter and Receiver
You can add a transmitter or receiver to a gimbal, ground station, or satellite by specifying its parameters in the Add Transmitter or Add Receiver dialog box, respectively.
When you add a transmitter or a receiver, by default, the app selects
gaussianAntennaobject from Satellite Communications Toolbox. However, you can set the Antenna parameter to Antenna Object and specify an antenna object from the MATLAB workspace, created using Antenna Toolbox™ or Phased Array System Toolbox™.You can configure the mounting location and mounting angle for both transmitters and receivers, along with other properties.
Add Gimbal
The Add Gimbal dialog box enables you to attach the gimbal to any satellite or ground station, and specify its mounting location and angle.
You can modify a scenario by removing selected components from it, or clear the scenario browser entirely and create an empty satellite scenario, by selecting Delete and Clear Scenario, respectively, in the Edit Scenario section of the toolstrip.
Create Links
The Create Links button in the Edit Scenario section of the toolstrip enables you to create link capability for the transmitters and receivers in the scenario.
You can configure the steering of these entities to point them at a desired target, such as a satellite, a gimbal, or a phased array antenna mounted on a transmitter or receiver.
After configuring the properties of satellites, ground stations, and links during creation, you can update them at any time using the bottom-left pane of the app.
P.618 Propagation Losses
Select the P.618 Losses checkbox in the Edit Scenario toolstrip section to analyze link availability with P.618 propagation data and prediction methods, defined in Recommendation ITU-R P.618.
In the Link Budget pane, the table gains two new columns, Rain Attenuation and Total Atmospheric Losses. The app also updates the results in the RIP, C/No, Eb/No, and Margin columns to include atmospheric losses.
Import Custom Scenario
The app enables you to import an entire scenario directly, instead of adding individual entities through the app toolstrip.
Model a customized scenario using the satelliteScenario object. Save the custom scenario as a MAT file, and import it into the app, or directly import the scenario from the MATLAB workspace. Use the Import Scenario button on the toolstrip to import a custom scenario in the app. For an example of how to model and import a custom satellite scenario, see Import Custom Scenario into Time-Varying Satellite Link Budget Analyzer.
You can still modify an imported custom scenario using the options in the Edit Scenario section of the toolstrip.
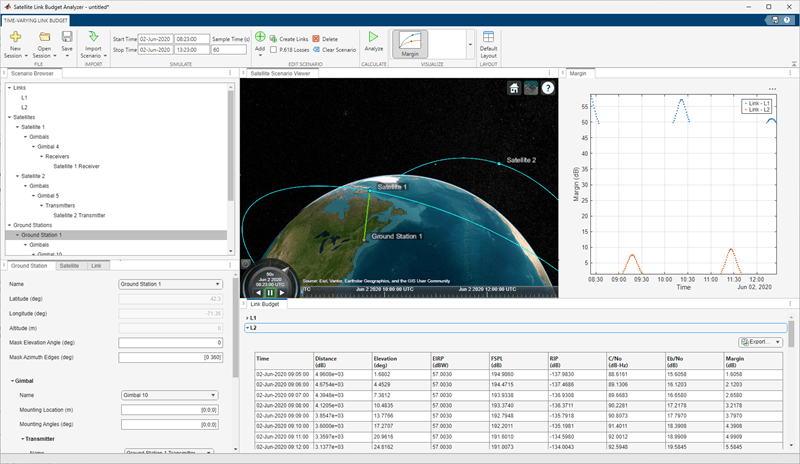
Analyze and Visualize Time-Varying Satellite Link Budget Results
To start the link budget analysis, click Analyze in the Calculate section of the app toolstrip.
By default, the results in the Link Budget pane include distance, elevation, transmit effective radiated power (EIRP), free-space path loss (FSPL), received isotropic power (RIP), C/N₀, Eb/N₀, and overall link margin, calculated over time as the satellite moves.
The app supports these two visualizations.
Satellite Scenario Viewer pane — Visualizes a 3-D scenario showcasing the orbiting satellites, ground stations, and links.
Margin pane — Displays a 2-D link margin plot.
This image shows a custom scenario with two satellites, two ground stations, and links between each ground station and its corresponding satellite.
Export Analysis Results
When the analysis is complete, you can export the link budget results to your workspace or an Excel spreadsheet. To export the results, in the Link Budget pane click Export, and select either Export table to workspace or Export table to .xlsx to export to the MATLAB workspace or an Excel file, respectively.
See Also
Apps
Objects
Functions
satellite|gimbal|receiver|transmitter|groundStation|link