Merge SimBiology Models
When comparing two SimBiology® models using the Comparison Tool, you can merge changes from one model to the other. Merging changes can be useful when resolving conflicts between different versions of the same model, for instance. If the models contain diagram (graphical) information, the comparison results include differences for the model diagrams, which you can also merge. For more information about the Comparison Tool, see Compare Files and Folders and Merge Files.
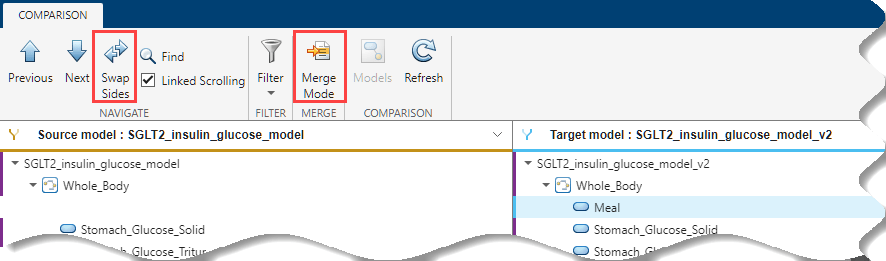
Enable Merge Mode
Start by comparing two SimBiology models in the Comparison Tool. By default, the Comparison Tool makes a copy of the target (right) model and uses it as the starting point for the merged model. To use the source (left) model instead, click Swap Sides on the toolstrip. You can only swap sides before entering the merge mode. To start merging the differences, click Merge Mode.
After you enable the merge mode, the tool creates three models: The Source model (left), Target model (right), and Merged model (below). The tool organizes the comparison (diff) results and merge choices into three tables: the Diff table, Merged Model Table, and Property Merge Table.
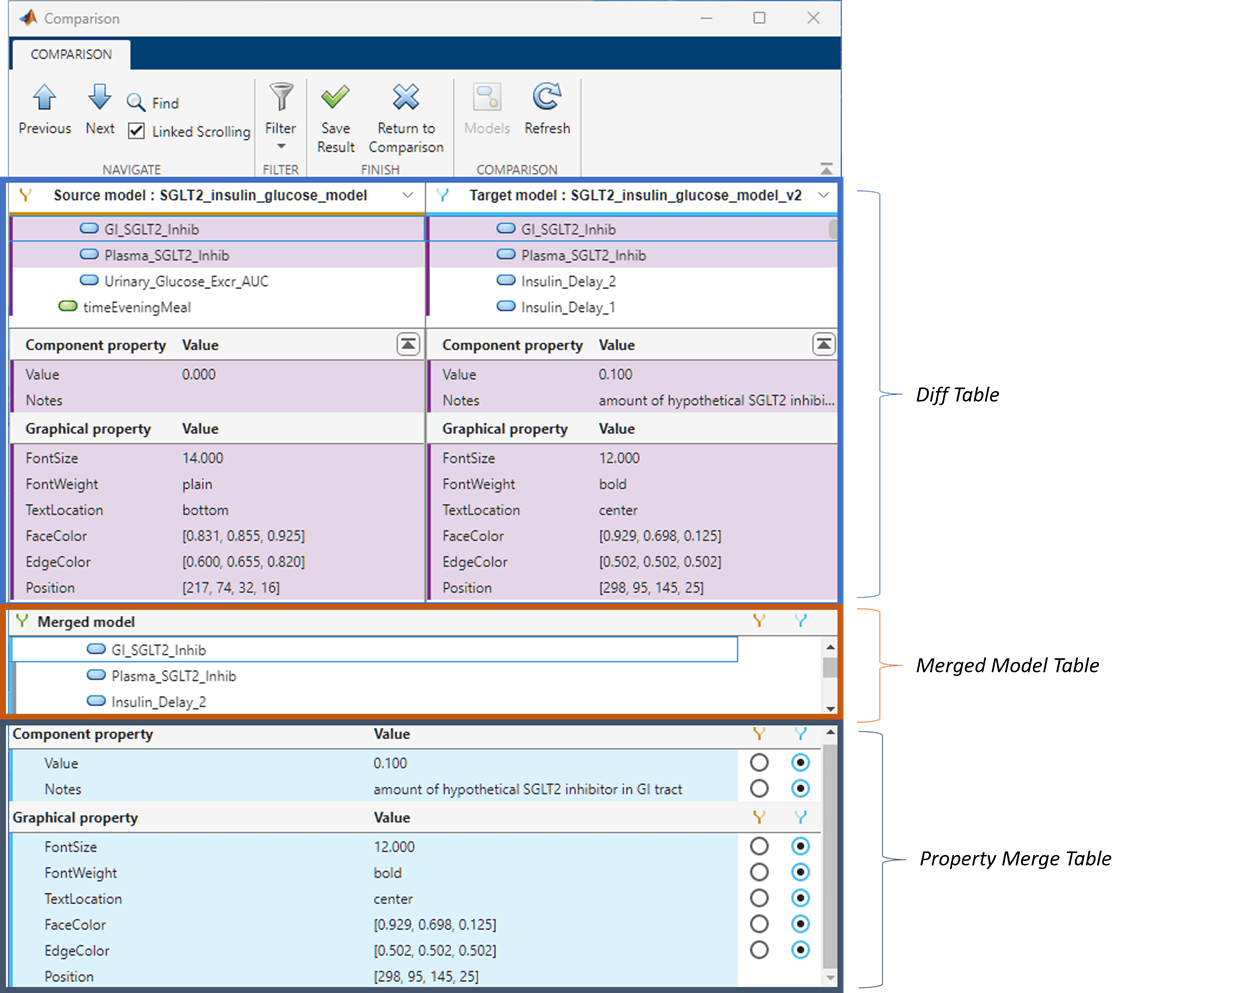
Diff Table
Use the Diff Table to see the differences between the source model and target model. The table shows the insertion, deletion, and modification of model components.
For instance, the Diff Table in the previous figure shows
the modification of the GI_SGLT2_Inhib species, where the
target model has different values for the Value, Notes, and graphical
properties.
Merged Model Table
Use the Merged Model Table to select which model component from the source or target model to use in the merged model.
Property Merge Table
The Property Merge Table shows properties for the model component selected in the Diff Table or Merged Model Table. Use this table to select which modified property values of a model component from the source or target model to use in the merged model.
Merge Model Components and Property Values
When working in the merge mode, you can step through each change by using the Next button on the toolstrip.
The first time you click Next, the tool selects the first changed component in the Diff Table.
The currently selected row is indicated by a light blue border in both the Diff Table and the Merged Model Table. For instance, the next figure shows that a modified event is currently selected.
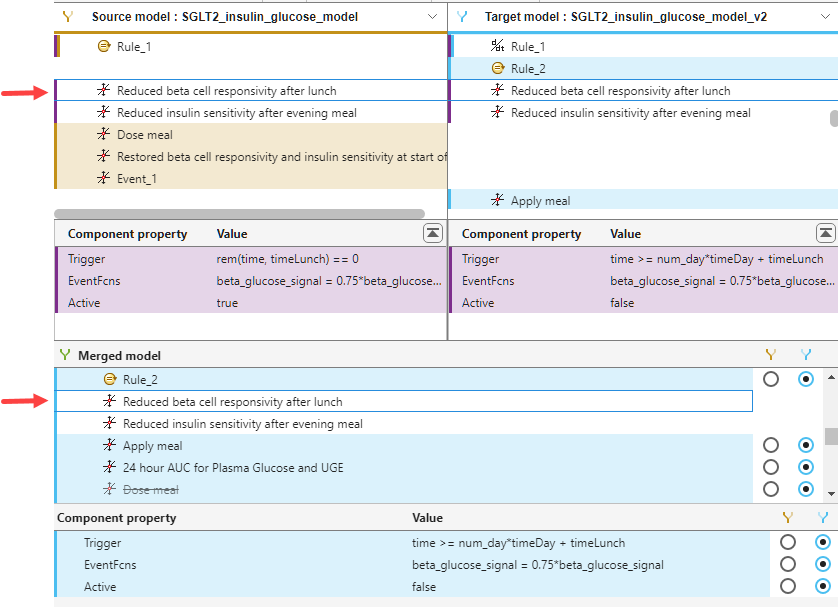
For each change, you can decide whether to select the change from the source or the target model to use in the merged model. To do so, click the corresponding button in the Merged Model Table or Property Merge Table.

The Merged Model Table enables you to make insertion and deletion selections. The Property Merge Table lets you select property value modifications for a model component.
After resolving the changes, click Save Result on the toolstrip to save the merged model in a new SimBiology project SBPROJ. The tool does not change the source and target models.
Note
The SimBiology Comparison Tool does not include annotation blocks in the comparison results.
Merging Tip
When you merge two models that have several differences between them, use the filtering options to focus the merge tables to changes of interest. To see the options, click the Filter button on the toolstrip.
By default, the Comparison Tool hides unchanged properties, dependent changes, and unchanged components. The Filter menu provides additional criteria to fine-tune the results. For example, you can hide the quantity-based components (compartment, species, and parameters), expression-based components (reactions, rules, events, and observables), and graphical changes.
Side Effects of Merging
Merging components and their properties, especially the rename or move action of components, might have side effects or dependent changes on the properties of other components. For example, if you choose a different name for a species, any expressions that reference the species are updated to use the new species name. Some examples of dependent changes from merging include the following.
The software inserts the children of an inserted component.
If the parent component of an inserted component does not exist, the software also inserts the parent, but not the other children of the parent.
Moving a model component from one parent to another could result in duplicate names, which are resolved automatically. For details, see Guidelines for Naming Model Components (the Warning section).
If a reaction rate is determined by a kinetic law, merging the ReactionRate property of the reaction changes the KineticLaw property, and vice versa.
When the source model has diagram information but the target model does not, the software creates a diagram of the merged model based on the diagram information of the source model.
Some properties, such as dependent changes, cannot be merged. The software also
collapses cloned blocks into a single block in the merged model. A merged species
block has the Position and Pin properties
of the first cloned block. Lines in the merged model are the same color as the line
to the first cloned block.
See Also
sbiodiff | SimBiology.DiffResults | getComponents | visdiff