Shift Pitch of Audio Signal Using Raspberry Pi
This example shows you how to shift the pitch of an audio signal on Raspberry Pi® hardware by using a MATLAB Function block with the Simulink® Support Package for Raspberry Pi Hardware.
In this example, you will learn how to:
Acquire audio from a USB microphone or a webcam microphone connected to the Raspberry Pi hardware.
Shift the pitch of the acquired audio using the MATLAB Function block.
Play the processed audio data through the headphone jack of the Raspberry Pi hardware.
Pitch Shifting
Pitch shifting is the ability to modify the pitch of an audio signal to either increase or decrease the pitch. For example, when a fast car passes you in the street, the pitch of the sound from the car increases as the vehicle approaches you and decreases as the vehicle moves away from you. As the source of the audio moves closer or further away from the receiver, the successive signals reach the receiver at either smaller or larger intervals of time. This time difference causes change in the frequency of the audio being heard by the receiver. You can perform a similar pitch-shifting operation by splitting an audio signal into two components, delaying the signals using varying time periods, and then adding them back together. This process simulates the effect of either increasing or decreasing the pitch depending on how the two signals are delayed or overlapped. To ensure uniform power levels, the individual gains for the split signals must be modulated.
Required Products
Virtual network computing (VNC) viewer (optional)
Required Hardware
Raspberry Pi hardware (Model 3B or 3B+ recommended)
Audio capture device: USB microphone or webcam microphone
A pair of headphones that can be plugged into the 3.5 mm headphone jack of the hardware
USB cable
Ethernet cable
A monitor connected to the Raspberry Pi hardware and an HDMI cable (optional)
Step 1: Connect Raspberry Pi Hardware for Pitch Shift
Before you start this example, we recommend you complete the Get Started with Simulink Support Package for Raspberry Pi Hardware example.
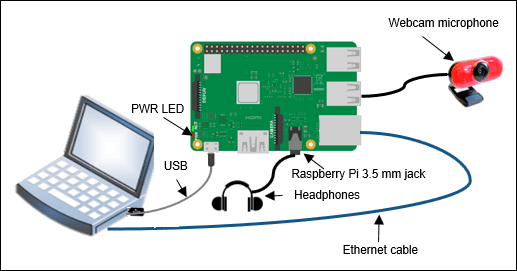
1. Connect the micro-USB end of the USB cable to the Raspberry Pi and the regular USB end of the USB cable to the computer. Wait until the PWR LED on the hardware starts blinking.
2. Connect the webcam or the microphone to one of the USB ports on the hardware. Note that some webcams draw too much power and may require a powered USB hub for proper operation.
3. Connect a pair of headphones to the 3.5 mm headphone jack of the hardware.
4. Using the Hardware Setup screen, configure the Raspberry Pi network.

Step 2: Change Audio Output Mode to Headphone Jack
1. In the hardware terminal, execute this command to open the Software Configuration Tool of the hardware.
sudo raspi-config
2. In the Software Configuration Tool Window, select Advanced Options and press Enter, then select Audio and press Enter.
3. Select the Force 3.5mm ('headphone') jack option and press Enter.
4. Press OK.
Step 3: Open Pitch Shift Simulink Model
Open the raspberrypi_pitchshift Simulink model.

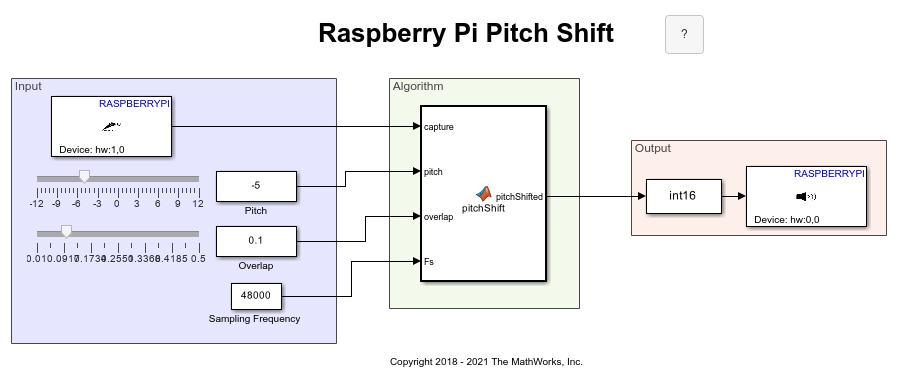
The model is divided into these areas based on the functionality of the blocks in each area.
Audio Input
The ALSA Audio Capture block captures live audio from the microphone connected to the hardware. Double-click the block and specify the name of the device to capture the audio data in the Device name parameter. If you do not know the name of the device, use the listAudioDevices
If you want to capture audio from an audio file saved in your computer, replace the Audio Capture block by an Audio File Read block and then specify the name of the audio file in the File Name parameter of the block.
Pitch Shift Algorithm
This section includes a MATLAB Function block that implements the delay-based pitch shift algorithm on the acquired audio data.
The inputs to the function block are:
capture: The output of the ALSA Audio Capture block as an N-by-C matrix, where N is the samples per audio channel, and C is the number of channels supported by the microphone.
pitch: The pitch shift in semi-tones ranging from
-12to12.overlap: The overlap of the delay line between the two split components. The value ranges from
0.01to0.5.Fs: The sampling frequency of audio data.
resetFlag: A variable to reset the operation of the
pitchShiftfunction. In this example, the flag is0indicating that the function is not reset.
Audio Output
The ALSA Audio Playback block sends the processed audio to the headphones connected to the hardware. Double-click the block and specify the name of the audio output device in the Device name parameter. If you do not know the name of the device, use the listAudioDevices
Step 4: Configure Pitch Shift Simulink Model
1. To open the Model Configuration Parameters dialog box, click the gear icon on the Simulink model toolbar.
2. In the Configuration Parameters dialog box, select Hardware Implementation.
3. Set the Hardware board parameter to Raspberry Pi. This selection automatically populates the parameters in the Hardware board settings with the default values for Raspberry Pi.
4. In the Hardware board settings pane, expand Target hardware resources and select Board Parameters. Specify these parameter values:
Device Address: The IP address or host name of the hardware.
Username: Specify the root user name of the Linux® system running on the hardware. The default user name of the Raspian Linux distribution is
pi.
Password: Specify the root password of the Linux system running on the hardware. The default password of the Raspian Linux distribution is
raspberry.
5. Click Apply. Click OK to save your changes.
Step 5: Deploy Pitch Shift Simulink Model on Raspberry Pi Hardware
On the Hardware tab of the Simulink model, in the Mode section, select Run on board and then click Build, Deploy & Start. The lower-left corner of the model window displays status while the support package generates the code. After successfully generating the code, the support package loads and runs the code on the hardware. The executable starts acquiring live audio from the audio device, shifts the pitch of the acquired audio, and then plays the processed audio through the audio jack of the hardware. You can now hear the pitch-shifted audio through the pair of headphones connected to the hardware.
You can also run this model in external mode to tune the pitch and overlap parameter values in the model and observe the changes in the characteristics of the output audio during simulation.
Other Things to Try
Replace the pitch shift algorithm with any other algorithm that has better performance with respect to your requirements.
Add a low-pass infinite impulse response (IIR) filter to the model to improve the performance of the algorithm.
See Also
Spatialize Monaural Audio into 5.1 Channel Surround Sound Using Raspberry Pi