Trigger Downstream Function-Call Subsystem Using Raspberry Pi External Interrupt Block
This example shows how to use the Simulink® Support Package for Raspberry Pi® Hardware to trigger a downstream function-call in the connected IO mode and external mode of simulation (Monitor and Tune) using a Raspberry Pi External Interrupt block. This example provides two Simulink models, one each for connected IO mode and external mode of simulation, to show the capabilities of the External Interrupt block in each of the modes.
In the connected IO mode of simulation, the SimIRQ input port of the External Interrupt block is enabled to accept the inputs 0 and 1 from the manual switch. For SimIRQ input equal to 1 at the sample time, the downstream function-call subsystem is triggered.
In the external mode of simulation (Monitor and Tune), a pulse generator provides simulation to the Raspberry Pi board digital pin externally. For every rising edge of this input pulse signal, the downstream function-call subsystem is triggered.
Prerequisite
For more information on how to run a Simulink model on Raspberry Pi hardware, see the Get Started with Simulink Support Package for Raspberry Pi Hardware example.
Required Hardware
Raspberry Pi board
Micro USB cable
Connecting wires
Configure Simulink Model for Connected IO Mode
For the connected IO simulation mode, this example uses a preconfigured Simulink model from the Simulink Support Package for Raspberry Pi Hardware.
Open the raspberrypi_external_interrupt_sim Simulink model.

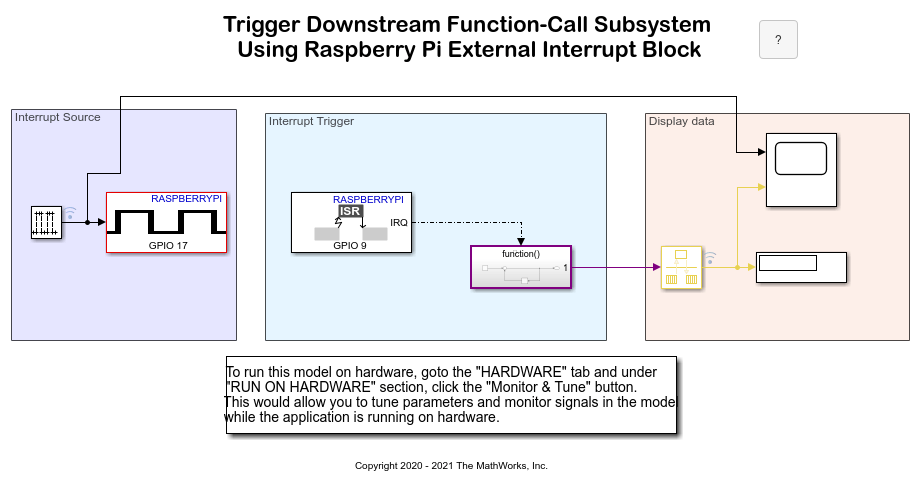
In the Interrupt Source area, you can use the Manual Switch to toggle between the Constant inputs 0 and 1. The output from the switch acts as a simulation to the SimIRQ input port of the External Interrupt block in the Interrupt Trigger area. The default position of manual switch is 0.
The External Interrupt block receives an input value of either 0 or 1 at each time step. When the input at the block port is 1, the block executes the function-call subsystem. For no input, the block triggers the downstream function-call subsystem until the simulation continues to run.
Configure the following parameters in the External Interrupt block:
1. Select the Add simulation input port parameter to enable the SimIRQ input port.
2. Select the Raspberry Pi Board. In this example, the Raspberry Pi 4 Model B board is used.
3. Select the digital input GPIO pin on the Raspberry Pi board to generate external interrupts. In this example, the parameter is set to its default value, 9.
4. Set the Pull mode parameter to Pull-up to set the GPIO pin 9 to logic high for no input detected on this pin.
5. Select the Edge selection mode to specify on which signal transitions, Rising, Falling, or Either of them, triggers the downstream function-call. In this example, the parameter is set to Rising. This means that the downstream function-call subsystem is triggered for every rising edge of the signal detected on the SimIRQ input port.
The Function-call Subsystem1 subsystem increments the value of the counter by 1 each time it is triggered at the sample time set in the Constant block.

The Display area consists of the Rate Transition, Scope, and Display blocks.
Configure the following parameter in the Rate Transition block:
1. Clear the Ensure deterministic data transfer (maximum delay option to ensure that the data transfer occurs when new data is available from the function-call output and the Display block is ready to receive the data. This avoids transfer delays, thus ensuring that the system operates with maximum responsiveness.
Run Simulink Model in Connected IO Mode
On the Hardware tab of the Simulink model, in the Mode section, select Connected IO and then click Run with IO.

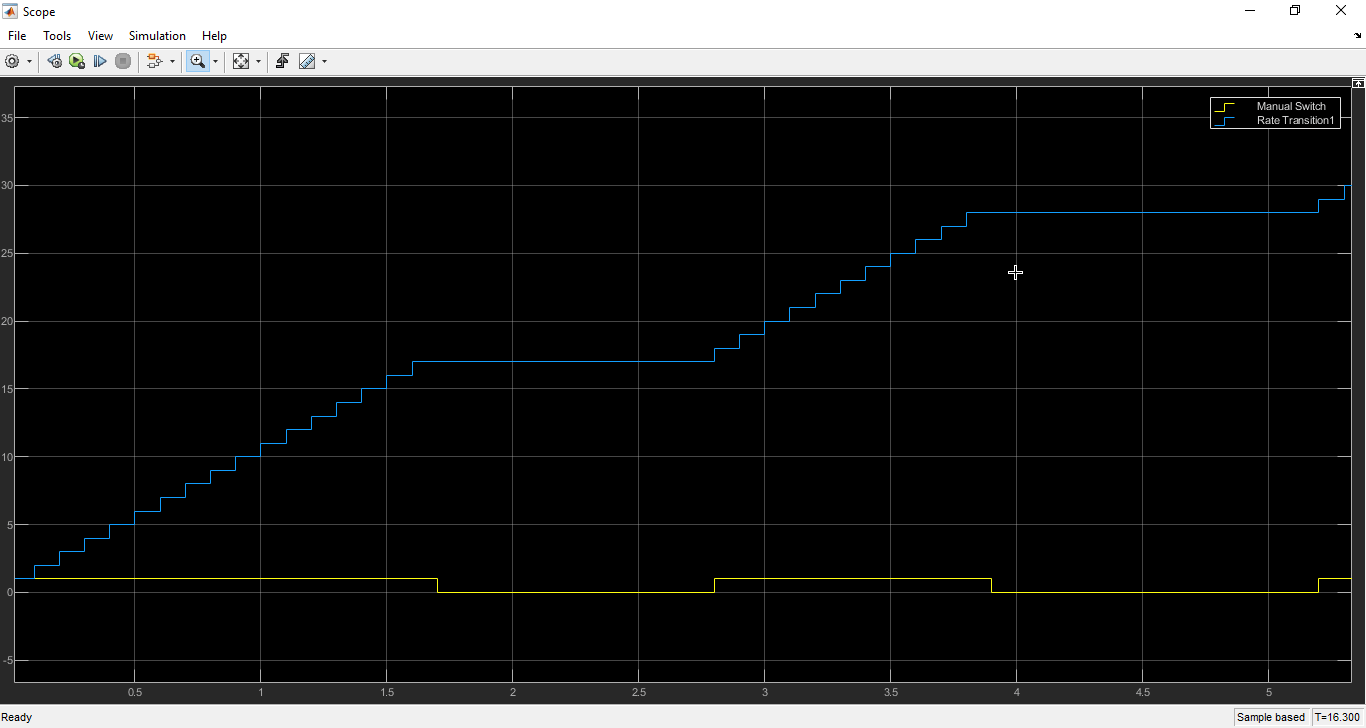
Observe the counter value being incremented in the Display block when the manual switch is at position 1. Also, observe that the counter value remains steady at the already incremented value when the manual switch is at position 0.
You can open the Scope and observe the manual switch output plotted against the rate transition block output.

You can also view the output of the manual switch and rate transition block output on the Simulation Data Inspector and Logic Analyzer.
Configure Simulink Model for External Simulation Mode (Monitor and Tune)
For the external simulation mode, this example uses a preconfigured Simulink model from the Simulink Support Package for Raspberry Pi Hardware.
Open the raspberrypi_external_interrupt Simulink model.

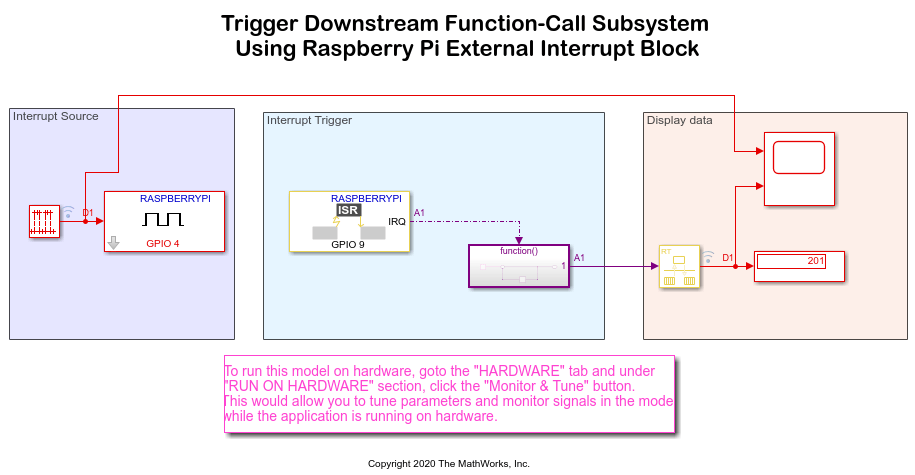
In the Interrupt Source area, a pulse generator provides pulses with constant amplitude and width to the External Interrupt block. Every rising edge of the pulse acts as an input to the External Interrupt block. These pulses are generated on the GPIO pin 4 of the Raspberry Pi board.
Connect the pulse generator pin 4 to the external interrupt pin 9 of the Raspberry Pi board.
Configure the following parameters in the Pulse Generator block:
1. Select the Sample based computation technique for the Pulse type parameter.
2. Set the Time(t) parameter to Use simulation time.
3. Set Amplitude to 1.
4. Set Period to 10.
5. Set Pulse width to 5.
6. Set Phase delay to 0.
Configure the External Interrupt block parameters to its default values. Ensure that the Add simulation input port option is cleared.
Run Simulink Model in External Simulation Mode (Monitor and Tune)
1. On the Hardware tab of the Simulink model, click Hardware settings.
2. In the Configuration Parameters dialog box, select Hardware Implementation > Target hardware resources > External mode.
3. Ensure to select the Run external mode in a background thread option to execute the Simulink model in a background thread.
4. On the Hardware tab of the Simulink model, in the Mode section, select Run on board and then click Monitor & Tune.

During simulation, the GPIO pin 4 generates pulses on pin 9 of the Raspberry Pi board. The pulses on pin 9 simulate an interrupt on every rising edge of the pulse signals.
Observe the increment of the counter values in Display block for every rising edge of the pulses. You can open the scope and observe the pulse generated output plotted against the rate transition block output.
You can notice a delay in the downstream function-call.
You can also view the output of the manual switch and rate transition block output on the Simulation Data Inspector and Logic Analyzer.

Other Things to Try
Observe the scope output for connected IO mode and external mode of simulation (Monitor and Tune) on the falling edge (set Mode to
Fallingin the External Interrupt block) as well as both rising and falling edge (set Mode toEitherin the External Interrupt block) of the simulation signal.For the external simulation mode, use a source block other than a Pulse Generator and observe the scope output.