Publish Data from Raspberry Pi Sense HAT to WebSocket Server
This example shows how to use Simulink® Support Package for Raspberry Pi® Hardware to publish the signals obtained from a Raspberry Pi Sense HAT to a WebSocket server, and read the data on a web browser in the WebSocket client.
Introduction
The Raspberry Pi Sense HAT is an add-on board for Raspberry Pi hardware. It has an 8X8 RGB LED Matrix, a five-position joystick, and includes the following sensors:
Humidity sensor
Pressure sensor
IMU sensor (accelerometer, gyroscope, and magnetometer)
WebSocket is a computer communications protocol, providing full-duplex communication channels over a single TCP connection. The WebSocket protocol enables the interaction between a web browser (or other client application) and a web server with lower overheads, facilitating real-time data transfer from and to the server. Most browsers support the WebSocket protocol, including Google Chrome®, Microsoft Edge®, Internet Explorer®, Firefox®, Safari®, and Opera®.
Simulink Support Package for Raspberry Pi Hardware enables you to publish data from the sensor signals of Sense HAT to a WebSocket server in JSON format. The support package library includes a Publish block that helps you to add up to 10 signals and configure the parameters required for connecting to a WebSocket server.
In this example, you will learn how to:
Configure the signals from the different sensors on Raspberry Pi Sense HAT to make it suitable to be used as the Signal input of Websocket Publish block
Configure the different parameters of Websocket Publish block
View the data on a sample web browser dashboard in a WebSocket client
Prerequisites
We recommend completing the Get Started with Simulink Support Package for Raspberry Pi Hardware example.
Required Hardware
To run this example, you need:
Raspberry Pi hardware
Raspberry Pi Sense HAT
Micro USB cable
Simulink Model
Open the raspberrypi_sensehat_dashboard Simulink model.

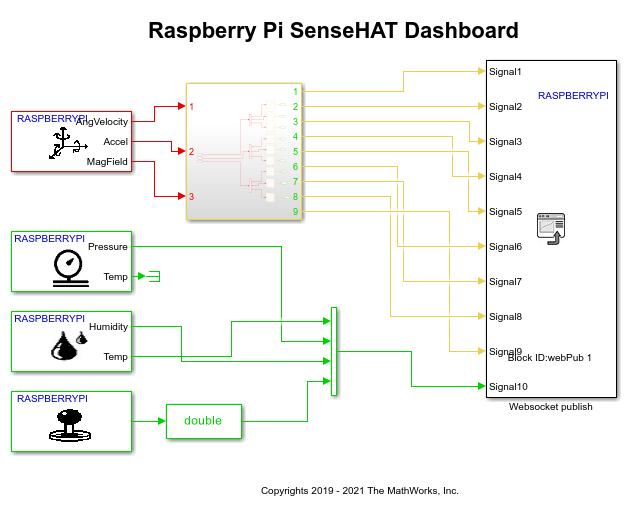
In this example model, we use four Sense HAT blocks from the Simulink library for Raspberry Pi hardware: LSM9DS1 IMU Sensor, LPS25H Pressure Sensor, HTS221 Humidity Sensor, and Joystick.
The output from these four blocks is split into ten signals and then connected to a Websocket Publish block:
The sample time of the LSM9DS1 IMU Sensor block is set to 0.01 seconds, and each of the output vectors (which correspond to the measured linear acceleration, angular velocity, and magnetic field) are connected to a subsystem that uses Buffer blocks. The Buffer blocks have the Output buffer size (per channel) parameter value set as 10. This ensures that the data samples can be plotted more accurately in a web browser in the WebSocket client.
The output signals from the LPS25H Pressure Sensor, HTS221 Humidity Sensor, and Joystick blocks are converted to a single signal using a Mux block, and this signal (a row vector) is connected to the Websocket Publish block.
Task 1 - Configure and Run Simulink Model
1. In the raspberrypi_sensehat_dashboard model, double-click the Websocket Publish block to open the block mask. Specify the following values for the parameters:
webPub 1 : A unique Block label to identify the signal data in the WebSocket server. You can change this value, if required.
192.168.0.100 : The Server IP address of the WebSocket server to which you want to publish the signal data. In this example, we use this private IP address because we are going to access the server in a private network.
9000 : The Server port of the WebSocket server that accepts the signals from this Websocket Publish block.
2. Complete the hardware connections:
Plug the Sense HAT module into the GPIO pins of the Raspberry Pi hardware.
Connect the host computer to Raspberry Pi hardware using the micro USB cable.
3. On the Hardware tab of the Simulink model, in the Mode section, select Run on board and then click Build, Deploy & Start.
The deployed model starts sending the signal data from the Sense HAT module to the WebSocket server in JSON format.
Task 2 - Access Signal Data from WebSocket Client
This task uses a web browser on the WebSocket client to read the JSON data. This example uses a local client on the host computer to read the data.
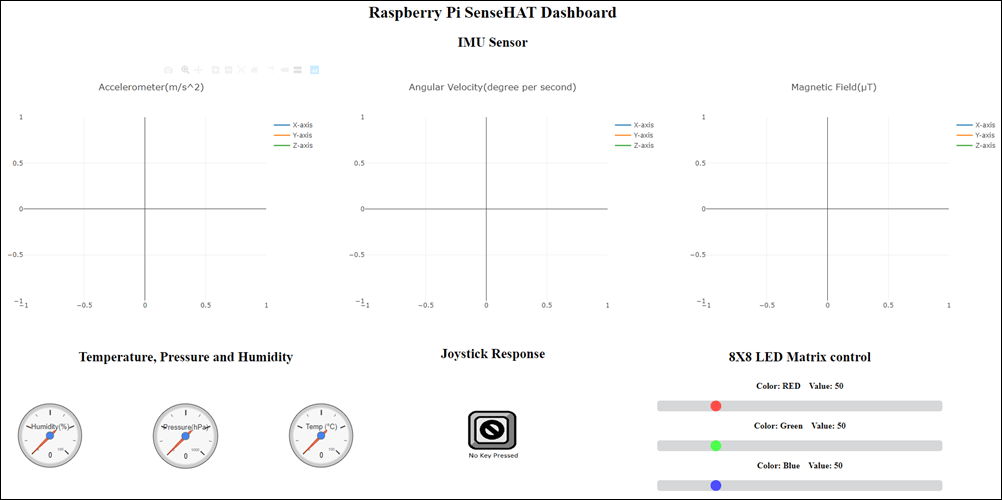
Simulink Support Package for Raspberry Pi provides a ready-to-use, JavaScript-based, web browser dashboard that can read data available in JSON format in a WebSocket server. To access this dashboard and open it in your default web browser, enter the following command at the MATLAB® command prompt:
web('Raspi_SenseHATDash.html', '-browser')Note: The preconfigured web browser dashboard is best viewed in a Google Chrome or Firefox browser.
The Raspberry Pi Sense HAT Dashboard is preconfigured using JavaScript to read JSON data from an IP address 192.168.0.100 and port 9000 (configured as the WebSocket server IP address and port in Task 1). Press F12 to view the source code of the HTML page, which explains how the dashboard has been built using JavaScript®.

While the model is running on the hardware, change the position or orientation of the hardware or press the Joystick on the Sense HAT in different directions. The values change in the dashboard.
Other Things to Try
Customize the dashboard on the WebSocket client and view the signal data.
Configure a different IP address for WebSocket Server and use the web browser on the WebSocket client to read the signal data.