Import C Compatible Rust Code into Simulink Using the Rust Importer Wizard
This example shows how to import C compatible external Rust® code into Simulink®. You can import the Rust code using the Rust Importer wizard from the Simulink Support Package for Rust Code.
In this example, the Rust code contains C compatible functions that performs arithmetic operations.
Note
This example does not generate Rust Code.
Prerequisites for Rust Importer Wizard
Install Simulink Support Package for Rust Code. For more information, see Install Simulink Support Package for Rust Code.
The Rust Importer wizard requires
cbindgen. After installing the support package, installcbindgenby entering this command in MATLAB® Command Window:! cargo install cbindgenAfter installation, you can verify that
cbindgenis available in your system path by running this command.! cbindgen --version
Rust Code Files
Before beginning the import process, check that the Rust crate meets all these requirements:
The crate is a library crate (binary crate is not supported) and it compiles into a static library with a C ABI.
The public functions are marked with:
no_mangleexternC
The external Rust code and Simulink interface uses only data types that have C equivalents.
Consider this Rust code.
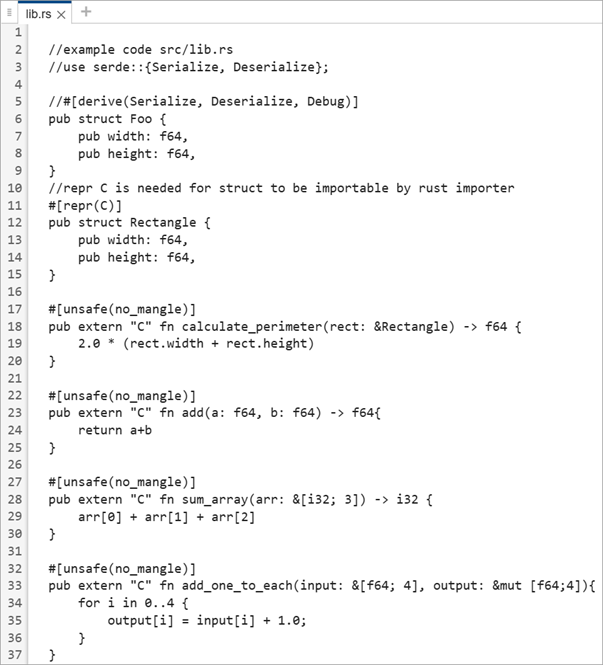
Import Rust Code
To import Rust code using the Rust Importer wizard:
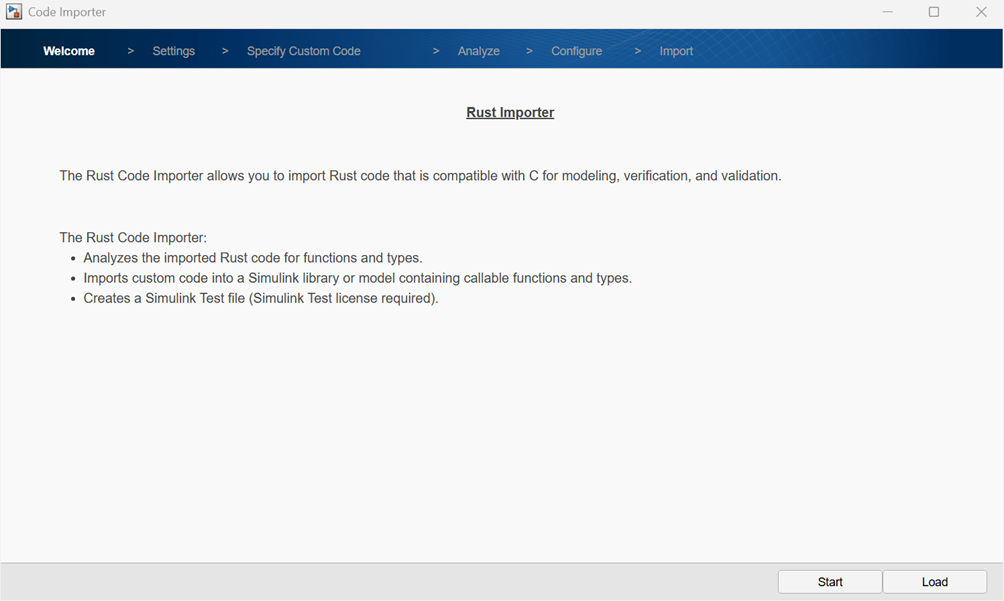
Open the Rust Importer wizard by creating an instance of the class
Simulink.RustImporterand calling theviewmethod.r = Simulink.RustImporter; r.view
On the Welcome page, click Start to begin the import process.
On the Settings page:
In the Library or model name text box, enter the name of the Simulink library or model that will contain the imported functions.
In the Output folder text box, specify the folder location where you want to save the library or the model. Use a period (
.) to save the output to the current folder.
Optionally, select Add generated library to the Simulink Library Browser to generate an
slblocks.mfile. Theslblocks.mfile is needed to add the generated library into the Simulink Library Browser.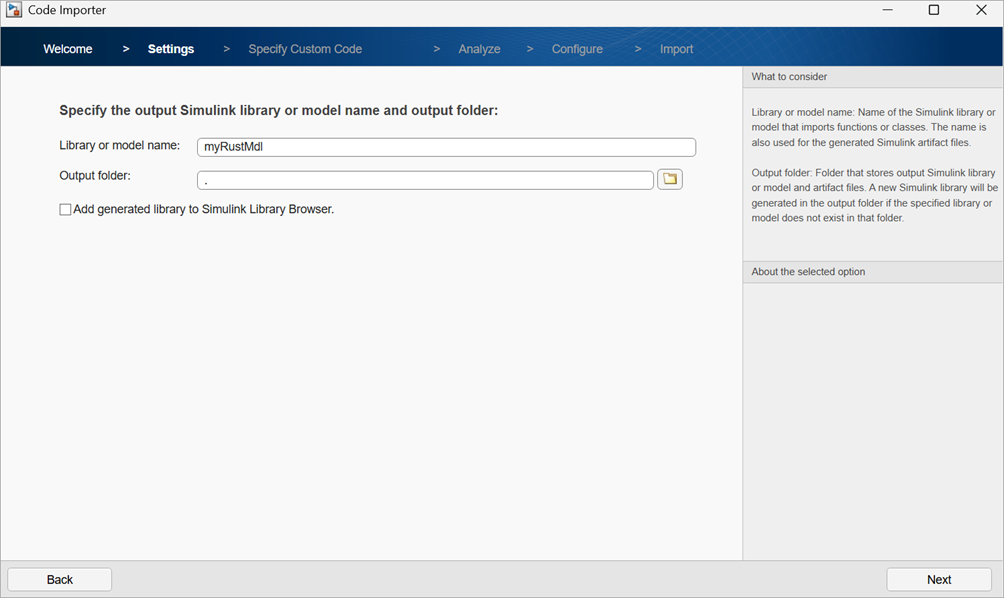
Click Next to continue.
On the Specify Custom Code page, enter the path of the folder relative to the output folder containing the
Cargo.tomlfile for the Rust code to be imported. In this example, theCargo.tomlfile is located in the current folder, which is also the output folder, and is specified by a period (.) in the Package root directory text box.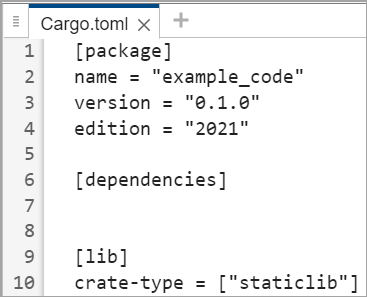
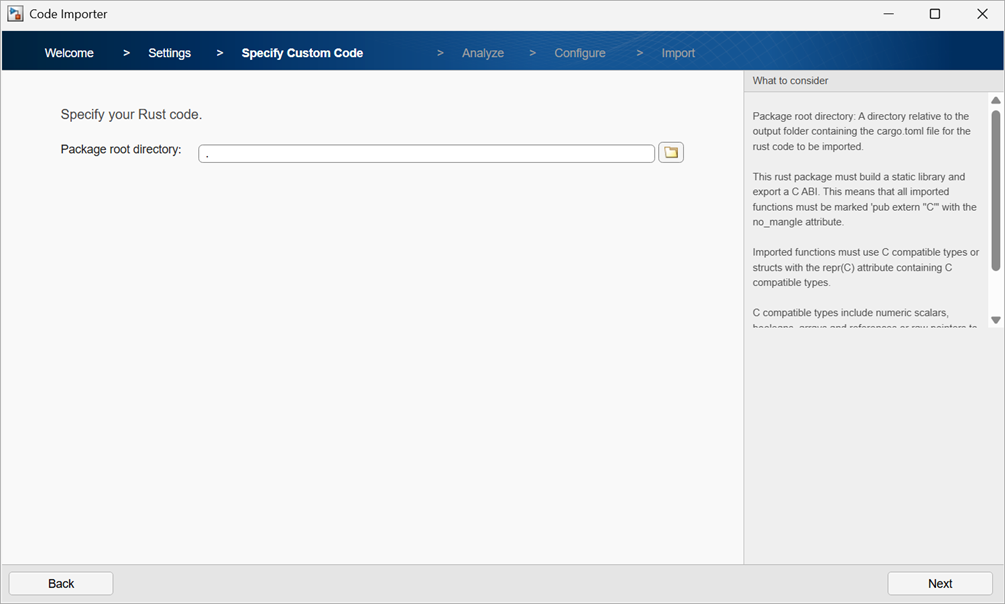
Click Next to continue.
On the Analyze page, click Next. The Rust Importer wizard analyzes the Rust code, and detects all C compatible Rust functions, and opens the Configure page.
The Configure page displays all C compatible functions from the Rust code and guides you through steps to integrate these functions into Simulink.
Note
Functions that are not compatible with C code are skipped and not shown. A warning appears in the Command Window when this occurs.
On the Configure page:
Select the functions to be imported into the Simulink library. In this example, the functions
add,add_one_to_each,calculate_perimeter, andsum_arrayare selected and imported from the Rust code.
Click Next to continue.
The wizard shows the C Caller block Port specifications table corresponding to each imported function. You can edit the block port specifications, if required.
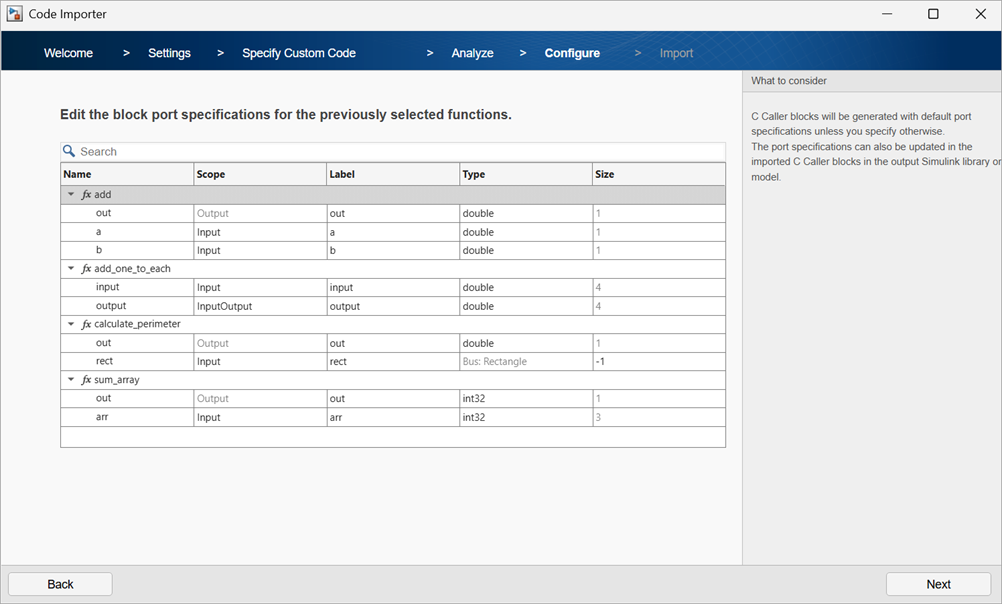
Click Next to continue.
Select the types to import into Simulink. If a type is required by one of the selected functions, the type is automatically selected and dimmed. For this example, the type
Rectangleis required for thecalculate_perimeterfunction. The wizard creates a Simulink data dictionary containing this type and links the dictionary to the generated library.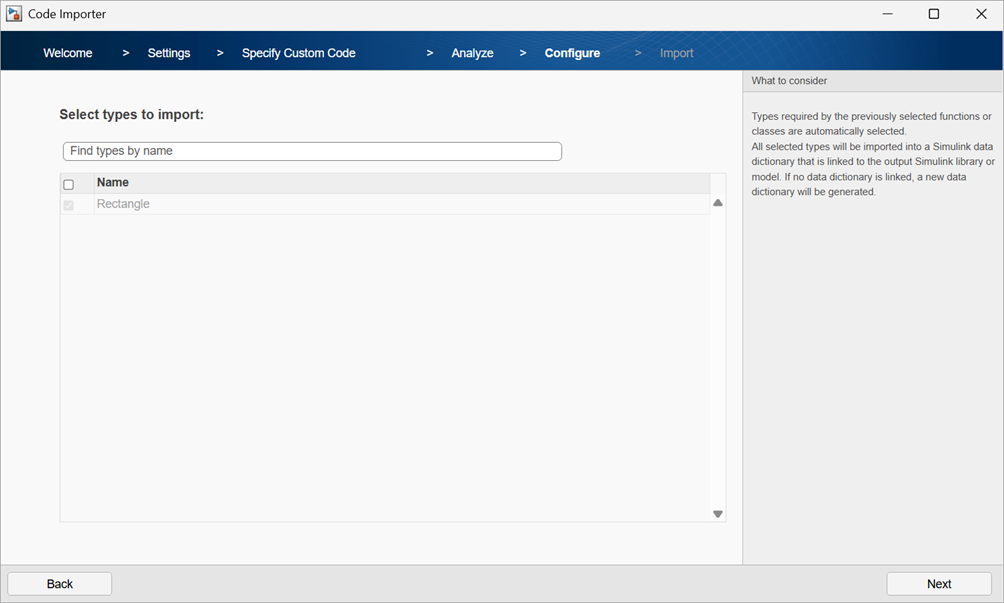
Click Next to continue.
On the Import page, check the specifications of the generated library.
If you have previously imported the function into the library or model at least once, then you have the option to specify the library update setting. In such a scenario, this page allows you to confirm the update operation to be performed on the library. For this purpose, the wizard provides two options:
To overwrite the existing blocks for the selected functions, select Replace existing blocks.
To preserve the existing blocks and add new C Caller blocks for the selected functions, select Import as new blocks.
For demonstration, the option is made available by importing the functions into the
myRustMdllibrary a second time. Select Replace existing blocks to overwrite the existing blocks in themyRustMdllibrary.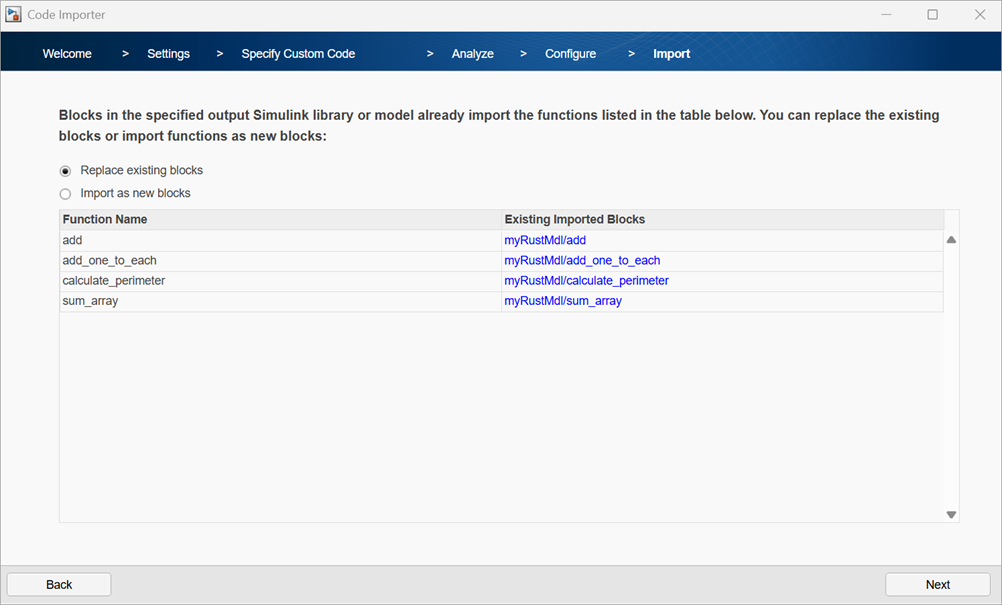
Click Next to continue.
The Create test harness option is available if you have a Simulink Test™ license.
To test the imported function using Simulink Test Manager, select Automatically create test harness for all imported functions or classes. Each block in the generated library is attached to an internal test harness.
For this example, select Skip.
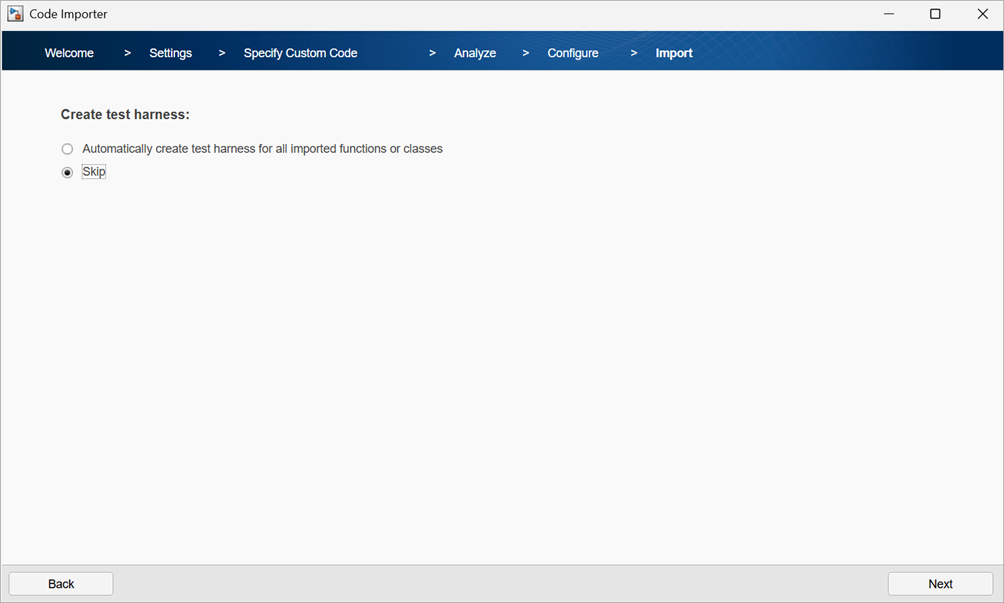
Click Next to continue.
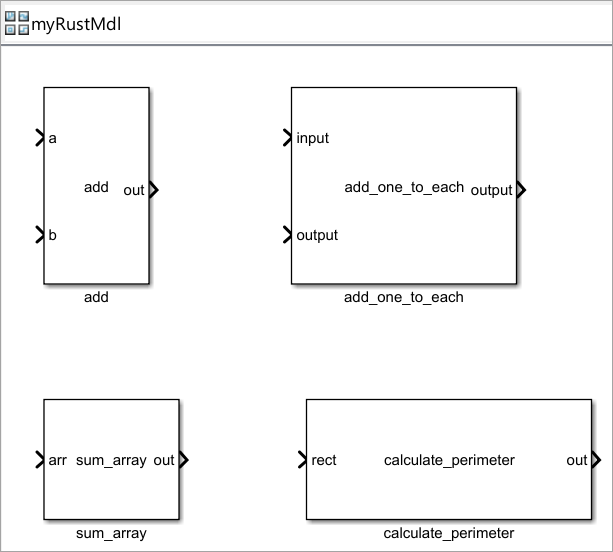
After the import process is completed, the wizard creates the library
myRustMdl. Verify the C Caller block port specifications and the imported functions.The model contains four C Caller blocks, one for each of the four Rust functions.
The next page confirms that the import process is successful and gives you an option to add the generated library into an existing project.
To add the library into a project, click Add, select the desired project file, and add the generated library to that project.
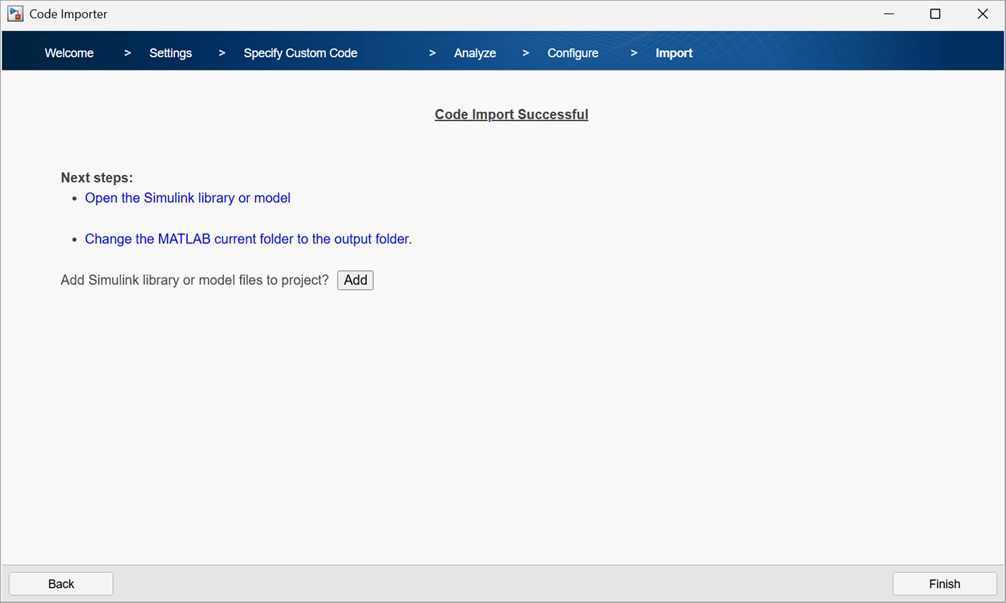
Since the import process is successfully completed, close the wizard by clicking the Finish button.
When you click Finish, select whether to save the current import settings to a JSON file. You can use this file to load the current import settings the next time you import Rust code.
After the import process is completed successfully, Simulink stores the generated artifacts in a folder with a name in the format
modelName_rust_interface, wheremodelNameis the name of the Simulink library or model generated in the previous step. This folder is stored in the output folder you specified in step 3. You need these artifacts to simulate the generated library or model.In this example, the Rust code is imported into a library named
myRustMdl, and the artifacts are stored in a folder namedmyRustMdl_rust_interfacein the output folder, which is same as the current folder.