Keyboard Shortcuts and Mouse Actions for Simulink Modeling
You can use keyboard shortcuts and mouse actions to model systems in Simulink®. To open this page from a model, press Shift+? or click Keyboard Shortcuts on the navigation bar.
Note
When you use the keyboard shortcuts on macOS:
Press command (⌘) instead of Ctrl.
Press option instead of Alt.
View Keyboard Shortcuts in Editor
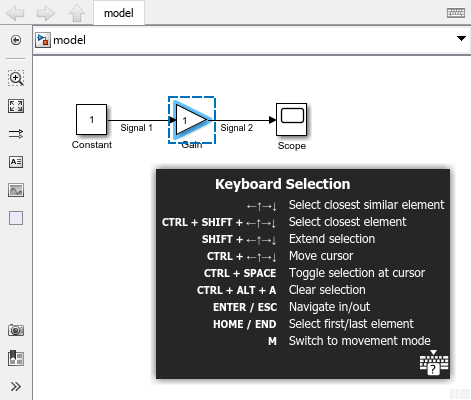
When you are in any of these modes, you can view a hints panel that displays keyboard shortcuts specific to the active mode.
Mode | Definition | How to Enter Mode | How to View Hints Panel |
---|---|---|---|
Keyboard Selection | Use the arrow keys to select a different block. | Select a block in your model. Press M to switch from movement mode (the default) to selection mode. | The hints panel appears when you enter selection mode. |
Movement | Move a block by dragging it with the pointer. | Drag a block with the pointer. | The hints panel appears when you enter movement mode. |
Keyboard Movement | Use the arrow keys to move the selected block. | When you open Simulink, you are in movement mode by default. To switch from selection mode to movement mode, press M. | The hints panel appears when you use the arrow keys to move a selected block. |
Signal tracing | Trace the signal line to the signal source or destination. See Highlight Signal Sources and Destinations for details. | Click a signal in your model. Pause on the ellipsis that appears. In the action bar that expands, click either Highlight Signal to Source or Highlight Signal to Destination . | The hints panel appears when you enter signal tracing mode. |
Pan and zoom | Pan to move the view over the model. Zoom to change how close the model appears. | When you open Simulink, you are in pan and zoom mode by default. | Press the space bar until the hints panel expands. If the hints panel is minimized, press the space bar until the ? button appears. To hide the hints panel, click the canvas. |
Resize | Change the size of a block. | Pause on a block resize handle. | The hints panel appears when you enter resize mode. |
To minimize the hints panel, press ? on your keyboard. When the hints panel is minimized, only the ? button is visible.
To restore the hints panel, press ? on your keyboard.
Minimizing or restoring a hints panel in one mode does not affect the hints panels of other modes. Expanded hints panels remain expanded and minimized hints panels remain minimized across MATLAB® sessions.
For example, to see the Keyboard Selection hints panel for selection mode:
Select a block in your model.
Press M. The minimized hints panel appears in the lower right of the model window.
To restore the hints panel, press ? on your keyboard.
Perform File and Clipboard Actions
Task | Shortcuts |
---|---|
Open model | Ctrl+O |
Create model | Ctrl+N |
Print model | Ctrl+P |
Save all modified models in current model hierarchy | Ctrl+S |
Save current referenced model | Ctrl+Shift+S |
Close model | Ctrl+W |
Cut | Ctrl+X |
Copy | Ctrl+C |
Paste | Ctrl+V |
Undo | Ctrl+Z |
Redo | Ctrl+Y, Ctrl+Shift+Z (Simulink Online™) |
Find search string | Ctrl+F |
Zoom and Pan
Task | Shortcuts and Actions |
---|---|
Fit diagram to window | Space bar |
Fit selection to window | Space bar + F |
Zoom in | Ctrl+Plus (+) or space bar + Plus (+) |
Zoom out | Ctrl+Minus (-) or space bar + Minus (-) |
Zoom to 100% | Ctrl+0, Alt+1, or space bar + 0 |
Zoom with scroll wheel | Scroll wheel Ctrl + scroll wheel when Scroll wheel controls zooming is cleared |
Zoom in on model element | Drag the Zoom button from the palette to the element. |
View portion of block diagram visible in model window relative to full block diagram with miniature map | Zoom or pan to part of the model. When only part of the model is visible, press the space bar until the miniature map appears. |
View different portion of model | Click the destination in the miniature map. |
Pan | Drag the highlighted area in the miniature map. Drag with middle button. Space bar + drag. When a scroll bar is shown, to move the scroll bar with your keyboard, press Space bar + left, right, up, or down arrow. |
Pan vertically | Ctrl + scroll wheel |
Pan horizontally | Shift + scroll wheel |
Pan by page | Shift + space bar + left, right, up, or down arrow |
Navigate Model
Task | Shortcuts and Actions |
---|---|
Open model | Double-click. Enter |
Change tabs | Ctrl+Shift+Tab |
Enter selected subsystem, referenced model, or Stateflow® chart | Enter |
Go to parent of selected subsystem, referenced model, or Stateflow chart | Esc |
Go to last viewed component in model hierarchy navigation history | Ctrl+[ |
Go to next viewed component in model hierarchy navigation history | Ctrl+] |
Look under block mask | Ctrl+U |
For linked blocks, go to library of parent block | Ctrl+L |
Open the Model Explorer | Ctrl+H |
Select and Move Model Elements
Selected elements have a solid blue outline. The most recently selected element has blue corner brackets in addition to the outline. To represent the cursor when you use the keyboard for selection, a blue box with dashed lines surrounds the element.
By default, the model is in movement mode. To switch to selection mode, press M.
Task | Shortcuts and Actions |
---|---|
Toggle between movement and selection mode | M |
Select all blocks, lines, and annotations | Ctrl+A |
Clear selection | Ctrl+Alt+A |
Select one or more model elements | Draw a selection box around the model elements you want to select. Start the selection box on an empty spot on the canvas. |
Move any model element, including signal labels | Drag element. |
Move selected elements | Drag one of the selected elements. Drag selection box. After selecting elements with the keyboard, in selection mode, press the left, right, up, or down arrow. |
By default, when you move or resize a block with three or more ports, the shape of signal lines connecting to blocks with one or two ports does not change. Instead, the connected blocks move. Turn the functionality off. | Hold the space bar while you move or resize a block. When you release the space bar, the functionality turns back on. |
Change selection to closest similar element in a direction | In selection mode, press the left, right, up, or down arrow. |
Move cursor to closest element in a direction, regardless of similarity | In selection mode, press Ctrl+Shift + left, right, up, or down arrow. |
Change selection to element at top-left of canvas | Ctrl+Home On macOS, press home. |
Change selection to element at bottom-right of canvas | Ctrl+End On macOS, press end. |
Change selection to leftmost element relative to cursor | Home On macOS, press control+left. |
Change selection to rightmost element relative to cursor | End On macOS, press control+right. |
Select additional adjacent elements | To select additional adjacent elements with the keyboard, in selection mode, press Shift + left, right, up, or down arrow. To select additional adjacent elements with the pointer, press Shift while dragging a selection box around the additional elements. |
Select additional elements that are not adjacent | To select additional elements with the keyboard, in selection mode, press Ctrl + left, right, up, or down arrow and navigate to the element you want to select. Then, add the element to the selection by pressing Ctrl + space bar. On macOS, to add the current element to the selection, press command+shift + space bar or shift + space bar. To select additional elements with the pointer, press Shift and click. |
Constrain movement of model elements to vertical and horizontal directions | Start dragging the element, then press Shift. |
Add and Edit Model Elements
Task | Shortcuts and Actions |
---|---|
Open or hide the Property Inspector | Ctrl+Shift+I On macOS, press command+option+O. Before R2023b: On macOS, press command+shift+I. |
Open or hide the Component Interface View | Ctrl+Shift+V (since R2024b) |
Open or hide the Type Editor | Ctrl+Shift+P (since R2023b) |
Set main parameter for selected block | Alt+Enter |
Add block to model at current location with the quick insert menu | Double-click the Simulink Editor canvas and start typing the block name, then select the block from the menu. Ctrl+Period (.) twice and start typing the block name, then press the down arrow to select the block from the list and press Enter to insert the block. On AZERTY keyboards, press Ctrl+Shift+Period (.) instead of Ctrl+Period (.). |
Choose block to connect to signal line | Move your pointer over the unconnected end of a signal line. When your pointer is over the end of the signal line, it becomes a circle. Double-click the end of the signal line. Using the quick insert menu that appears, add a block. The new block is connected to the end of the signal line that you double-clicked. For information about how to use the quick insert menu, see Add Blocks to Models Using Quick Insert Menu. |
Open the Library Browser | Ctrl+Shift+L |
Add annotation to model at current location with the quick insert menu | Double-click the Simulink Editor canvas and type the annotation content, then select the annotation option. Ctrl+Period (.) twice and type the annotation content, then press the down arrow to select the annotation option and press Enter to insert the annotation. On AZERTY keyboards, press Ctrl+Shift+Period (.) instead of Ctrl+Period (.). |
Copy selected model elements | Drag elements with the right mouse button. Ctrl + drag. |
Copy selected model elements between Simulink Editor windows | Drag elements between windows. |
Delete selected model elements | Delete or Backspace |
Connect Model Elements
Task | Shortcuts and Actions |
---|---|
Connect blocks with signal lines | Click a port. Click the blue chevron symbol that appears near a compatible port you want to connect to. Select the first block, then Ctrl + click a second block. Drag from port to port. Click a port and press Shift as you connect to the next port. Press Shift to make multiple, consecutive connections. |
Branch signal line | Click a port, move the cursor near the line you want to branch, and then click after you see the preview. Select a line, move the cursor toward the element you want to connect with, and then click the blue chevron symbol that appears near the port. Ctrl + drag line. Right mouse button + drag. |
Add ports to blocks that take multiple inputs | Drag toward the port from a compatible block or signal line. Drag from the edge of the block that you want to add the port to. Click the edge of the port, and then drag. Click the edge of the port, move the cursor over the signal type — signal, bus, or connector — from the menu, and drag. |
Disconnect selected blocks | Press Shift, then drag block. After selecting blocks with the keyboard, press M then Shift + left, right, up, or down arrow. |
Comment through selected blocks | Ctrl+Shift+Y |
Comment out or uncomment selected blocks | Ctrl+Shift+X |
Name Model Elements
Task | Shortcuts and Actions |
---|---|
Rename selected model element | Click or double-click the label. Select the element and press F2. On macOS, press command+return instead of F2. |
Name signal line | Double-click the signal and type its name. |
Display name on branch of a named signal line | Double-click the branch. |
Name every branch of a signal line | Right-click the signal, select Properties, and use the Signal Properties dialog box. |
Delete signal label and name | Delete characters in the label, or delete the name in Signal Properties dialog box. |
Delete signal label only | Right-click the label and select Delete Label. |
Copy signal label | Ctrl + drag the signal label. |
Edit port labels on subsystem blocks | Point to the port label and click the interactive cue (blue box surrounding the label). Select the port. Click the port label cue or press F2. To switch between block name and signal name when editing labels on signal ports, press Ctrl+1,2. To make successive port label edits on a subsystem block:
|
Format Block Diagram
Task | Shortcuts and Actions |
---|---|
Automatically arrange model | Ctrl+Shift+A |
Resize block, maintaining ratio of width and height | Shift + drag handle |
Resize block about the center | Ctrl + drag handle |
Route lines around blocks | Shift + drag while drawing |
Rotate blocks clockwise | Ctrl+R |
Rotate blocks counterclockwise | Ctrl+Shift+R |
Flip blocks | Ctrl+I |
Create subsystem from selection | Ctrl+G |
Create subsystem or area from empty selection | To create the highlighted option, which you can change by using the arrow keys or mouse:
Press the number key associated with an option. |
Change signal label font | Select the signal line (not the label), then on the Format tab, click the Font Properties button arrow, then click Fonts for Model. |
Mask block | Ctrl+M |
Refresh Model blocks | Ctrl+K |
Perform Generic Actions
Task | Shortcuts and Actions |
---|---|
Perform generic action with the quick action search menu | Double-click the Simulink Editor canvas, select the Actions tab, and start typing the action name or description, then select the action from the list. Ctrl+Period (.) and start typing the action name or description, then press the down arrow to select the action and press Enter to perform it. On AZERTY keyboards, press Ctrl+Shift+Period (.) instead of Ctrl+Period (.). |
Perform context-sensitive action | Before opening the quick action search menu, select a model element. |
Simulate, Update, and Generate Code for Models
Task | Shortcuts |
---|---|
Start simulation | Ctrl+T or F5 |
Stop simulation | Ctrl+Shift+T |
Update model | Ctrl+D |
Open Configuration Parameters dialog box | Ctrl+E |
Build model (for code generation) | Ctrl+B |
Debug Simulations
Since R2023b
The keyboard shortcuts in the table are the same in the Simulink Editor, the Stateflow Editor, and the MATLAB Function Block Editor.
Task | Shortcuts |
---|---|
Step over | F10 On macOS, press shift+command+O. |
Step in | F11 On macOS, press shift+command+I. |
Step out | Shift+F11 On macOS, press shift+command+U. |