湿度传感器使用 HTTP POST 请求向通道
此示例显示如何从从深度睡眠中唤醒的设备将多个数据字段发布到 ThingSpeak™ 通道。您读取土壤湿度传感器并将该值发布到 ThingSpeak 通道。HTTP POST 请求是通过写入通信客户端来执行的,无需单独的库。直接将 HTTP 请求写入无线网络客户端可以通过 ThingSpeak 通信库提供更高的灵活性和速度。
支持的硬件
ESP8266-12
NodeMCU ESP8266-12
具有以太网或无线连接的 Arduino®(经过一些代码调整)
在此示例中,板载 ADC 读取湿度传感器并将值和经过的时间发布到 ThingSpeak 通道的两个字段。您可以修改 POST 以用数据填充最多 8 个字段。
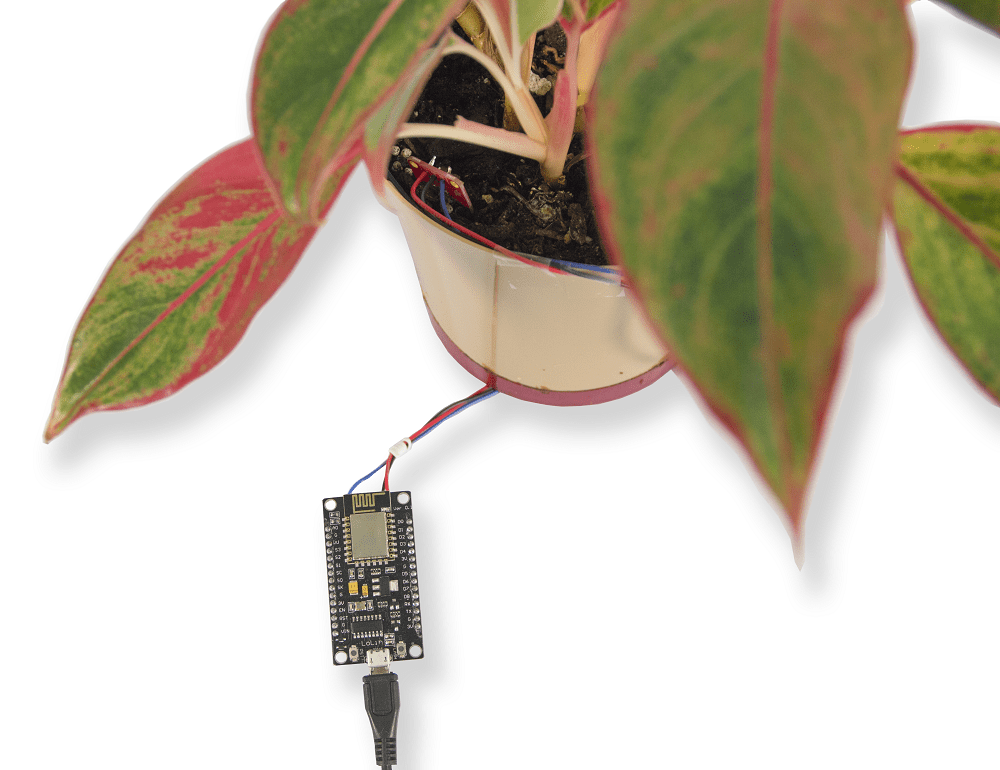
该图显示了一棵办公室植物,其湿度传感器连接到 NodeMCU ESP8266-12。NodeMCU 提供无线网络连接。湿度传感器由电路板上的数据引脚供电,从而限制了传感器通电的时间。这种设计降低了功率并延长了传感器的寿命。在测量之间,整个设备进入深度睡眠模式以节省电力。一旦数据发布到通道,您就可以设置对数据的反应。例如,您可以设置 React App 来通知您湿度水平较低。


前提条件
1) 创建一个 ThingSpeak 通道,如在新通道中收集数据所示。
2) 在通道设置 选项卡上,启用字段 1。您可以提供一个信息丰富的字段名称,例如 Moisture Value。

3)注意从 API Keys 选项卡中写入 API 密钥。您需要在用于对设备进行编程的代码中使用这个值。有关更多信息,请参阅通道配置和通道属性。
所需硬件
基于 ESP8266 的开发板或具有互联网连接的 Arduino 开发板(本演示中使用 NodeMCU ESP8266-12E)
土壤湿度传感器(例如 Sparkfun 湿度传感器)
跳线(至少 4 根)
USB 电缆
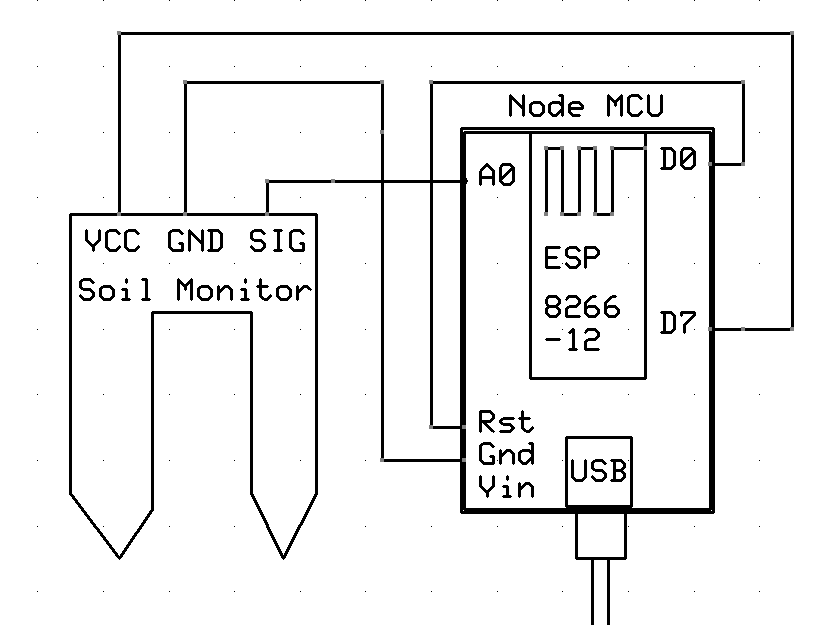
原理图和连接
1) 将湿度传感器的 VCC 连接到 NodeMCU 上的引脚 D7。
2) 将传感器 Gnd 连接到 NodeMCU 地。
3) 将传感器 Sig 引脚连接到 NodeMCU 引脚 A0。
4) 将 NodeMCU Rst 引脚连接到 NodeMCU 引脚 D0,以实现从深度睡眠中唤醒。
对您的设备进行编程
1) 下载最新的 Arduino IDE。
2) 添加 ESP8266 板包。
a) 在 File > Preferences 下的 Additional Board Manager URLs 中输入 https://arduino.esp8266.com/stable/package_esp8266com_index.json。
b) 选择 Tools > Boards > Board Manager。在搜索栏中搜索 ESP8266 并安装该包。
3) 在 Arduino IDE 中选择适当的端口和主板。用于生成此示例的硬件使用了 Node MCU 1.0 (ESP 8266–12E) 选项。
4) 创建应用程序:在 Arduino IDE 中打开一个新窗口并保存文件。添加代码部分提供的代码。请务必在代码中编辑无线网络信息和 API 密钥。
5) 成功上传程序后,您可以使用串行监视器或通道视图页面监视输出。
代码
1) 包含 ESP8266WiFi 库并初始化硬件和数据收集的变量。编辑网络信息并在代码中写入 API 密钥。
#include <ESP8266WiFi.h>

// Network information.
#define WIFI_NAME "YOUR_WIFI_NAME"
#define PASSWORD "WIFI_PASSWORD"

// Hardware information.
#define SENSOR_POWER 13                            // Connect the power for the soil sensor here.
#define SOIL_PIN A0                                // Connect the sensor output pin here.
#define TIMEOUT  5000                              // Timeout for server response.
#define SLEEP_TIME_SECONDS 1800

// ThingSpeak information.
#define NUM_FIELDS 2                               // To update more fields, increase this number and add a field label below.
#define SOIL_MOISTURE_FIELD 1                      // ThingSpeak field for soil moisture measurement.
#define ELAPSED_TIME_FIELD 2                       // ThingSpeak field for elapsed time from startup.
#define THING_SPEAK_ADDRESS "api.thingspeak.com"
String writeAPIKey="XXXXXXXXXXXXXXXX";             // Change this to the write API key for your channel.

// Global variables.
int numMeasure = 5;                                // Number of measurements to average.
int ADCValue = 0;                                  // Moisture sensor reading.

WiFiClient client;
2) 在 setup 函数中,启动串口监视器,连接无线网络,并初始化您使用的设备引脚。
// Put your setup code here, to run once:
void setup()
{
    Serial.begin( 115200 );   // You may need to adjust the speed depending on your hardware.
    connectWifi();
    pinMode( SENSOR_POWER , OUTPUT );
    digitalWrite( SENSOR_POWER , LOW );   // Set to LOW so no power is flowing through the sensor.
}
3) 在主循环中,读取土壤监测器并将其存储在 data 数组中。将数据 POST 到 ThingSpeak,然后将设备置于低功耗模式。
// Put your main code here, to run repeatedly:
void loop()
{
    // Write to successive fields in your channel by filling fieldData with up to 8 values.
    String fieldData[ NUM_FIELDS ];

    // You can write to multiple fields by storing data in the fieldData[] array, and changing numFields.
    // Write the moisture data to field 1.
    fieldData[ SOIL_MOISTURE_FIELD ] = String( readSoil( numMeasure ) );
    Serial.print( "Soil Moisture = " );
    Serial.println( fieldData[ SOIL_MOISTURE_FIELD ] );

    // Write the elapsed time from startup to Field 2.
    fieldData[ ELAPSED_TIME_FIELD ] = String( millis() );

    HTTPPost( NUM_FIELDS , fieldData );

    delay( 1000 );
    Serial.print( "Goodnight for "+String( SLEEP_TIME_SECONDS ) + " Seconds" );
    ESP.deepSleep( SLEEP_TIME_SECONDS * 1000000 );
    // If you disable sleep mode, add delay so you don't post to ThingSpeak too often.
    // delay( 20000 );
}
4) 使用 readSoil 函数为传感器供电,然后使用 ADC 读取输出端的电压。测量完毕后请关闭电源。
// This function reads the soil moisture sensor numAve times and returns the average.
long readSoil(int numAve)
{
  long ADCValue = 0;

  for ( int i = 0; i < numAve; i++ ) {
    digitalWrite( SENSOR_POWER, HIGH );  // Turn power to device on.
    delay(10);    // Wait 10 milliseconds for sensor to settle.
    ADCValue += analogRead( SOIL_PIN );     // Read the value from sensor.
    digitalWrite( SENSOR_POWER, LOW );   // Turn power to device off.
  }

  ADCValue = ADCValue / numAve;
  return ADCValue;                    // Return the moisture value.
}
5) 使用 connectWiFi 函数将您的设备连接到无线网络。
// Connect to the local Wi-Fi network
int connectWifi()
{

    while (WiFi.status() != WL_CONNECTED) {
        WiFi.begin( WIFI_NAME , PASSWORD );
        Serial.println( "Connecting to Wi-Fi" );
        delay( 2500 );
    }
    Serial.println( "Connected" );  // Inform the serial monitor.
}
6) 构建数据字符串以发布到您的通道。连接到 ThingSpeak,并使用 Wi-Fi® 客户端完成 HTTP POST。
// This function builds the data string for posting to ThingSpeak
    // and provides the correct format for the wifi client to communicate with ThingSpeak.
    // It posts numFields worth of data entries, and takes the
    // data from the fieldData parameter passed to it.

int HTTPPost( int numFields , String fieldData[] ){

    if (client.connect( THING_SPEAK_ADDRESS , 80 )){

       // Build the postData string.
       // If you have multiple fields, make sure the sting does not exceed 1440 characters.
       String postData= "api_key=" + writeAPIKey ;
       for ( int fieldNumber = 1; fieldNumber < numFields+1; fieldNumber++ ){
            String fieldName = "field" + String( fieldNumber );
            postData += "&" + fieldName + "=" + fieldData[ fieldNumber ];

            }

        // POST data via HTTP.
        Serial.println( "Connecting to ThingSpeak for update..." );
        Serial.println();

        client.println( "POST /update HTTP/1.1" );
        client.println( "Host: api.thingspeak.com" );
        client.println( "Connection: close" );
        client.println( "Content-Type: application/x-www-form-urlencoded" );
        client.println( "Content-Length: " + String( postData.length() ) );
        client.println();
        client.println( postData );

        Serial.println( postData );

        String answer=getResponse();
        Serial.println( answer );
    }
    else
    {
      Serial.println ( "Connection Failed" );
    }

}
7) 使用 getResponse 等待并接收来自服务器的响应。
// Wait for a response from the server indicating availability,
// and then collect the response and build it into a string.

String getResponse(){
  String response;
  long startTime = millis();

  delay( 200 );
  while ( client.available() < 1 && (( millis() - startTime ) < TIMEOUT ) ){
        delay( 5 );
  }

  if( client.available() > 0 ){ // Get response from server.
     char charIn;
     do {
         charIn = client.read(); // Read a char from the buffer.
         response += charIn;     // Append the char to the string response.
        } while ( client.available() > 0 );
    }
  client.stop();

  return response;
}
您可以通过在干湿循环期间监控通道来确定有用的值范围。ADC 读取并发布到您的通道的数字与电压成正比,因此与土壤湿度成正比。这些值根据温度、湿度和土壤类型而变化。一旦知道了干燥土壤的值,您就可以使用 React App 生成通知,告知植物该浇水了。有关设置 React 的更多信息,请参阅 React App。