使用直方图了解数据的变化
此示例显示如何从现有的 ThingSpeak™ 通道读取数据并生成直方图。直方图显示所选数据中记录每个特定温度的次数。在示例中,作为起点,您使用 ThingSpeak 中的 MATLAB Analysis 和 MATLAB Visualization App 提供的代码模板之一。
ThingSpeak 通道 12397 包含来自位于马萨诸塞州纳蒂克 MathWorks® 园区停车场顶部的气象站的气象数据。字段 4 包含温度测量值。
从模板创建 MATLAB Visualization
要创建来自 ThingSpeak 通道的一组数据的直方图可视化,您可以使用代码模板创建 MATLAB 脚本。
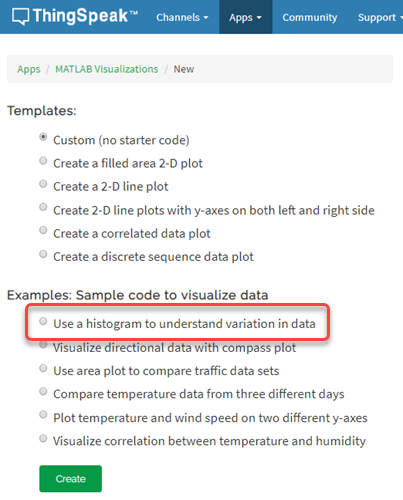
转至 Apps 选项卡并选择 MATLAB Visualizations。点击 New,选择 Use a histogram to understand variation in data,然后点击 Create。
可视化您的数据
ThingSpeak 使用代码填充 MATLAB Code 字段以生成温度直方图。
1)指定与 ThingSpeak 通信的变量。由于气象站通道是公共的,因此不需要读取 API 密钥。如果您正在从自己的通道阅读,则可以修改这些值。
readChannelID = 12397;
TemperatureFieldID = 4;
readAPIKey = '';
2) 使用 thingSpeakRead 检索 1200 分钟的温度数据。
tempF = thingSpeakRead(readChannelID,'Fields',TemperatureFieldID,...
'NumMinutes',20*60,'ReadKey',readAPIKey);
3) 使用 histogram 生成图。设置 x 轴和 y 轴标签以及图标题。
histogram(tempF);
xlabel('Temperature (F)');
ylabel('Number of Measurements for Each Temperature');
title('Histogram of Temperature Variation');
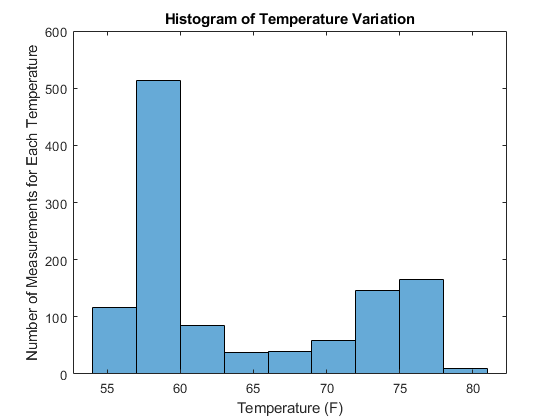
4) 您可以编辑模板代码以适合您的应用程序。例如,编辑代码以更改阅读时间(分钟)和情节标题。按 Save and Run 生成图。
由于直方图是根据实时数据生成的,因此您的直方图看起来与此图并不完全相同。
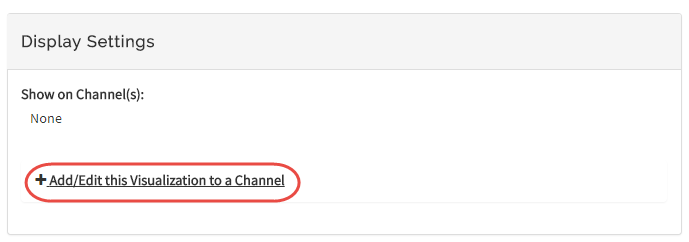
5) 您可以选择将已保存的可视化效果添加到您的通道。在 Display Settings 中,使用 Add/Edit this Visualization to a Channel 旁边的加号来展开通道列表。
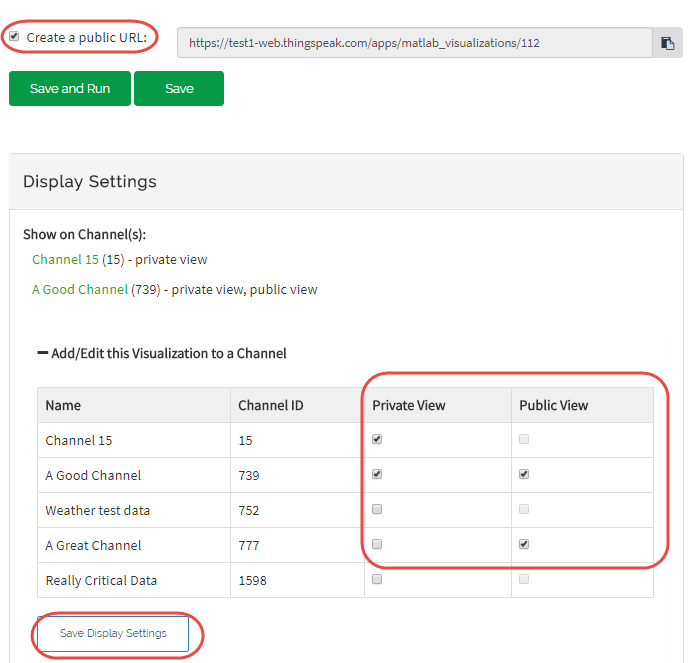
选中与要添加可视化效果的通道对应的复选框。要添加私有可视化效果,请选中 Private View。要共享 URL 并将可视化内容添加到 Public View,请点击 Create a public URL。要更新您的选择,请点击 Save Display Settings。
比较两个直方图
Histogram 还允许您比较不同条件下的分布。您可以将当前的波动与过去一天的波动进行比较。以下代码未包含在模板中。要绘制多个分布,请将此代码添加到模板。
1) 读取前一天额外的数据来与原始数据集进行比较。
tempFYesterday = thingSpeakRead(readChannelID,'Fields',TemperatureFieldID,...
'DateRange',[datetime('today')-days(2),datetime('today')-days(1)],'ReadKey',readAPIKey);
2) 转动 hold on 以使数据保持在同一图上。使用 histogram 并将 'FaceColor'to 设置为红色来区分数据。还添加图例。
% Plot the original Data
histogram(tempF)
xlabel('Temperature (F)');
ylabel('Number of Measurements for Each Temperature');
title('Histogram of Temperature Variation');
hold on
histogram(tempFYesterday,'FaceColor','r');
legend('Today','Yesterday');
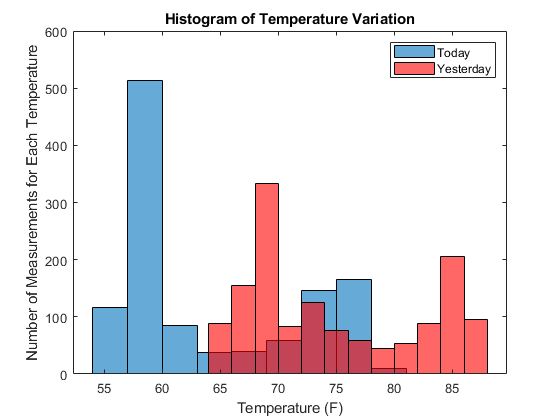
3) 按 Save and Run 生成双图。
输出可视化展示了两个时间段内变化的差异。
另请参阅
函数
Histogram(MATLAB) |thingSpeakRead