使用 Arduino 上的 TalkBack 控制灯光
此示例显示如何从 ThingSpeak™ TalkBack 队列中获取命令并使用它们来改变板载 LED 的状态。
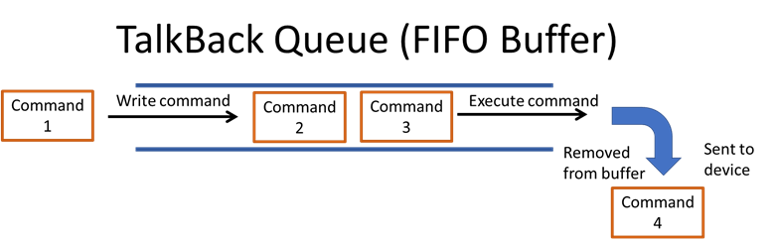
当您的应用程序涉及仅当队列中有命令时才想要运行的计算机时,请使用 TalkBack。

在此示例中,您将 TURN_ON 或 TURN_OFF 写入 TalkBack 队列,设备会更改板载 LED 的状态以匹配命令。使用 ThingSpeak TalkBack App 存储设备命令。您可以使用 Web 界面或 HTTP 命令将设备命令写入列表。您可以在列表中存储最多 8000 条命令。每次设备读取命令列表时,它会读取一条命令并从列表中删除最新的命令。
支持的硬件
Arduino UNO 或类似产品,带 Wi-Fi 模块或 Wi-Fi 连接
MKR1000
前提条件
设置 TalkBack 来运行此示例。转至 Apps > TalkBacks,然后选择 New TalkBack。然后,将命令添加到队列中。

将命令添加到 TalkBack 队列
您可以通过以下两种方式之一将命令添加到 TalkBack 队列。
使用 ThingSpeak TalkBack 网络界面将命令添加到 TalkBack 队列。您可以将 TalkBack 配置为最多 8000 条命令。
使用 ThingSpeak API。您可以使用 HTTP POST 请求将命令添加到队列。在以下 POST 中,将
TALKBACK_ID、YOUR_TALKBACK_API_KEY、TALKBACK_COMMAND和POSITION_NUMBER替换为您通道中的相应值。
POST https://api.thingspeak.com/talkbacks/TALKBACK_ID/commands
 api_key=YOUR_TALKBACK_API_KEY
     command_string=TALKBACK_COMMAND
     position=POSITION_NUMBER
对 Arduino 进行编程
1) 下载最新的 Arduino®IDE。
2) 如果 WiFi101 尚未添加到 Library Manager 中。
a) 选择 Sketch > Include Library > Manage Libraries。搜索 WiFi101。
b) 选择 WiFi101 库并点击 Install。
3) 将 WiFi101 库添加到草图中。
a) 选择 Sketch > Include Library > Manage Libraries。
b) 选择 WiFi101 将其添加到您的草图中。
4) 将 SPI 库添加到草图中。
a) 选择 Sketch > Include Library > Manage Libraries。
b) 选择 SPI 将其添加到您的草图中。
5) 在 Tools 菜单中,选择 Arduino IDE 中适当的端口和主板。
6) 将代码粘贴到 Arduino IDE。添加您的 WiFi 网络信息、您的 TalkBack API 密钥和您的 TalkBack 号码。
7) 对设备进行编程,然后观察串行监视器和 LED,以观察命令使用时的变化。每次执行命令时,该命令就会从列表中删除。使用完命令后,您需要将更多命令添加到列表中。
代码
1)首先包含适当的库并定义变量。
/*
FetchCommandFromTalkBack

Description: Checks a TalkBack queue every 60 seconds and set the state of the built-in LED according
             to the latest command fetched. Turn the LED on and off by using the commands TURN_ON and TURN_OFF.
             The TalkBack documentation can be found at: https://www.mathworks.com/help/thingspeak/talkback-app.html.


Hardware: Arduino WiFi Shield 101 or MKR

Notes:
 - Requires WiFi101 library. Use the WiFi101 library version 0.13.0 or older. WiFi101 library versions 0.14.0 and newer have a bug
   that prevents the ThingSpeak library from working properly.
 - Make sure the WiFi Shield 101 has updated firmware. Find instructions at https://www.arduino.cc/en/Tutorial/FirmwareUpdater.

Copyright 2018, The MathWorks, Inc.
*/

#include <SPI.h>  // Required for shield communication
#include <WiFi.h>

char ssid[] = <enter your SSID>;   // your network SSID (name)
char pass[] = <enter your password>;   // your network password

WiFiClient  client;

unsigned long myTalkBackID = <enter your TalkBack ID;
const char * myTalkBackKey = <enter your TalkBack API key>;
2) 在 setup 函数中,初始化 LED 并启动串行监视器。
void setup() {
  pinMode(LED_BUILTIN, OUTPUT);  // Set up LED
  Serial.begin(115200);          // Initialize serial
}
3) 在主循环中,首先建立与本地 WiFi 网络的连接。使用正确的参数创建 POST 消息。发送 POST 请求,验证结果并检查 TalkBack 命令。等待 60 秒然后再次检查队列。
void loop() {

  // Connect or reconnect to Wi-Fi
  if(WiFi.status() != WL_CONNECTED){
    Serial.print("Attempting to connect to SSID: ");
    Serial.println(String(ssid));
    while(WiFi.status() != WL_CONNECTED){
      WiFi.begin(ssid, pass);
      Serial.print(".");
      delay(5000);
    }
    Serial.println("\nConnected.");
  }

  // Create the TalkBack URI
  String tbURI = String("/talkbacks/") + String(myTalkBackID) + String("/commands/execute");

  // Create the message body for the POST out of the values
  String postMessage =  String("api_key=") + String(myTalkBackKey);

   // Make a string for any commands in the queue
  String newCommand = String();

  // Make the POST to ThingSpeak
  int x = httpPOST(tbURI, postMessage, newCommand);
  client.stop();

  // Check the result
  if(x == 200){
    Serial.println("checking queue...");
    // check for a command returned from TalkBack
    if(newCommand.length() != 0){

      Serial.print("  Latest command from queue: ");
      Serial.println(newCommand);

      if(newCommand == "TURN_ON"){
        digitalWrite(LED_BUILTIN, HIGH);
      }

      if(newCommand == "TURN_OFF"){
        digitalWrite(LED_BUILTIN, LOW);
      }
    }
    else{
      Serial.println("  Nothing new.");
    }

  }
  else{
    Serial.println("Problem checking queue. HTTP error code " + String(x));
  }


  delay(60000); // Wait 60 seconds to check queue again
}
4) 使用 httpPOST 函数读取下一个 TalkBack 命令。
// General function to POST to ThingSpeak
int httpPOST(String uri, String postMessage, String &response){

  bool connectSuccess = false;
  connectSuccess = client.connect("api.thingspeak.com",80);

  if(!connectSuccess){
      return -301;
  }

  postMessage += "&headers=false";

  String Headers =  String("POST ") + uri + String(" HTTP/1.1\r\n") +
                    String("Host: api.thingspeak.com\r\n") +
                    String("Content-Type: application/x-www-form-urlencoded\r\n") +
                    String("Connection: close\r\n") +
                    String("Content-Length: ") + String(postMessage.length()) +
                    String("\r\n\r\n");

  client.print(Headers);
  client.print(postMessage);

  long startWaitForResponseAt = millis();
  while(client.available() == 0 && millis() - startWaitForResponseAt < 5000){
      delay(100);
  }

  if(client.available() == 0){
    return -304; // Didn't get server response in time
  }

  if(!client.find(const_cast<char *>("HTTP/1.1"))){
      return -303; // Couldn't parse response (didn't find HTTP/1.1)
  }

  int status = client.parseInt();
  if(status != 200){
    return status;
  }

  if(!client.find(const_cast<char *>("\n\r\n"))){
    return -303;
  }

  String tempString = String(client.readString());
  response = tempString;

  return status;

}