使用安全 MQTT 发布和订阅进行远程传感器控制
此示例展示如何在 ThingSpeak 中使用 MQTT 发布和订阅架构。MQTT 协议是一种低开销的设备消息传递系统。使用 MQTT,订阅控制通道的字段 1。当您更新控制通道时,发布的值将发送到您的设备。舵机旋转到指定角度。该设备测量网络强度并更新存储通道。代码中的注释指出了如何使此示例适应非安全连接。
支持的硬件
ESP8266、NodeMCU、WeMOS
Arduino MKR1000
具有无线网络连接的 Arduino Uno、Mega、Due 或 Leonardo
粒子光子(带有少量代码和原理图调整)
该示例设计为仅使用几个额外组件(即单个伺服电机)即可工作。您可以使用板载 Wi-Fi 天线来测量 Wi-Fi 强度。

这些图像显示了来自存储通道的样本通道输出。字段 1 存储从控制通道设置的伺服电机的角度,字段 2 显示测得的 Wi-Fi 强度值。

数据分析表明,WeMOS 硬件的方向对测量的信号强度有方向性影响。

前提条件
1) 为订阅控件创建一个 ThingSpeak 通道,如在新通道中收集数据所示。订阅通道保存伺服电机的角度。当伺服电机角度更新时,订阅的设备会以 MQTT 消息的形式接收该角度。该设备设置伺服角度并测量该角度下的新无线网络强度。
2) 为发布的数据创建另一个 ThingSpeak 通道。发布通道记录设定的角度和信号强度数据。
3) 在 Channel Settings 视图中,为发布通道启用字段 1 和 2。为了区分字段,请为每个字段赋予一个描述性名称。

4) 注意 Channel Settings 视图中 API Keys 选项卡上的读写 API 密钥(图中圈出部分)。
5) 通过点击页面顶部的 Devices > MQTT,然后点击 Add a new device 创建 MQTT 设备。当您设置设备时,授权两个通道进行发布和订阅。详情请参阅创建 ThingSpeak MQTT 设备。
6) 添加新设备时,点击 Download Credentials > Arduino (mqtt_secrets.h)。保留此下载的秘密文件以便在下面的代码部分访问。
所需硬件
WeMOS D1 Mini,或者以下设备之一,对所使用的库进行了更改:NodeMCU、ESP8266-01、ESP8266-04、ESP8266-12、ESP8266-12E、Arduino® MKR1000 或其他具有以太网或无线网络连接的 Arduino
伺服电机(例如 Futaba S3003)
跳线(至少 3 根)
USB 电缆
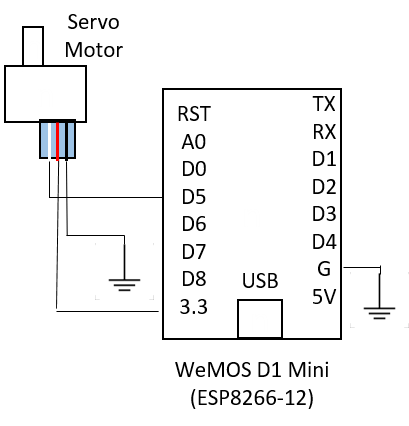
原理图和连接
1) 将 WeMOS D1 Mini 上的 D5 连接到伺服器的信号线。
2) 将伺服器的接地线连接到 WeMOS 板上的接地。
3) 将伺服电源连接至 3.3 V。在某些情况下,直接使用 5 V 可能会超出 USB 电源限制。
对 Arduino 进行编程
使用 Arduino IDE 对您的设备进行编程。您可以从此处下载最新的 Arduino IDE。
1) 添加 ESP8266 板包:
a.在 File > Preferences 下,在 Additional Board Manager URLs 中输入 https://arduino.esp8266.com/stable/package_esp8266com_index.json。
b.选择 Tools > Boards > Board Manager。在搜索栏中输入 ESP8266 并安装该包。
2) 修改允许的数据包大小。
a.导航到包含发布子库头文件文件的文件夹,通常是 Documents\Arduino\libraries\PubSubClient\src。
b.编辑 PubSubClient.h to c 将最大数据包大小更改为 4096。完成后,该行应显示为:
#define MQTT_MAX_PACKET_SIZE 4096
3) 创建应用程序:
a.在 Arduino IDE 中打开一个新窗口,并保存文件。
b.添加代码部分提供的代码。
c.请务必在代码中编辑无线网络信息和通道 ID。
4) 将库和秘密文件添加到草图:
a.如果尚不存在,请通过选择 Sketch > Include Library > Manage Libraries 将以下库添加到库管理器。搜索每个库的名称并选择 Install。
PubSubClientESP8266Wifiservo
b.添加 mqtt_secrets.h 文件。
测试您的设备
成功上传程序后,您可以使用串行监视器监视输出。将一个范围在 0 到 175 之间的值上传到您的 ThingSpeak 控制通道。您可以从 API Keys 选项卡复制 GET 请求格式,或者使用您的写入 API 密钥修改此文本。将每个 URL 直接输入到浏览器的地址栏中,并将您的写入 API 密钥更改为您通道的写入 API 密钥。
https://api.thingspeak.com/update?api_key=YOUR_WRITE_API_KEY&field1=ANGLE_VALUE
每当您向订阅通道发布帖子时,设备都会将角度和 Wi-Fi 信号强度发布到存储通道。确保角度值在 0 到 175 范围内。
代码
1) 包含所需的库并定义数据字段:
#include <PubSubClient.h>
#include <WiFiClientSecure.h>                         // Needed only if using secure connection.
#include <ESP8266WiFi.h>
#include <Servo.h>
#include "mqtt_secrets.h"
#define ANGLE_FIELD 0
#define DATA_FIELD 1                                  // Data field to post the signal strength to.
2) 定义并初始化变量。确保编辑无线网络信息、通道 ID 和凭证。在通道主页顶部找到您的通道 ID。
char ssid[] = "YOUR_SSID";                   // Change to your network SSID (name).
char pass[] = "YOUR_WIFI_PASSWORD";          // Change to your network password.
const char* server = "mqtt3.thingspeak.com";
char mqttUserName[] = SECRET_MQTT_USERNAME;  // Change to your MQTT device username.
char mqttPass[] = SECRET_MQTT_PASSWORD;      // Change to your MQTT device password.
char clientID[] = SECRET_MQTT_CLIENT_ID;     // Change to your MQTT device clientID.
long readChannelID = 85;
long writeChannelID = 86;

// Here's how to get ThingSpeak server fingerprint: https://www.a2hosting.com/kb/security/ssl/a2-hostings-ssl-certificate-fingerprints
const char* thingspeak_server_fingerprint = "27 18 92 dd a4 26 c3 07 09 b9 7a e6 c5 21 b9 5b 48 f7 16 e1";

// WiFiClient client;                                 // Initialize the Wi-Fi client library. Uncomment for nonsecure connection.
WiFiClientSecure client;                              // Uncomment for secure connection.
PubSubClient mqttClient( client );                    // Initialize the PuBSubClient library.
Servo myservo;  // Create servo object to control a servo .

int fieldsToPublish[8]={1,1,0,0,0,0,0,0};             // Change to allow multiple fields.
float dataToPublish[8];                               // Holds your field data.
int changeFlag=0;                                     // Let the main loop know there is new data to set.
int servo_pos=0;                                      // Servo position
3) 在此代码中定义函数原型。
//
// Prototypes
//

// Handle messages from MQTT subscription.
void mqttSubscriptionCallback(char* topic, byte* payload, unsigned int length);

// Generate a unique client ID and connect to MQTT broker.
void mqttConnect();

// Subscribe to a field or feed from a ThingSpeak channel.
int mqttSubscribe( long subChannelID,int field, int unSub);

// Publish messages to a channel feed.

// Connect to a given Wi-Fi SSID.
int connectWifi();

// Measure the Wi-Fi signal strength.
void updateRSSIValue();
4) 初始化输入和输出引脚,启动串行监视器,并在 setup 例程中初始化 MQTT 客户端。
void setup() {
Serial.begin( 115200 );
Serial.println( "Start" );
int status = WL_IDLE_STATUS; // Set temporary Wi-Fi status.

    connectWifi();                                        // Connect to Wi-Fi network.
    // mqttClient.setServer( server, 1883 );              // Set the MQTT broker details, nonsecure port. Uncomment for nonsecure connection.
    mqttClient.setServer( server, 8883 );                 // Set the MQTT broker details, secure port. Uncomment for secure connection.
    mqttClient.setCallback( mqttSubscriptionCallback );   // Set the MQTT message handler function.
    myservo.attach(14);                                   // Attach the servo on GIO2 to the servo object.
    myservo.write(90);                                    // Start in the middle.
}
5) 每次主循环执行时,检查来自 MQTT 订阅的数据是否可供处理。然后设置伺服位置以匹配数据。确保无线和 MQTT 客户端处于活动状态并保持与客户端服务器的连接。
void loop() {

    if (WiFi.status() != WL_CONNECTED) {
        connectWifi();
    }

    if (!mqttClient.connected())
    {

       mqttConnect(); // Connect if MQTT client is not connected.

         if(mqttSubscribe( readChannelID,1,0 )==1 ){
                Serial.println( " Subscribed " );
            }
    }

    mqttClient.loop(); // Call the loop to maintain connection to the server.

    if ((servo_pos>175)||(servo_pos<0)){
    servo_pos=0;
    }

    if (changeFlag){

        changeFlag=0;
        myservo.write(servo_pos);
        dataToPublish[ANGLE_FIELD]=servo_pos;
        delay(1100);                       // Wait for ThingSpeak to publish.
        Serial.println( "Servo value " + String( servo_pos ) );
        mqttPublish( writeChannelID, dataToPublish, fieldsToPublish );
    }

    delay(1);
}
6) 使用 mqttSubscriptionCallback 函数处理传入的 MQTT 消息。如果主循环执行处理步骤而不是回调,程序运行会更顺畅。在此函数中,使用标志来引起主循环的变化。
/**
 * Process messages received from subscribed channel via MQTT broker.
 *   topic - Subscription topic for message.
 *   payload - Field to subscribe to. Value 0 means subscribe to all fields.
 *   mesLength - Message length.
 */

void mqttSubscriptionCallback( char* topic, byte* payload, unsigned int mesLength ) {

    char p[mesLength + 1];
    memcpy( p, payload, mesLength );
    p[mesLength] = NULL;
    Serial.print( "Answer: " );
    Serial.println( String(p) );
    servo_pos=atoi( p );
    changeFlag=1;
}
7) 使用 MQTTConnect 函数建立并维持与 MQTT 的连接。
void mqttConnect()
{
    // Loop until connected.
    while ( !mqttClient.connected() )
    {
      Serial.println(String( mqttUserName)+ " , " + mqttPass + " , " + clientID);

        // Connect to the MQTT broker.
        Serial.print( "Attempting MQTT connection..." );
        if ( mqttClient.connect( clientID, mqttUserName, mqttPass ) )
        {
            Serial.println( "Connected with Client ID:  " + String( clientID ) + " User "+ String( mqttUserName ) + " Pwd "+String( mqttPass ) );

        } else
        {
            Serial.print( "failed, rc = " );
            // See https://pubsubclient.knolleary.net/api.html#state for the failure code explanation.
            Serial.print( mqttClient.state() );
            Serial.println( " Will try again in 5 seconds" );
            delay( 5000 );
        }
    }
}
8) 使用 mqttSubscribe 从 LED 控制场接收更新。在此示例中,您订阅了一个字段,但您也可以使用此函数订阅整个通道源。使用 field = 0 调用函数来订阅整个源。
/**
 * Subscribe to fields of a channel.
 *   subChannelID - Channel to subscribe to.
 *   field - Field to subscribe to. Value 0 means subscribe to all fields.
 *   readKey - Read API key for the subscribe channel.
 *   unSub - Set to 1 for unsubscribe.
 */

int mqttSubscribe( long subChannelID, int field, int unsubSub ){
    String myTopic;

    // There is no field zero, so if field 0 is sent to subscribe to, then subscribe to the whole channel feed.
    if (field==0){
        myTopic="channels/"+String( subChannelID )+"/subscribe";
    }
    else{
        myTopic="channels/"+String( subChannelID )+"/subscribe/fields/field"+String( field );
    }

    Serial.println( "Subscribing to " +myTopic );
    Serial.println( "State= " + String( mqttClient.state() ) );

    if ( unsubSub==1 ){
        return mqttClient.unsubscribe(myTopic.c_str());
    }
    return mqttClient.subscribe( myTopic.c_str() ,0 );
}
9) 代码中没有使用 mqttUnsubscribe 函数,但您可以使用它来结束订阅。
/**
 * Unsubscribe channel
 *   subChannelID - Channel to unsubscribe from.
 *   field - Field to unsubscribe subscribe from. The value 0 means subscribe to all fields.
 *   readKey - Read API key for the subscribe channel.
 */

int mqttUnSubscribe(long subChannelID,int field,char* readKey){
    String myTopic;

    if (field==0){
         myTopic="channels/"+String( subChannelID )+"/subscribe";
    }
    else{
        myTopic="channels/"+String( subChannelID )+"/subscribe/fields/field"+String( field );
    }
    return mqttClient.unsubscribe( myTopic.c_str() );
}
10) 使用 mqttPublish 函数将您的角度和 Wi-Fi RSSI 数据发送到 ThingSpeak 通道。
/**
 * Publish to a channel
 *   pubChannelID - Channel to publish to.
 *   pubWriteAPIKey - Write API key for the channel to publish to.
 *   dataArray - Binary array indicating which fields to publish to, starting with field 1.
 *   fieldArray - Array of values to publish, starting with field 1.
 */

void mqttPublish(long pubChannelID, float dataArray[], int fieldArray[]) {
    int index=0;
    String dataString="";

    updateRSSIValue();  // Make sure the stored value is updated.

    //
    while (index<8){

        // Look at the field array to build the posting string to send to ThingSpeak.
        if (fieldArray[ index ]>0){

            dataString+="&field" + String( index+1 ) + "="+String( dataArray [ index ] );
        }
        index++;
    }

    Serial.println( dataString );

    // Create a topic string and publish data to ThingSpeak channel feed.
     String topicString ="channels/" + String( pubChannelID ) + "/publish";
    mqttClient.publish( topicString.c_str(), dataString.c_str() );
    Serial.println( "Published to channel " + String( pubChannelID ) );
}
11) 使用 connectWiFi 函数将您的设备连接到无线网络。
int connectWifi()
{
    while ( WiFi.status() != WL_CONNECTED ) {
        WiFi.begin( ssid, pass );
        delay( 8500 );
        Serial.println( "Connecting to Wi-Fi" );
    }
    Serial.println( "Connected" );
    client.setFingerprint(thingspeak_server_fingerprint);  // Comment this line if using nonsecure connection.
}
12) 使用 updateRSSIValue 函数读取您当前连接的网络的信号强度。
void updateRSSIValue(){

   long rssi = WiFi.RSSI();
   Serial.print( "RSSI:" );
   Serial.println(rssi);
   dataToPublish[ DATA_FIELD ]=float( rssi );

}