使用 Particle Photon Client 订阅通道更新
此示例展示如何使用粒子光子板订阅来自 CheerLights 通道的通道更新。该程序从通道读取颜色并使用 Photon 板上的内置 LED 显示它。您可以订阅通道源或直接订阅 CheerLights 通道上的颜色字段,如本例所示。
设置
1) 为 CheerLights 通道创建 MQTT 设备。
a) 点击 ThingSpeak 页面顶部的 Devices > MQTT,然后点击 Add a new device。
b) 输入您的设备的名称和描述。
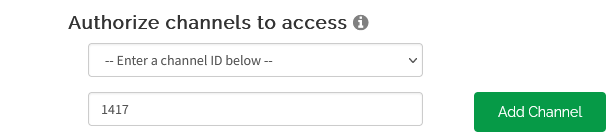
在 Authorize channels to access 下,点击 Select a Channel > Enter a channel ID below。
d) 输入 CheerLights 通道号 1417 并点击 Add Channel。
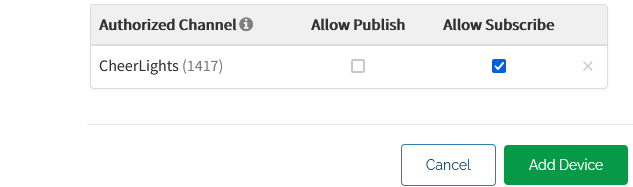
您的 Authorized Channel 列表现在包括 CheerLights (1417)。点击 Add Device。
f) 出现 New Device Added 对话框。点击 Download Credentials > Plain Text。点击 Done。使用下面代码部分中保存的凭据。
2) 将库 MQTT/MQTT.h 包含到您的 Particle IDE 中。
3) 使用 Web IDE 创建一个新的 Photon App。
4) 添加 MQTT 库。添加库包括代码顶部的行 #include <MQTT.h>。
5) 粘贴此处显示的代码。根据需要修改 channelID,、username 和 password。
代码
1) 首先声明与 ThingSpeak™ 通信的变量。订阅 CheerLights 的字段 1,即通道 1417。该程序在这些行顶部的空间中包含了 MQTT 库。
// This #include statement is automatically added by the Particle IDE.
#include <MQTT.h>

const long channelID = 1417;
String subscribeTopic = "channels/" + String( channelID ) + "/subscribe/fields/field1";

char clientId[] = "MQTT_CLIENDID_FROM_THINGSPEAK";   //clientID returned when adding this device on ThingSpeak
char username[] = "MQTT_USERNAME_FROM_THINGSPEAK";   //username returned when adding this device on ThingSpeak
char password[] = "MQTT_PASSWORD_FROM_THINGSPEAK";   //password returned when adding this device on ThingSpeak
char server[] = "mqtt3.thingspeak.com";

MQTT client(server, 1883, callback);       // Initialize the MQTT client
2) 从 MQTT 代理中继的消息调用 callback 函数来处理消息。
void callback(char* topic, byte* payload, unsigned int length) {
    char p[length + 1]; // Leave an extra space to null terminate the string.
    memcpy(p, payload, length);
    p[length] = NULL;  // Terminate the string.

    Particle.publish(p);

    if (!strncmp(p, "red", 3)) {
        RGB.color(255, 0,  0);
    }

    else if (!strncmp(p, "green", 5)) {
        RGB.color(0, 255, 0);
    }

    else if (!strncmp(p, "blue", 4)) {
        RGB.color(0, 0, 255);
    }

    else if(!strncmp(p, "yellow", 6)) {
        RGB.color(255, 255, 0);
    }

    else if(!strncmp(p, "orange", 5)) {
        RGB.color(255, 165, 0);
    }

    else if(!strncmp(p, "magenta", 5)) {
        RGB.color(255, 0, 255);
    }

    else if(!strncmp(p, "cyan", 5)) {
        RGB.color(0, 255, 255);
    }

    else if(!strncmp(p, "white", 5)) {
        RGB.color(255, 255, 255);
    }

    else if(!strncmp(p, "oldlace", 5)) {
        RGB.color(253, 245, 230);
    }

    else if(!strncmp(p, "purple", 5)) {
        RGB.color(128, 0, 128);
    }

    else if(!strncmp(p, "pink", 5)) {
        RGB.color(255, 192, 203);
    }

    else {
        RGB.color(255, 255, 255);
    }
}
3) 使用 setup 函数启用 LED 控制并启动 MQTT 连接和订阅。
void setup() {
    // Set up the onboard LED.
    RGB.control(true);

    // Connect to the server.
    subscribeMQTT();
}
4) 在 loop 函数中,检查连接,如果连接丢失则重新连接并订阅。指定设备检查时间。在这个示例中,将设备在晚上 11 点到凌晨 4 点之间设置为睡眠模式。
void loop() {
    int timeHour = Time.hour();

    if (client.isConnected()) {
        client.loop();
    } else {
        subscribeMQTT();
    }

    if ((timeHour > 23) or (timeHour < 4)) {
        Particle.publish("Sleep");
        System.sleep(SLEEP_MODE_DEEP, 7200);
    }

    delay(1);
}
5) 使用 subscribeMQTT 函数与 broker 建立连接,然后订阅通道字段。
void subscribeMQTT() {

   if (!client.isConnected()) {
       Particle.publish("Connecting");
        client.connect(clientId, username, password, NULL, MQTT::QOS0, 0, NULL, true);
        delay(2000);

        if (client.isConnected()) {
            client.subscribe(subscribeTopic);
            Particle.publish("Subscribed");
        } else {
            Particle.publish("Not connected");
        }
    }
}
测试您的代码
要测试您的代码,请使用位于 https://cheerlights.com/growing-the-community-new-cheerlights-discord-bot/ 的 cheer lights discord 服务器更改 CheerLights 颜色。
另请参阅
Subscribe to a Channel Feed | Subscribe to a Channel Field Feed