安装 Polyspace Server 和 Access 产品
Polyspace® 使用静态分析检查 C/C++ 代码中是否存在 Bug、运行时错误、编码标准违规和其他问题。您可以使用以下产品在服务器级别的计算机上运行 Polyspace 分析并在 Web 浏览器中审查分析结果:
用于查找 Bug 和编码违规的 Polyspace Bug Finder™ Server™
用于进行详尽代码验证的 Polyspace Code Prover™ Server
基于 Web 浏览器对分析结果进行审查的 Polyspace Access™(从 Polyspace Bug Finder Server 或 Polyspace Code Prover Server 启动执行)
通过将这些产品与自动化编译工具配合使用,您可以将 Polyspace 分析集成到持续集成系统中。
您需要安装什么
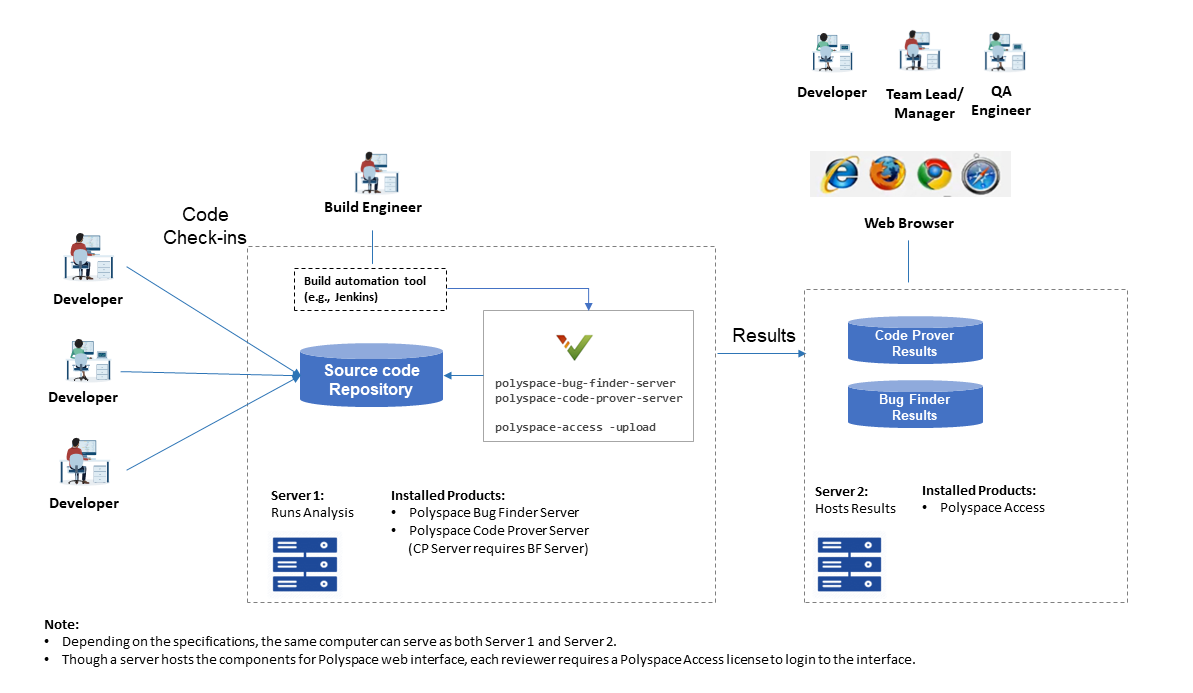
在持续集成过程中,开发人员将代码提交到共享存储库。自动化编译系统定期或基于预定义的触发器对每次提交的代码进行编译和测试,然后对代码进行集成。您可以在此过程中运行 Polyspace 分析。

此工作流包括三个步骤:
触发 Polyspace 分析:
当开发人员提交其代码时,自动化编译工具(例如 Jenkins®)会触发 Polyspace 分析。
运行 Polyspace 分析:
分析是使用 Polyspace Bug Finder Server 或 Polyspace Code Prover Server 产品运行的。结果将上传到托管 Polyspace Access Web 界面的服务器端。服务器端的这一台计算机既可以运行分析,也可以托管上传的结果。
审查分析结果:
要查看上传结果,每位评审都必须拥有一个 Polyspace Access 许可证,用于登录到 Polyspace Access Web 界面。
以下步骤介绍了提交代码后的工作流。在提交代码前,开发人员可以:
在桌面端运行 Polyspace 分析并审查结果。请参阅安装 Polyspace 桌面端产品。
将 Polyspace 分析负载从其桌面端转移到远程服务器端,并在其桌面端审查下载的结果。请参阅安装用于将 Polyspace 分析从桌面端提交到远程服务器端的产品。
有关所有 Polyspace 产品的概述,请参阅Polyspace 产品和软件开发工作流。
产品安装
要执行此工作流,您必须在充当服务器的计算机上安装以下产品。
用于运行分析的 Polyspace 产品
安装 Polyspace Bug Finder Server 或 Polyspace Code Prover Server 以运行分析并将结果上传到 Web 界面以进行审查。
安装
运行 MathWorks® 安装程序。为 Polyspace 服务器端产品选择一个许可证。您可以通过购买产品或申请试用版来获取安装程序和许可证。有关详细说明,请参阅安装和许可。
在安装 Polyspace Server 产品时一并安装网络许可证管理器(如未安装),用于管理许可证。配置许可证管理器,使其在重新启动时自动启动。例如,在 Windows® 中,您可以配置许可证管理器,使其作为服务启动。
在安装结束后,启动网络许可证管理器。请参阅启动和停止网络许可证管理器。
要在命令行以非交互方式或静默方式安装产品,请参阅以非交互方式进行安装。
要安装 Polyspace Code Prover Server,您需要先有 Polyspace Bug Finder Server。为进行更高效地分析,运行分析的计算机应该至少具有四个物理核,每个核至少应有 4 GB 内存。Code Prover 分析最多可以并行执行四个核。Bug Finder 分析可以使用最大数量的可用核。
安装文件夹. 系统会根据您的操作系统和发布版本使用一个默认安装文件夹。在安装过程中,您可以根据需要更改此默认文件夹。
例如,下面列出了版本 R2025b 的默认安装文件夹。
| 操作系统 | 默认安装文件夹 |
|---|---|
| Windows | C:\Program Files\Polyspace Server\R2025b |
| Linux®(大多数分发版) | /usr/local/Polyspace_Server/R2025b |
| Mac | /Applications/Polyspace_Server/R2025b |
请注意,polyspaceroot\polyspace\binpolyspacerootPATH 环境变量中。
用于审查结果的 Polyspace 产品
安装用于托管 Polyspace Access 的 Web 界面的组件。
要在 Web 界面中查看结果,每位评审都必须拥有一个 Polyspace Access 许可证。
安装. 请参阅安装用于 Web 审查的 Polyspace Access。
用于调度 Polyspace 分析的产品
在持续集成工作流中,会使用自动化编译工具在编译过程中调度 Polyspace 分析。运行 Polyspace 分析或审查结果时不需要使用此工具,只有在将分析集成到整个软件编译和测试工作流时才需要使用此工具。
例如,Jenkins 是一个常用的开源工具,可以执行编译脚本。为方便编写脚本,Jenkins 中的一个 Polyspace 插件即提供了可以自动执行 Polyspace 静态分析的编译环境,同时还简化了针对 Polyspace 结果的分析后电子邮件通知。
安装. 安装用于持续集成或自动化编译的工具。
例如,要安装 Jenkins,请参阅 Jenkins 网站。在 Jenkins 界面中,从左侧选择管理 Jenkins。选择管理插件。搜索 Polyspace 插件,然后下载并安装该插件。
版本兼容性
如果您将 Polyspace 分析结果上传到 Polyspace Access,您必须使用与 Polyspace Access 版本相同或更低的 Polyspace Server 版本。例如,如果您将结果上传到 Polyspace Access 的 R2025b 版本,则必须使用 R2025b 或更低版本的 Polyspace Server。
更具体地说,如果您将分析结果上传到 Polyspace Access:
分析必须使用相同或更低版本的 Polyspace Server 运行。
上传命令必须来自相同或更低版本的 Polyspace Server。
同样的注意事项还适用于:
从 Polyspace Access 导出结果及生成报告。
从 Polyspace 桌面端产品将结果上传到 Polyspace Access。
检查 Polyspace 安装
要检查 Polyspace Bug Finder Server 是否安装成功,请执行以下操作:
打开一个命令行窗口。导航到
polyspaceserverroot\polyspace\binpolyspaceserverrootC:\Program Files\Polyspace Server\R2025b。输入:
polyspace-bug-finder-server -help
您应该会看到 Bug Finder 分析可以使用的选项的列表。要检查 Polyspace Code Prover Server 是否安装成功,可以对 Polyspace Code Prover Server 执行同样的操作。只需将 polyspace-bug-finder-server 替换为 polyspace-code-prover-server 即可。
要检查是否已设置 PolyspaceAccess Web 界面以上传结果,请执行以下操作:
再次导航到
polyspaceserverroot\polyspace\bin输入:
polyspace-access -host hostName -port portNumber -create-project testProject
其中,
hostNamelocalhost。portNumber9443。如果连接成功,则会在 Polyspace Access Web 界面中创建一个名为
testProject的工程。在 Web 浏览器中打开以下 URL:
其中,https://hostName:portNumber/metrics/index.html
hostNameportNumber
在 PolyspaceAccess Access Web 界面上的工程资源管理器窗格中,您会看到新创建的工程 testProject。
安装 Polyspace 和其他 MathWorks 产品
安装其他 Polyspace 产品
要安装其他 Polyspace 基础产品,请为每个基础产品再次运行 MathWorks 安装程序。
Polyspace Test™ 和 Bug Finder 桌面端和服务器端产品是基础产品。您通常将 Code Prover 桌面端和服务器端产品作为 Bug Finder 桌面端和服务器端产品安装的一部分进行安装。
例如,要安装 Polyspace Test、Polyspace Bug Finder 和 Polyspace Bug Finder Server,请运行安装程序三次。在每次运行中,请选择适当的许可证并按照提示进行操作。您不能将 Bug Finder 和 Code Prover 服务器端产品与其他 Polyspace 产品安装在同一安装文件夹中。
安装其他 MathWorks 产品
要安装 Polyspace 和其他 MathWorks 产品(例如 MATLAB®),请运行 MathWorks 安装程序两次。
在第一次运行时,选择与其他 MathWorks 产品(例如 MATLAB、Simulink® 或 Embedded Coder®)对应的许可证。
在第二次运行时,选择与 Polyspace 产品对应的许可证。如果您要安装多个 Polyspace 基础产品,请参阅安装其他 Polyspace 产品。
在此工作流中,MATLAB 和 Simulink 等产品将安装在与 Polyspace 产品不同的根文件夹中。您可以将两个安装链接起来,并使用 MATLAB 脚本来运行 Polyspace。请参阅将 Polyspace 与 MATLAB 和 Simulink 集成。
安装较早的 Polyspace 产品版本
如果您从 MathWorks 下载页面下载 MathWorks 安装程序,您将获得所安装产品版本的最新更新。
要安装产品的先前更新,请按照以下步骤操作:
从 MathWorks 下载页面中,选择产品版本,然后在我要下拉列表中,选择获取 ISO 和 DMG,而不是安装产品。
从选择版本和选择更新下拉列表中,选择您想要安装的版本和更新编号。
从获取适用于 MATLAB 和 Simulink 产品的 ISO 和 DMG 部分,下载 MathWorks 安装程序。
启动安装程序,并提供您的 MathWorks 帐户信息。如果您拥有 Polyspace 产品的许可证,您应该会在选择许可证表中看到列出的产品许可证。选择合适的产品许可证,然后继续进行安装。有关此工作流的详细信息,请参阅以编程方式安装产品。