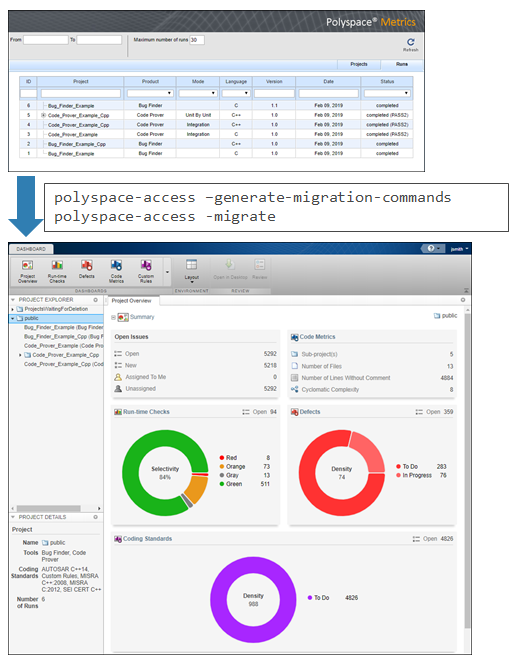
Migrate Results from Polyspace Metrics to Polyspace Access
If you use Polyspace® Metrics to store results and monitor the quality of your source code, you can transfer those results to Polyspace Access™.
The Polyspace Access Dashboard perspective offers a web interface with navigation between projects and categories of results. From the Project Overview dashboard, view aggregated statistics for all your projects or drill down to view results details by category or file. For each family of findings, open an additional dashboard to see details. After you narrow down the set of findings that you want to address, open them in the Review perspective to start reviewing individual results.
Note
The Review perspective is only available for analysis results generated with a Polyspace product version R2019a or later. To review R2018b or earlier results that you migrated to Polyspace Access, see Open or Export Results from Polyspace Access (Polyspace Access).
You can also review results from Polyspace Access by opening them in the Polyspace desktop interface. You do not need to download a local copy of Polyspace Access results to view those results in the desktop interface. The edits that you make to the results are saved directly in Polyspace Access and enable you to perform collaborative reviews.

Requirements for Migration
The transfer of results from the Metrics repository to the Polyspace
Access database requires the polyspace-access binary. This
binary is available under the
polyspaceroot/polyspace/binpolyspaceroot is the Polyspace product installation folder, for instance C:\Program
Files\Polyspace Server\2019a.
For syntax and examples, see polyspace-access -generate-migration-commands (Polyspace Access) and polyspace-access -migrate (Polyspace Access).
Migration of Results
To migrate results from Polyspace Metrics to Polyspace Access, follow these steps. You must be logged in to your Metrics server to complete this operation.
Identify the Metrics results repository location. The Polyspace Metrics results are stored in the
results-repositoryfolder at that location.To view the path to this location, from the desktop interface, go to Tools > Metrics Server Settings. Or, at the command line, run the command
psqueue-check-config.By default, results are stored under
C:\Users\on Windows® andusername\AppData\Roaming\Polyspace_RLDatas\results-repository/home/on Linux®.username/.polyspace/results-repositoryusernameis your computer login user name.Generate migration scripts.
Once you identify the folder of the repository from which you want to transfer results, define a migration strategy. You can choose to transfer all your projects or you can narrow down the scope of the transfer to a specific set of projects.
Specify a set of projects with the options listed in this table.
Option Description -max-project-runsintNumber of most recent analysis runs you want to migrate for each project. For instance, to migrate only the last two analysis runs of a project, specify 2.
-project-date-afterYYYY[-MM[-DD]]Only migrate results that were uploaded to Polyspace Metrics on or after the specified date.
-productproductNameProduct used to analyze and produce project findings, specified as
bug-finder,code-prover, orpolyspace-ada.-analysis-modemodeAnalysis mode used to generate project findings, specified as
integrationorunit-by-unit.For example, to transfer only Polyspace Bug Finder™ analysis results that you uploaded to Polyspace Metrics on or after June 2017, use this command:
The command outputs a migration script file for each project stored inpolyspace-access -generate-migration-commands ^ C:\Users\username\AppData\Roaming\Polyspace_RLDatas\results-repository ^ -output-folder-path C:\Polyspace_Workspace\Migrate^ -project-date-after 2017-06^ -product bug-finder
C:\Users\that matches the specified product and date. The migration scripts are stored underusername\AppData\Roaming\Polyspace_RLDatas\results-repositoryC:\Polyspace_Workspace\Migrate.Before you continue, you can optionally open the migration scripts in a text editor and modify the
-projector-parent-projectparameters. The parameters correspond to the name of the project and the folder under which it is stored in Polyspace Access, respectively.Migrate the projects.
After you generate the migration scripts, to transfer all the selected projects use those scripts with this migration command:
The command looks for migration scripts underpolyspace-access -host hostName -port port ^ -migrate -option-file-path ^ C:\Polyspace_Workspace\Migrate
C:\Polyspace_Workspace\Migrateand uploads the results to the Polyspace Access instance that you specify withhostName. Enter your Polyspace Access user name and password at the prompt.hostNameporthttps://. If you are unsure about which host name and port number to use, contact your Polyspace Access administrator. Depending on your configuration, you might also need to specify thehostName:port/metrics/index.html-protocoloption in the migration command.During the execution of a migration script, the command generates a temporary
STARTEDfile. After each successful execution of a migration script, the command deletes theSTARTEDfile and generates a correspondingDONEfile in the same folder as the script. For example, the command generatesfoo.startedduring the execution offoo.cmd, and thenfoo.doneoncefoo.cmdis done. Do not delete theseDONEfiles until you have completed your migration from Metrics to Access.Depending on the amount of data that you are transferring and on your network configuration, the migration might take a long time. You can interrupt the transfer, and then continue from where you left off at a later time. To stop the transfer, press CTRL+C. To restart the transfer:
Go to the folder where you store the migration scripts and open the
STARTEDfile in a text editor. The file might be in a subfolder of the migration scripts folder.Follow the instructions in the file, then reuse the same migration command that you used when you started the migration. The command skips projects that uploaded successfully.
If a project migration fails, go to the migration script folder. See the
FAILED file for more information.
Differences in SQO Between Polyspace Metrics and Polyspace Access
After you migrate your projects from Polyspace Metrics to Polyspace Access, you might notice differences when you examine your code quality against Evaluate Polyspace Code Prover Results Against Software Quality Objectives (Polyspace Code Prover).
The difference is due to the way Polyspace Metrics and Polyspace
Access calculate the thresholds for the quality objectives. Polyspace Metrics looks at individual files to determine whether your code achieves
a given SQO threshold. For instance, if file foo.c does not achieve
threshold SQO2, then the whole project does not achieve that
threshold.
Polyspace
Access looks at the whole project to determine whether your source code meets a
given SQO threshold. Even if file foo.c does not achieve the
threshold, the whole project can still meet the specified quality objective
threshold.