在服务器端运行 Polyspace Code Prover 并将结果上传到 Web 界面
Polyspace® Code Prover™ Server™ 会证明 C/C++ 代码中不存在运行时错误,然后将检查结果上传到 Web 界面以便进行代码审查。
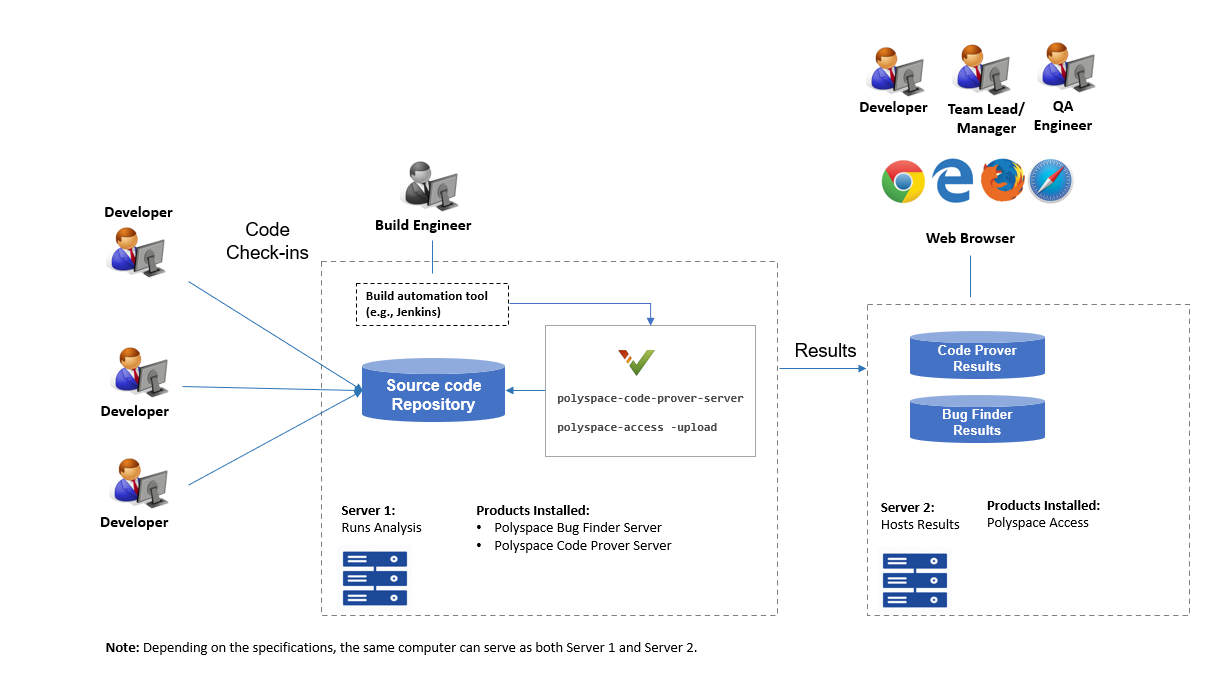
您可以将运行 Code Prover 作为持续集成的一部分。可以设置脚本,以按固定时间间隔或基于提交的新代码运行 Code Prover 分析。这些脚本可以上传分析结果,以便在 Polyspace Web 界面中审查,还可视需要向源文件的所有者发送 Polyspace 检查结果。负责人可以打开 Web 界面,仅审查自己提交的代码的新检查结果,然后对问题进行修复或申述。
在典型的工程或团队中,Polyspace Code Prover Server 可在多台测试服务器上定期运行并上传结果以供审查。团队中的每位开发人员和质量工程师都有一个 Polyspace Access™ 许可证,可用于在 Web 界面中查看结果以进行调查和 Bug 修复。

前提条件
要在服务器端运行 Code Prover 分析并在 Polyspace Access Web 界面中审查结果,请执行以下一次性设置:
要运行分析,请安装 Polyspace Code Prover Server 产品的一个实例。
要上传结果,请设置托管 Polyspace Access 的 Web 界面所需的组件。
要查看上传的结果,您和审查结果的每位开发人员都必须有 Polyspace Access 许可证。
检查 Polyspace 安装
要检查是否已安装 Polyspace Code Prover Server,请执行以下操作:
打开一个命令行窗口。导航到
polyspaceserverroot\polyspace\binpolyspaceserverrootC:\Program Files\Polyspace Server\R2025b。另请参阅安装文件夹。输入:
polyspace-code-prover-server -help
您应该会看到 Code Prover 分析可以使用的选项列表。
要检查是否已设置 Polyspace Web 界面以上传结果,请执行以下操作:
再次导航到
polyspaceserverroot\polyspace\bin输入:
polyspace-access -host <hostName> -port <portNumber> -create-project testProject其中,
hostNamelocalhost。portNumber9443。如果设置已完成,则 Polyspace Web 界面中会创建一个名为
testProject的工程。每次使用
polyspace-access命令时都会提示您输入登录名和密码。为避免每次都输入登录信息,请随该命令提供登录名和您的密码的加密版本。要创建加密密码,请输入:输入您的登录名和密码。复制加密密码,并在使用polyspace-access -encrypt-passwordpolyspace-access命令时使用-encrypted-password选项并提供此加密密码。在 Web 浏览器中打开以下 URL:
其中,https://<hostName>:<portNumber>/metrics/index.htmlhostNameportNumber
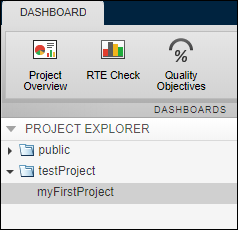
在 Polyspace Web 界面上的工程资源管理器窗格中,您会看到新创建的工程 testProject。
对示例文件运行 Code Prover
要运行 Code Prover,请在操作系统中打开一个命令行窗口。
要运行 Code Prover 分析,请使用
polyspace-code-prover-server命令。要在 Polyspace Access Web 界面中创建工程文件夹,请使用
polyspace-access -create-project(Polyspace Access) 命令。要将结果上传到工程,请使用
polyspace-access -upload(Polyspace Access) 命令。
为避免键入完整的命令路径,请将路径 polyspaceserverroot\polyspace\binPath 环境变量中。
对随您的 Polyspace 安装提供的示例文件试用这些命令。
将示例源文件从
polyspaceserverroot\polyspace\examples\cxx\Code_Prover_Example\sources输入:
polyspace-code-prover-server -sources example.c,single_file_analysis.c -I . -main-generator -results-dir .
polyspace-access -host <hostName> -port <portNumber> -login <username> -encrypted-password <pwd> -create-project testProject
polyspace-access -host <hostName> -port <portNumber><portNumber> -login <username> -encrypted-password <pwd> -upload . -project myFirstProject -parent-project testProject
其中,
usernamepwd
刷新 Polyspace Web 界面。您会在工程资源管理器窗格的 testProject 文件夹下看到新上传的结果。

要查看工程中的结果,请点击审查。有关详细信息,请参阅在 Web 浏览器中审查 Polyspace Code Prover 结果。也可以使用 Polyspace Access 界面右上角的  按钮来访问该文档。
与 polyspace-code-prover-server 命令一起使用的选项包括:
-sources:指定逗号分隔的源文件。-I:指定包含文件夹的路径。每次要添加单独的包含文件夹时,请使用-I标志。-results-dir:指定将保存 Polyspace Code Prover 结果的文件夹的路径。请注意,每次运行时都会清理并重新填充结果文件夹。为避免在清理过程中意外删除文件,请为 Polyspace 结果指定一个专用文件夹,而不是使用包含其他文件的现有文件夹。
验证模块或库 (-main-generator):指定如果在源文件中找不到main函数,则必须生成该函数
有关可用于 Code Prover 分析的选项的完整列表,请参阅 Polyspace Code Prover 分析选项的完整列表。要在系统 Web 浏览器中打开该 Code Prover 文档,请输入:
polyspace-code-prover-server -doc在服务器端进行 Code Prover 分析的示例脚本
要运行分析,您可以使用脚本而非在命令行中键入命令。脚本可以在您每次添加或修改源文件时运行。
下面显示的是一个示例 Windows® 批处理文件。在该示例中,Polyspace 的安装路径是在脚本中指定的。要使用此脚本,请将 polyspaceserverroot 替换为您的安装路径。您必须提前生成要在脚本中使用的加密密码。请参阅检查 Polyspace 安装。
echo off
set POLYSPACE_PATH=polyspaceserverroot\polyspace\bin
set LOGIN=-host hostName -port portNumber -login <username> -encrypted-password <pwd>
"%POLYSPACE_PATH%\polyspace-code-prover-server" -sources example.c,single_file_analysis.c -I .^
 -main-generator -results-dir .
"%POLYSPACE_PATH%\polyspace-access" %LOGIN% -create-project testProject
"%POLYSPACE_PATH%\polyspace-access" %LOGIN% -upload . -project myFirstProject -parent-project testProject
pause
下面显示的是一个示例 Linux® shell 脚本。
POLYSPACE_PATH=polyspaceserverroot/polyspace/bin
LOGIN=-host hostName -port portNumber -login <username> -encrypted-password <pwd>
${POLYSPACE_PATH}/polyspace-code-prover-server -sources example.c,single_file_analysis.c -I .\
 -main-generator -results-dir .
${POLYSPACE_PATH}/polyspace-access $LOGIN -create-project testProject
${POLYSPACE_PATH}/polyspace-access $LOGIN -upload . -project myFirstProject -parent-project testProject
在启动脚本以外的单独文件中指定源和选项
您可以在单独的文本文件中列出源文件和分析选项,而不必在启动脚本中列出。
使用
-sources-list-file选项指定列出源文件的文本文件。使用
-options-file选项指定列出分析选项的文本文件。
通过从启动脚本中删除源文件和分析选项设定,您可以在有新的代码提交时根据需要修改这些设定,同时保持启动脚本不变。
假定使用前面示例中的脚本。您可以修改 polyspace-code-prover-server 命令以使用文本文件指定源文件和选项。不使用:
polyspace-code-prover-server -sources example.c,single_file_analysis.c -I . -main-generator -results-dir .polyspace-code-prover-server -sources-list-file sources.txt -options-file polyspace_opts.txt -results-dir .sources.txt列出了源文件:example.c single_file_analysis.cpolyspace_opts.txt在单独的行中列出分析选项:-I . -main-generator
通常,源文件是在编译命令(联编文件)中指定的。除了直接指定源文件,您也可以跟踪编译命令来创建一个源文件设定列表。请参阅 polyspace-configure。
完整工作流
在典型的持续集成工作流中,您需要运行一个执行以下步骤的脚本:
从您的编译命令中提取 Polyspace 选项。
例如,如果您使用联编文件来编译您的源代码,则可以从联编文件中提取分析选项。下面的命令首先执行
make,然后根据执行的流程确定分析选项。polyspace-configure -output-options-file compile_opts make另请参阅:
使用之前创建的选项文件运行分析。追加另一个包含分析所需的其余选项的选项文件。
polyspace-code-prover-server -options-file compile_opts -options-file run_opts请参阅指定多个选项文件。
将结果上传到 Polyspace Access。
polyspace-access <login> -upload <resultsFolder> -project <projName> -parent-project <parentProjName>其中,
login-host <hostName> -port <portNumber> -login <username> -encrypted-password <pwd>
resultsFolderprojNameparentProjName(可选)向开发人员发送电子邮件通知,告知他们所提交的代码的新结果。电子邮件包含的附件中有指向 Polyspace Access Web 界面中结果的链接。
请参阅使用 Jenkins 进行 Polyspace 分析的示例脚本中用于执行这些步骤的脚本示例。