Add Source Files for Analysis in Polyspace User Interface
This topic shows how to create a project in the user interface of the Polyspace® desktop products.
If using the Polyspace Server products, see Set Up Code Prover Analysis on Servers During Continuous Integration.
If using Polyspace as You Code, see Set Up Polyspace Analysis in IDEs.
To begin a Polyspace analysis, you must specify the path to your source files and headers.
You can specify your source paths explicitly or extract them from a build command (makefile) after executing the command. If you use a build command for building your source code or build your source code in an IDE (using an underlying build command), try extracting from the build command first. If Polyspace cannot trace your build command, manually add the paths to your source and include folders. You specify the target and compiler options later. See Target and Compiler.
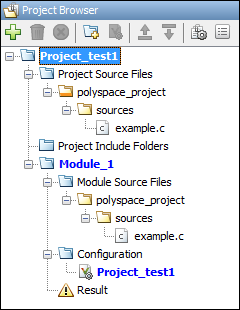
Provide the source paths in a Polyspace project. The source files are displayed on the Project Browser pane.
A corresponding .psprj
file is created in the location where you
saved the project. When you create a project, choose the default location for saving it
or enter a new location. To change the default location, select Tools > Preferences and use the options on the Project and Results Folder
tab.
Polyspace Project and Source File Paths
A Polyspace project points to source files using their absolute paths. However, each time you reopen a project in the Polyspace user interface, the absolute paths to the sources are recomputed relative to the current location of the project.
For instance, suppose that a project is stored in:
//networkLocation/polyspaceProjects/
//networkLocation/src/file.c
//usr/local/polyspaceProjects/
//usr/local/src/file.c
Because source file paths are recomputed relative to a project path, you can commit a Polyspace project to a version control system along with your source files. When you check out the project from your version control system and open a local copy of the project, all source file paths are recomputed based on the new location of the project. The project now points to a local copy of the source files.
Adding Sources
Add Sources from Build Command
If you use a build command such as make
to build your source code (or build your source code in an IDE), you can create a Polyspace project from your build command. To create a Polyspace project from a build command, do one of the following:
Run
on your build command and create a Polyspace project (polyspace-configure
file). You can open this project in the Polyspace Platform user interface.projectName
.psprjxCreate a project directly in the Polyspace user interface.
Creating a project at the command line might have certain advantages:
You can make sure that your build command completes successfully and simply prepend
polyspace-configure
(along with required options) to your build command.You can execute your build command on command-line interfaces with predefined environment variables. For instance, you can execute a Microsoft® Visual Studio® build command on a developer command prompt, where environment variables related a Visual Studio build are already set up. You do not have access to these environment variables from within the Polyspace Platform user interface.
This section describes how to create a Polyspace project in the user interface from a build command.
Select File > New Project. Select Create from build command.
After providing a project name and location, on the next window, enter this information:
The build command, exactly as you run it on your code.
The folder from which you run your build command.
If you build your source code within an IDE such as Visual Studio, in the field for specifying the build command, enter the path to your executable, for instance,
C:\Program Files (x86)\Microsoft Visual Studio 10.0\Common7\IDE\VCExpress.exe
.Click Run. Polyspace runs the build command and extracts the information for creating a Polyspace project, specifically, source paths and compiler information.
If you specified the path to an IDE for the build command, when you click Run, Polyspace opens your IDE. In your IDE, perform a complete build of your code. When you close your IDE, Polyspace extracts your source paths and compiler information. See also Create Polyspace Projects from Visual Studio Build.
When you create a project from your build command, the Project
Browser pane displays your source folders but not the include
folders. In case you want to verify that your include folders were extracted, open
the project file (with extension .psprj
) in a text editor.
You can use additional options to modify the default project creation from build
command. For instance, to create a Polyspace project despite build errors, in the Add advanced configure
options field, enter the option
-allow-build-error
. To look up allowed options, see polyspace-configure
.
Add Sources Manually
Select File > New Project.
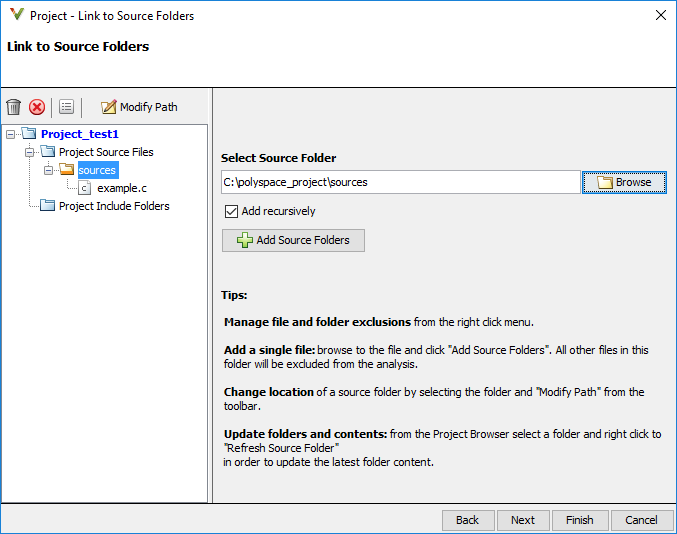
After providing a project name and location, on the next window, enter or navigate to the root folder containing your source files. After selecting the Add recursively box, click Add Source Folders. All files in the folder and subfolders are added to your project. To exclude specific files or folders from analysis, right-click the files or folders and select Exclude Files.
On the next window, add include folders. The analysis looks for include files
relative to the include folder paths that you specify. For instance, if your code
contains the preprocessor directive #include<../mylib.h>
and
you include the
folder:
C:\My_Project\MySourceFiles\Includes
C:\My_Project\MySourceFiles
must contain a file
mylib.h
.For Standard Library headers such as stdio.h
, if you know the
path to the headers from your compiler, specify them explicitly. Otherwise, the
analysis uses Polyspace implementation of the Standard Library headers, which in some special
cases, might not match your compiler implementation. See also Provide Standard Library Headers for Polyspace Analysis.
Your project file with source and include folders are displayed in the Project Browser pane. Later, if you add files to one of these folders, you can update your project. Right-click the folder that you want to update, or the entire Project Source Files folder, and select Refresh Source Folder.
You can also right-click to exclude files or add more folders to the project. The files that you add the first time are copied to the first module in your project. If you add new files later, you must explicitly right-click them and add them to a module.
Add Source Files Based on AUTOSAR Design Specifications
If your code implements AUTOSAR software components, you can provide the top level folder containing your AUTOSAR design specifications and folders containing the source code implementation of those specifications.
Select File > New. In the Project-Properties window, select Create from AUTOSAR specification.
Specify the top level folder containing your ARXML files and all the folders containing source files.
For details, see Run Polyspace on AUTOSAR Code.