Main Content

Remove Low Frequency Noise in Simulink Using Normalized LMS Adaptive Filter

Adaptive filters track the dynamic nature of a system and allow you to eliminate time-varying signals. The DSP System Toolbox™ libraries contain blocks that implement least-mean-square (LMS), block LMS, fast block LMS, and recursive least squares (RLS) adaptive filter algorithms. These filters minimize the difference between the output signal and the desired signal by altering their filter coefficients. Over time, the adaptive filter's output signal more closely approximates the signal you want to reproduce.

Design an Adaptive Filter in Simulink

In this example, you design an LMS adaptive filter to remove the low frequency noise in your signal:

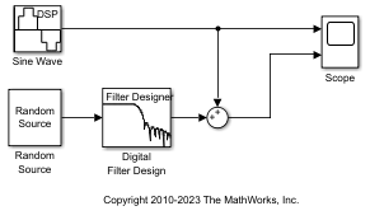
If the model you created in Add a Digital Filter to Your Model is not open on your desktop, open ex_gstut5 which is an equivalent model.

gstut5.png

Open the DSP System Toolbox™ library by typing dsplib at the MATLAB® command prompt.

Remove the low frequency noise from your signal by adding an LMS Filter block to your system. In the airplane scenario, this is equivalent to subtracting the wind noise inside the cockpit from the input to the microphone. Double-click the Filtering library, and then double-click the Adaptive Filters library. Add the LMS Filter block into your model.

gstut5_with_LMS.png

Set the LMS Filter block parameters to model the output of the Digital Filter Design block. Open the LMS Filter dialog box by double-clicking the block. Set and apply the block parameters as follows:

  • Algorithm = Normalized LMS

  • Filter length = 32

  • Specify step size via = Dialog

  • Step size (mu) = 0.1

  • Leakage factor (0 to 1) = 1.0

  • Initial value of filter weights = 0

  • Clear the Adapt port check box.

  • Reset port = None

  • Select the Output filter weights check box.

Based on these parameters, the LMS Filter block computes the filter weights using the normalized LMS equations. The filter order you specified is the same as the filter order of the Digital Filter Design block. The Step size (mu) parameter defines the granularity of the filter update steps. Because you set the Leakage factor (0 to 1) parameter to 1.0, the current filter coefficient values depend on the filter's initial conditions and all of the previous input values. The initial value of the filter weights (coefficients) is zero. Since you selected the Output filter weights check box, the Wts port appears on the block. The block outputs the filter weights from this port.

Now that you have set the block parameters of the LMS Filter block, you can incorporate this block into your block diagram.

Add an Adaptive Filter to Your Model

In this example, you recover your original sinusoidal signal by incorporating the adaptive filter you designed in Design an Adaptive Filter in Simulink into your system. In the aircraft scenario, the adaptive filter models the low frequency noise heard inside the cockpit. As a result, you can remove the noise so that the pilot's voice is the only input to the microphone:

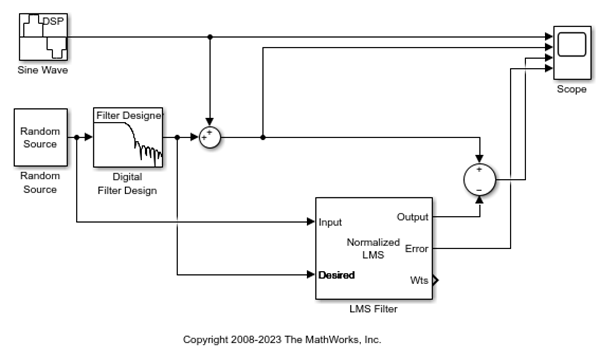
If the model you created in Design an Adaptive Filter in Simulink is not open on your desktop, open ex_gstut6 which is an equivalent model.

gstut6.png

Add a Sum block to your model to subtract the output of the adaptive filter from the sinusoidal signal with low frequency noise. From the Simulink® Math Operations library, drag a Sum block into your model. Open the Sum dialog box by double-clicking this block. Change the List of signs parameter to |+- and then click OK.

Incorporate the LMS Filter block into your system.

  • Connect the output of the Random Source block to the Input port of the LMS Filter block. In the aircraft scenario, the random noise is the white noise measured by the sensor on the outside of the airplane. The LMS Filter block models the effect of the airplane's fuselage on the noise.

  • Connect the output of the Digital Filter Design block to the Desired port on the LMS Filter block. This is the signal you want the LMS block to reproduce.

  • Connect the output of the LMS Filter block to the negative port of the Sum block you added in step 2.

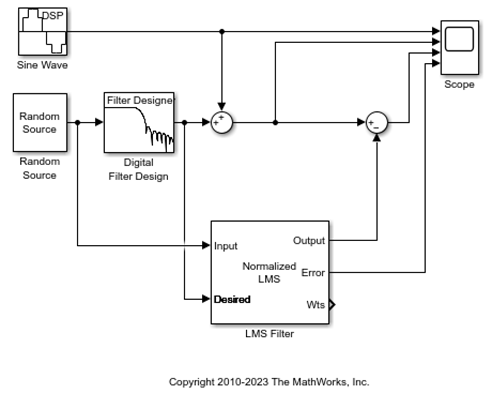
  • Connect the output of the first Sum block to the positive port of the second Sum block. Your model should now look similar to the following figure.

gstut6_intermediate.png

The positive input to the second Sum block is the sum of the input signal and the low frequency noise, s(n) + y. The negative input to the second Sum block is the LMS Filter block's best estimation of the low frequency noise, y'. When you subtract the two signals, you are left with an approximation of the input signal.

s(n)approx=s(n)+y-y

In this equation:

  • s(n) is the input signal.

  • s(n)approx is the approximation of the input signal.

  • y is the noise created by the Random Source block and the Digital Filter Design block.

  • y is the LMS Filter block's approximation of the noise.

Because the LMS Filter block can only approximate the noise, there is still a difference between the input signal and the approximation of the input signal. In subsequent steps, you set up the Scope block so you can compare the original sinusoidal signal with its approximation.

Add two additional inputs and axes to the Scope block. Open the Scope dialog box by double-clicking the Scope block. Click the Parameters button. For the Number of input ports parameter, enter 4. Close the dialog box by clicking OK.

Label the new Scope axes. In the Scope window, right-click on the third axes and select Axes properties. The Scope properties: axis 3 dialog box opens. In the Title box, enter Approximation of Input Signal. Close the dialog box by clicking OK. Repeat this procedure for the fourth axes and label it Error.

Connect the output of the second Sum block to the third port of the Scope block.

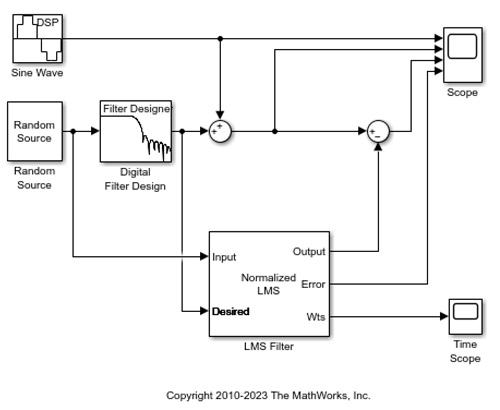
Connect the output of the Error port on the LMS Filter block to the fourth port of the Scope block. Your model should now look similar to the following figure.

gstut6_intermediate2.png

In this example, the output of the Error port is the difference between the LMS filter's desired signal and its output signal. Because the error is never zero, the filter continues to modify the filter coefficients in order to better approximate the low frequency noise. The better the approximation, the more low frequency noise that can be removed from the sinusoidal signal. In the next topic, View the Coefficients of Your Adaptive Filter, you learn how to view the coefficients of your adaptive filter as they change with time.

View the Coefficients of Your Adaptive Filter

The coefficients of an adaptive filter change with time in accordance with a chosen algorithm. Once the algorithm optimizes the filter's performance, these filter coefficients reach their steady-state values. You can view the variation of your coefficients, while the simulation is running, to see them settle to their steady-state values. Then, you can determine whether you can implement these values in your actual system:

If the model you created in Add an Add an Adaptive Filter to Your Model is not open on your desktop, open ex_gstut7 which is an equivalent model.

Note that the Wts port of the adaptive filter, which outputs the filter weights, still needs to be connected.

gstut7.png

Open the DSP System Toolbox™ library by typing dsplib at the MATLAB® command prompt.

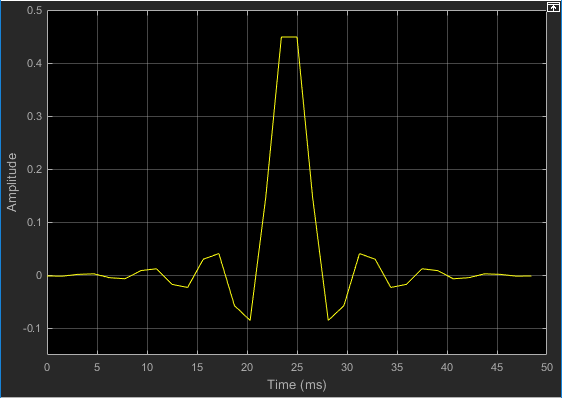
View the filter coefficients by connecting a Time Scope block to the Wts port of the LMS Filter block.

On the Time Scope block, modify the following configuration properties:

  • Time span = 0.05

  • Y-limits (Minimum) = -0.15

  • Y-limits (Maximum) = 0.5

gstut7_completed.png

Open Model Settings. In the Modeling tab, click Model Settings. In the Solver pane, set these configuration parameters:

  • Stop time = inf

  • Type = Fixed-step

  • Solver = discrete (no continuous states)

We recommend these configuration parameters for models that contain DSP System Toolbox blocks. Because these blocks calculate values directly rather than solving differential equations, you must configure the Simulink® Solver to behave like a scheduler. The Solver, while in scheduler mode, uses a block's sample time to determine when the code behind each block is executed. For example, the sample time of the Sine Wave and Random Source blocks in this model is 0.05. The Solver executes the code behind these blocks, and every other block with this sample time, once every 0.05 second.

Note: When working with models that contain DSP System Toolbox blocks, use source blocks that enable you to specify their sample time. If your source block does not have a Sample time parameter, you must add a Zero-Order Hold block in your model and use it to specify the sample time. For more information, see Continuous-Time Source Blocks. The exception to this rule is the Constant block, which can have a constant sample time. When it does, Simulink executes this block and records the constant value once at the start of the simulation and any time you tune a parameter. This allows for faster simulations and more compact generated code.

Run your model and view the behavior of your filter coefficients in the Time Scope, which opens automatically when your simulation starts. Over time, the filter coefficients approach their steady-state values.

weights.png

You can also view the behavior of the system in the Scope window. Over time, you see the error decrease and the approximation of the input signal more closely match the original sinusoidal input signal.

final_results.png

You have now created a model capable of adaptive noise cancellation.

Summary

You have learned how to design a lowpass filter using the Digital Filter Design block. You also learned how to create an adaptive filter using the LMS Filter block. The DSP System Toolbox product has other blocks capable of designing and implementing digital and adaptive filters. For more information on the filtering capabilities of this product, see Filter Design and Filter Analysis.

Because all blocks in this model have the same sample time, this model is single rate, and Simulink® ran it in SingleTasking solver mode. If the blocks in your model have different sample times, your model is multirate and Simulink might run it in MultiTasking solver mode. For more information on solver modes, see Recommended Settings for Discrete-Time Simulations.

To learn how to generate code from your model using the Simulink Coder™ product, see Generate C Code from Simulink Model.

See Also

|

Related Topics