Generate Code by Using Embedded Coder Quick Start
ComponentDeploymentFcn is a simple export-function model that uses
Initialize Function and Terminate Function blocks to represent
startup and shutdown behavior and two function-call subsystems to represent the component
algorithm. You prepare ComponentDeploymentFcn for embedded code generation
by using Embedded Coder® Quick Start, which chooses code generation settings based on your goals and
application.
Generate Code with Quick Start Tool
Open the model
ComponentDeploymentFcnby typing this command:openExample('ecoder/GenerateCServiceInterfaceCodeFromComponentModelExample',... 'supportingFile', 'ComponentDeploymentFcn.slx');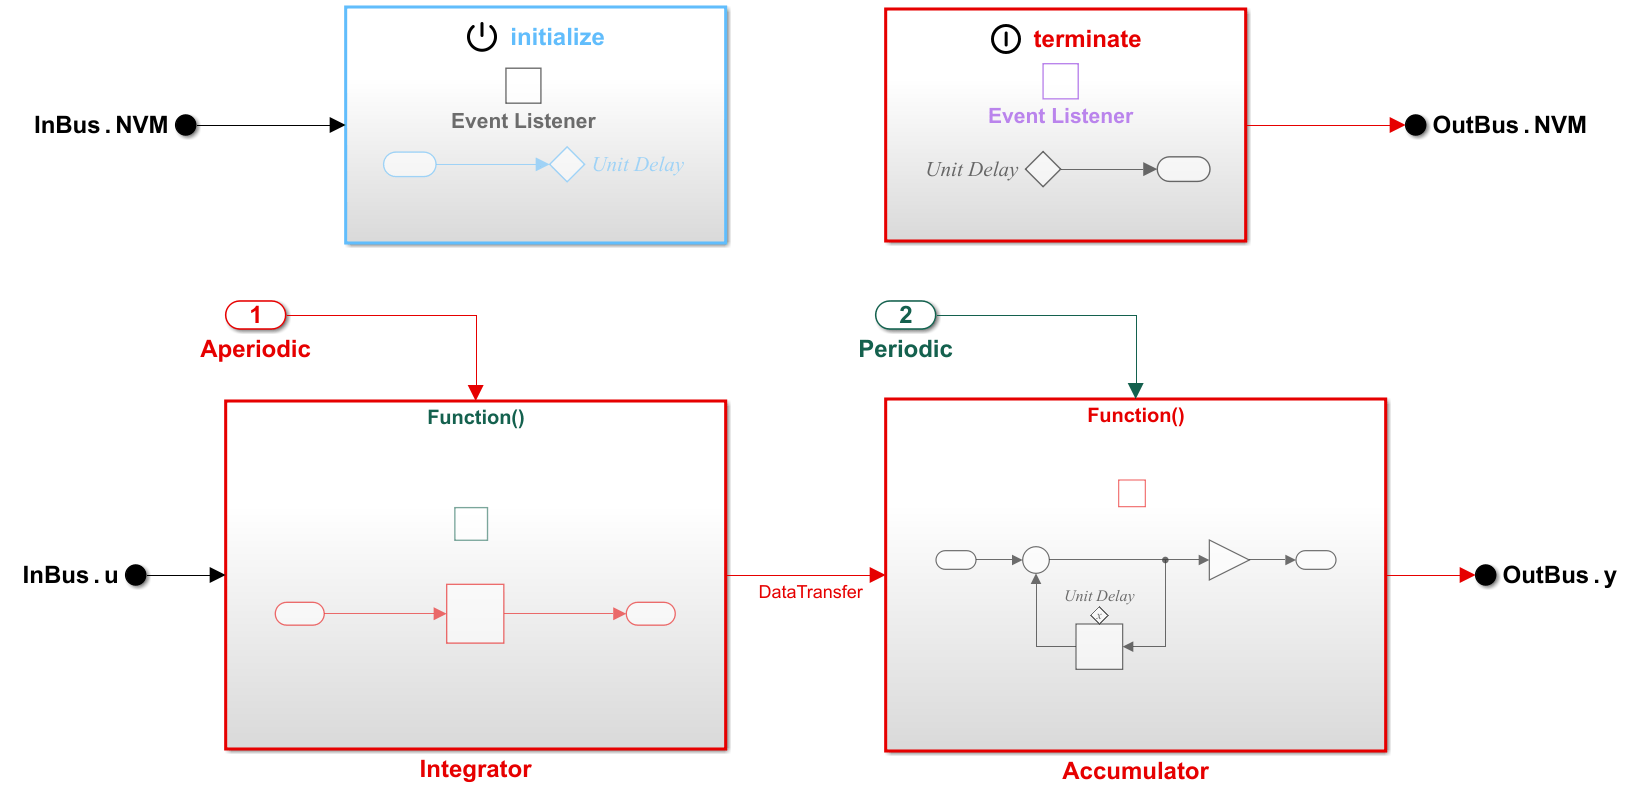
If the C Code tab is not already open, in the Apps gallery, under Code Generation, click Embedded Coder.
On the C Code tab, click Quick Start.

Advance through the steps of the Quick Start tool, stopping at the Generate Code step. Each step asks questions about the code that you want to generate. For this tutorial, use the default settings that are already selected. The tool validates your selections against the model and presents the parameter changes required to generate code.
In the Generate Code step, apply the proposed changes and generate code from
ComponentDeploymentFcnby clicking Next.The Code Generation Complete page presents possible next steps and informs you that the tool configured the model for code generation that applies a service code interface. A service interface configuration maps model data elements to service interfaces that are defined and stored in a shared Embedded Coder Dictionary configured for the model.
Click Finish.
In the Embedded Coder app, return to the C Code tab. From this tab you can configure code generation customizations and check the results in the Code view.

Inspect the Generated Code
The generated code appears in three primary files:
ComponentDeploymentFcn.c, ComponentDeploymentFcn.h,
and services.h. In your MATLAB® current folder, the ComponentDeploymentFcn_ert_rtw folder
contains the files ComponentDeploymentFcn.c and
ComponentDeploymentFcn.h. The file services.h, which
is the header file that specifies function prototypes for target platform services, is in
the folder services.
The folder slprj/ert/_sharedutils contains the file
rtwtypes.h, which defines standard data types that the generated code
uses by default. This folder contains generated files that can or must be shared between
multiple models.
The files ComponentDeploymentFcn.h and
ComponentDeploymentFcn.c declare and define entry-point functions,
which you call from your application code. For this example model, the entry-point functions
include an initialization function, two execution functions, and a terminate function. The
functions exchange data with your target application code through service interfaces that
you configure. The file services.h is a header file that declares
interfaces that the generated entry-point functions use to call target platform
services.
To see the entry-point functions in the generated code:
On the right side of the Simulink® Editor window, in the Code view, locate the search bar.
Click in the search bar and select
CD_accumulator, the name of the entry-point function generated for the function-call subsystemAccumulator.
In
ComponentDeploymentFcn.c, inspect the code generated for entry-point functionCD_accumulator.void CD_accumulator(void) { const real_T *tmpDataTransferIRead; real_T rtb_Sum_0; int32_T i; tmpDataTransferIRead = get_CD_accumulator_DataTransfer(); for (i = 0; i < 10; i++) { rtb_Sum_0 = tmpDataTransferIRead[i] + CD_measured.delay[i]; (getref_CD_accumulator_OutBus_y())[i] = CD_tunable.k * rtb_Sum_0; CD_measured.delay[i] = rtb_Sum_0; } }The entry-point function calls the data transfer service function
get_CD_accumulator_DataTransferto read the output value transferred from the integrator function. For each element of the bus signal, the function applies a delay and gain value and writes the output by calling target platform sender service functiongetref_CD_accumulator_OutBus_y. The data communication method and function names that the code generator applies for the service calls are defined by the service interfaces selected in the Code Mappings editor. By default, the code mappings specify service interfaces configured for data communication that occurs outside of (before and after) function execution and applies data concurrency safeguards. The values of the input data remain unchanged as the function executes. Each time the function accesses the data, the code uses the same value. This method of data communication favors memory optimization over data freshness.In the Code view, use the arrows on the right to step through each instance of
CD_accumulator, including the function definition inComponentDeploymentFcn.cand the declaration inComponentDeploymentFcn.h. You can also see the number of search hits in each file from the file menu.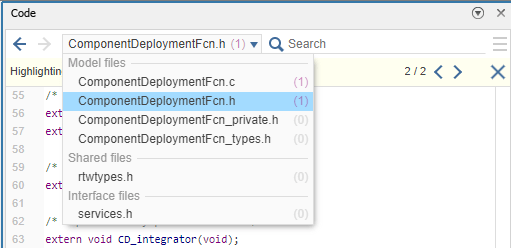
Repeat the search steps to locate and explore instances of the other entry-point functions.
Next, change the service interface configuration and review differences in the generated code.