Specifying the Trigger Type
Comparison of Trigger Types
To specify the type of trigger you want to execute, set the
value of the TriggerType property of the video
input object. You must use the triggerconfig function
to set the value of this property. The following table lists all the
trigger types supported by the toolbox, with information about when
to use each type of trigger.
Comparison of Trigger Types
TriggerType Value | TriggerSource and TriggerCondition Values | Description |
|---|---|---|
| Always | The trigger occurs automatically,
immediately after the |
| Always | The trigger occurs when you issue the |
| Device-specific | Hardware triggers are external signals that are processed directly by the hardware. This type of trigger is used when synchronization with another device is part of the image acquisition setup or when speed is required. A hardware device can process an input signal much faster than software. For more information, see Using a Hardware Trigger. Note Only a subset of image acquisition devices supports hardware triggers. To determine the trigger types supported by your device, see Determining Valid Configurations. |
Note
To get a list of options you can use on a function, press the Tab key after entering a function on the MATLAB® command line. The list expands, and you can scroll to choose a property or value.
Using an Immediate Trigger
To use an immediate trigger, simply create a video input object.
Immediate triggering is the default trigger type for all video input
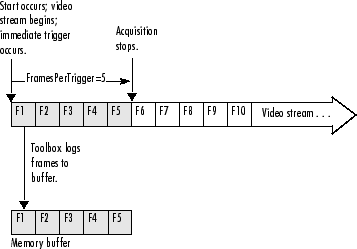
objects. With an immediate trigger, the object executes the trigger
immediately after you start the object running with the start command. The following figure illustrates
an immediate trigger.
Immediate Trigger

The following example illustrates how to use an immediate trigger:
Create an image acquisition object — This example creates a video input object for a Matrox® image acquisition device. To run this example on your system, use the
imaqhwinfofunction to get the object constructor for your image acquisition device and substitute that syntax for the following code.vid = videoinput('matrox',1);Verify that the object has not acquired any frames.
vid.FramesAcquired
ans =

	0
Configure properties — To use an immediate trigger, you do not have to configure the
TriggerTypeproperty because'immediate'is the default trigger type. You can verify this by using thetriggerconfigfunction to view the current trigger configuration or by viewing the video input object's properties.triggerconfig(vid) ans = TriggerType: 'immediate' TriggerCondition: 'none' TriggerSource: 'none'This example sets the value of the
FramesPerTriggerproperty to5. (The default is 10 frames per trigger.)vid.FramesPerTrigger = 5
Start the image acquisition object — Call the
startfunction to start the image acquisition object. By default, the object executes an immediate trigger and acquires five frames of data, logging the data to a memory buffer. After logging the specified number of frames, the object stops running.start(vid)
To verify that the object acquired data, view the value of the
FramesAcquiredproperty. The object updates the value of this property as it acquires data.vid.FramesAcquired ans = 5
To execute another immediate trigger, you must restart the object. Note, however, that this deletes the data acquired by the first trigger. To execute multiple immediate triggers, specify a value for the
TriggerRepeatproperty. See Specifying Multiple Triggers for more information.Clean up — Always remove image acquisition objects from memory, and the variables that reference them, when you no longer need them.
delete(vid)
clear vid
Using a Manual Trigger
To use a manual trigger, create a video input object and set
the value of the TriggerType property to 'manual'.
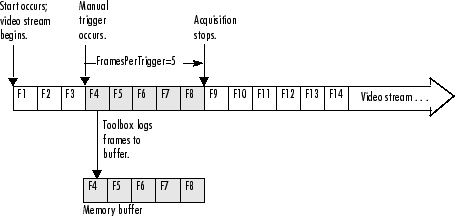
A video input object executes a manual trigger after you issue the trigger function. The following figure illustrates
a manual trigger.
Manual Trigger

The following example illustrates how to use a manual trigger:
Create an image acquisition object — This example creates a video input object for a webcam image acquisition device. To run this example on your system, use the
imaqhwinfofunction to get the object constructor for your image acquisition device and substitute that syntax for the following code.vid = videoinput('winvideo',1);Verify that the object has not acquired any frames.
vid.FramesAcquired
ans =
	0
Configure properties — Set the video input object's
TriggerTypeproperty to'Manual'. To set the values of certain trigger properties, including theTriggerTypeproperty, you must use thetriggerconfigfunction. See Setting the Values of Trigger Properties for more information.triggerconfig(vid, 'Manual')
This example also sets the value of the
FramesPerTriggerproperty to5. (The default is 10 frames per trigger.)vid.FramesPerTrigger = 5
Start the image acquisition object — Call the
startfunction to start the image acquisition object.start(vid);
The video object is now running but not logging. With manual triggers, the video stream begins when the object starts but no frames are acquired until the trigger executes.
isrunning(vid)

ans =

     1

islogging(vid)

ans =

     0
Verify that the object has still not acquired any frames.
vid.FramesAcquired
ans =
	0
Execute the manual trigger — Call the
triggerfunction to execute the manual trigger.trigger(vid)
The object initiates the acquisition of five frames. Check the
FramesAcquiredproperty again to verify that five frames have been acquired.vid.FramesAcquired ans = 5
After it acquires the specified number of frames, the video input object stops running.
isrunning(vid)

ans =

     0
To execute another manual trigger, you must first restart the video input object. Note that this deletes the frames acquired by the first trigger. To execute multiple manual triggers, specify a value for the
TriggerRepeatproperty. See Specifying Multiple Triggers for more information.Clean up — Always remove image acquisition objects from memory, and the variables that reference them, when you no longer need them.
delete(vid)
clear vid
Using a Hardware Trigger
To use a hardware trigger, create a video input object and set
the value of the TriggerType property to 'hardware'.
You must also specify the source of the hardware trigger and the condition
type. The hardware monitors the source you specify for the condition
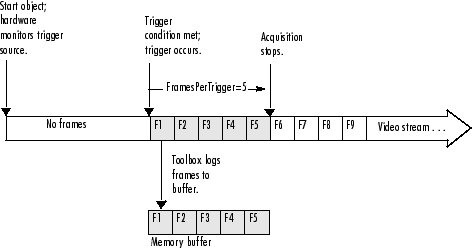
you specify. The following figure illustrates a hardware trigger.
For hardware triggers, the video stream does not start until the trigger
occurs.
Note
Trigger sources and the conditions that control hardware triggers
are device specific. Use the triggerinfo function
to determine whether your image acquisition device supports hardware
triggers and, if it does, which conditions you can configure. Refer
to the documentation that came with your device for more detailed
information about its hardware triggering capabilities.
Hardware Trigger

The following example illustrates how to use a hardware trigger:
Create an image acquisition object — This example creates a video input object for a Matrox image acquisition device. To run this example on your system, use the
imaqhwinfofunction to get the object constructor for your image acquisition device and substitute that syntax for the following code. The device must support hardware triggers.vid = videoinput('matrox',1);Determine valid trigger property configurations — Use the
triggerinfofunction to determine if your image acquisition device supports hardware triggers, and if it does, to find out valid configurations of theTriggerSourceandTriggerConditionproperties. See Determining Valid Configurations for more information.In this example,
triggerinforeturns the following valid trigger configurations.triggerinfo(vid) Valid Trigger Configurations: TriggerType: TriggerCondition: TriggerSource: 'immediate' 'none' 'none' 'manual' 'none' 'none' 'hardware' 'risingEdge' 'TTL' 'hardware' 'fallingEdge' 'TTL'Configure properties — Configure the video input object trigger properties to one of the valid combinations returned by
triggerinfo. You can specify each property value as an argument to thetriggerconfigfunctiontriggerconfig(vid, 'hardware','risingEdge','TTL')
Alternatively, you can set these values by passing one of the structures returned by the
triggerinfofunction to thetriggerconfigfunction.configs = triggerinfo(vid); triggerconfig(vid,configs(3));
This example also sets the value of the
FramesPerTriggerproperty to5. (The default is 10 frames per trigger.)vid.FramesPerTrigger = 5
Start the image acquisition object — Call the
startfunction to start the image acquisition object.start(vid)
The object is running but not logging any data.
isrunning(vid)

ans =

     1

islogging(vid)

ans =

     0
The hardware begins monitoring the trigger source for the specified condition. When the condition is met, the hardware executes a trigger and begins providing image frames to the object. The object acquires the number of frames specified by the
FramesPerTriggerproperty. View the value of theFramesAcquiredproperty to see how much data was acquired. The object updates the value of this property as it acquires data.vid.FramesAcquired ans = 5After it executes the trigger and acquires the specified number of frames, the video input object stops running.
isrunning(vid)

ans =

     0
To execute another hardware trigger, you must first restart the video input object. Note that this deletes the frames acquired by the first trigger. To execute multiple triggers, specify a value for the
TriggerRepeatproperty. See Specifying Multiple Triggers for more information.Clean up — Always remove image acquisition objects from memory, and the variables that reference them, when you no longer need them.
delete(vid)
clear vid
Setting DCAM-Specific Trigger Modes
You can now use all trigger modes and all trigger inputs that
DCAM cameras support. Previous toolbox releases supported only trigger
mode 0. Support for additional trigger modes and
inputs do not affect any existing code you use.
Control trigger functionality using the triggerinfo and triggerconfig functions
and the triggersource property. Before R2010a,
one triggersource was available, externalTrigger.
Selecting externalTrigger configures the camera
to use trigger mode 0 with trigger source 0.
The triggersource property is now composed
of the trigger type (internal or external), the trigger source (0,
1, 2, etc.), and the mode number (0 through 5, 14 and 15). The following
table summarizes the options.
| Trigger Mode | Parameter | External Source | Multiple Frames Per Trigger |
|---|---|---|---|
| 0 | none | yes | yes |
| 1 | none | yes | no |
| 2 | (N >= 2) | yes | no |
| 3 | (N >= 1) | no | yes |
| 4 | (N >= 1) | yes | no |
| 5 | (N >= 1) | yes | no |
| 14 | unknown | unknown | unknown |
| 15 | unknown | unknown | unknown |
For example, the second triggersource for
trigger mode 1 is called externalTrigger1-mode1.
To use mode 3, the triggersource is internalTrigger-mode3.
Note
Toolbox versions before R2010a supported DCAM trigger mode 0
with the first available triggersource as externalTrigger.
The existing externalTrigger property will be maintained
so to prevent backward compatibility issues. In addition, in order
to preserve symmetry with the new functionality, triggersource
externalTrigger0-mode0, which is synonymous, will also be
supported. The new trigger modes do not work before R2010a.
Usage Notes
If a trigger mode has multiple trigger sources (modes 0, 1, 2, 4,
and 5), then triggersource has
a digit indicating the corresponding camera source, even if only one
camera source is available. For example, if the camera has only a
single triggersource available, the toolbox reports
the triggersource name as externalTrigger0-modeX.
If the trigger mode does not have multiple sources (mode 3),
then no source digit appears in the name (i.e, internalTriggerMode3 instead
of internalTriggerMode3-Source0).
The DCAM adaptor includes a TriggerParameter property
that is passed to the camera when you set trigger configurations.
The TriggerParameter property is validated when
you call START after selecting a hardware trigger
mode.
If the selected trigger mode prohibits multiple frames per trigger,
then an error appears when you call START without
setting FramesPerTrigger to 1.
If the camera supports only trigger mode 0 with
source 0, then the original functionality of having
only the externalTrigger triggersource is supported.
Trigger modes 14 and 15 are vendor-specific and are assumed to be external triggers and have no restrictions on any settings. You must validate any settings you use.
The following sections detail the trigger modes.
Trigger Mode 0
This is the only trigger mode supported before R2010a. When a trigger is received, a frame is acquired. You can acquire multiple frames per trigger by switching the camera for hardware triggered mode to free running mode when a triggered frame is acquired.
No parameter is required.

The camera starts the integration of the incoming light from the external trigger input falling edge.
Trigger Mode 1
In this mode, the duration of the trigger signal is used to control the integration time of the incoming light. This mode is used to synchronize the exposure time of the camera to an external event.
No parameter is required.

The camera starts the integration of the incoming light from
the external trigger input falling edge. Integration time is equal
to the low state time of the external trigger input if triggersource is fallingEdge,
otherwise it is equal to the high state time.
Trigger Mode 2
This mode is similar to mode 1, except the
duration of the trigger signal does govern integration time. Instead
the number of trigger signals received does. Integration commences
upon the start of the first trigger signal and continues until the
start of the Nth trigger signal.
Parameter N is required and describes the
number of trigger signals in an integration.

The camera starts the integration of the incoming light from
the first external trigger input falling edge. At the Nth
external trigger input falling edge, integration stops. Parameter N is
required and must be 2 or greater. (N >= 2).
Trigger Mode 3
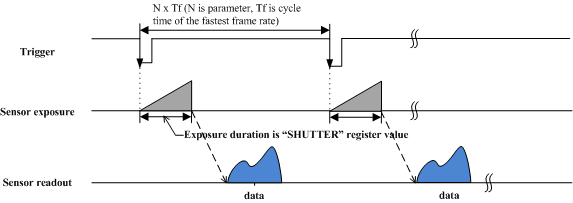
Use this internal trigger mode to achieve a lower frame rate.
When the trigger generates internally, a frame is acquired and returned.
A new frame is not acquired for N x Tf when N is
the parameter and Tf is the cycle time of the fastest frame rate supported
by the camera.
A parameter is required, as described above.

This is an internal trigger mode. The camera issues the trigger
internally and cycle time is N times of the cycle time of the fastest
frame rate. Integration time of incoming light is described in the
shutter register. Parameter N is required and must
be 1 or greater (N >= 1).
Trigger Mode 4
This mode is the “multiple shutter preset mode.” It is similar to mode 1, but the exposure time is governed by the shutter property. On each trigger, shutter property defines the exposure duration. When N triggers are received, a frame is acquired.
Parameter N is required and describes the
number of triggers.

The camera starts integration of incoming light from the first
external trigger input falling edge and exposes incoming light at
shutter time. Repeat this sequence until the Nth external trigger
input falling edge, then finish integration. Parameter N is
required and must be 1 or greater (N >= 1).
Trigger Mode 5
This mode is the “multiple shutter pulse width mode.”
It is a combination of modes 1 and 2. The exposure time is governed
by the duration of the trigger signal and a number of trigger signals
can be integrated into a single readout. If the trigger parameter
is 1, this mode is degenerate with mode 1.
A parameter is required. The parameter describes the number of triggers.

The camera starts integration of incoming light from first the
external trigger input falling edge and exposes incoming light until
the trigger is inactive. Repeat this sequence until the Nth external
trigger input falling edge, then finish integration. Parameter N is
required and must be 1 or greater (N >= 1).
Trigger Mode 14
This is a vendor-specific mode and no information is available. Consult the documentation for your camera.
Trigger Mode 15
This is a vendor-specific mode and no information is available. Consult the documentation for your camera.