Create Custom UI Component With HTML
To extend your custom UI component using third-party visualizations or widgets, create a custom component that contains an HTML UI component. Use the underlying HTML UI component to customize the component appearance and to interface with third-party libraries, and use the custom component capabilities to define component properties and callbacks that the user can set.
Custom Component Overview
To create a custom UI component that uses an HTML UI component, there are two files that you must create.
Custom UI component file — In this file, you define your custom component. You specify its properties, its property values, the events it listens for, and the callback functions it executes.
HTML source file — In this file, you configure and update the visual appearance of the UI component, listen for user interactions, and pass the information that an interaction has occurred to the custom UI component class.
Your code must communicate changes to property values and user interactions across these two files.
Enable Response to Property Updates
Since the custom UI component file defines the properties that users can set, but the HTML source file controls the visual style of the component, these two files need to communicate about property updates.
In the UI component file, configure the properties of your UI component.
Specify the properties that users can set by defining them as public properties
in a properties block. In the update method of your class, store the values of the public
properties as fields in a struct in the
Data property of your HTML UI component. This gives the
HTML source file access to these property values.
In the HTML source file, use the property values to update the appearance of
the HTML UI component. To do so, in the setup function inside
of a <script> tag, access the values of the fields in
Data and use them to modify the style properties of
your HTML elements.
Enable Response to User Interactions
Users define component callback functions in MATLAB®, but these callbacks often listen for a response to an action performed on an HTML element defined in the HTML source file. So these two files also need to communicate about user interactions.
In the UI component class file, first create the callback properties of your
UI component. Create an events block with the
HasCallbackProperty. When you define an event in this
block, MATLAB creates an associated public callback property for the UI
component. For example, if you create an event named
ButtonPushed, this will automatically create a public
property for your class named ButtonPushedFcn.
To execute a user-defined callback function associated with a user
interaction, your code must first recognize when the user interaction has
occurred. In the UI component class file, give the HTML UI component a way to do
this. In the HTML source file, in the setup function inside
of a <script> tag, create an event listener that listens
for the user interaction. When the listener detects the interaction, inform
MATLAB that the interaction has occurred by using the
sendEventToMATLAB
JavaScript® function.
After the UI component class file receives the information that a user
interaction has occurred, it must then trigger the callback associated with the
interaction. To do this, in the setup method of the custom UI
component, create an HTMLEventReceivedFcn callback function
for the HTML UI component. This function executes whenever the component
receives an event from the HTML source. In the callback function, call the
notify function on the custom UI component event you
defined. This executes the user-defined callback function associated with the
event.
RoundButton Class Implementation
This example demonstrates a typical structure for writing a custom UI component
that uses an HTML UI component. The example shows how to create a custom button
component as a subclass of the ComponentContainer base class. For an
example of a custom button component created in App Designer, see Create Custom Button with Hover Effect Using HTML.
The class creates a button with a custom rounded style. It allows users to specify the button color, text, text color, and response on click.
To define your UI component class, create two files in the same folder on the MATLAB path:
RoundButton.m— UI component class definitionRoundButton.html— HTML source file
RoundButton.m Class Definition
RoundButton class | Discussion |
|---|---|
classdef RoundButton < matlab.ui.componentcontainer.ComponentContainer | Create a custom UI component named
RoundButton by defining a subclass of the
matlab.ui.componentcontainer.ComponentContainer
class. |
properties Color {mustBeMember(Color, ... {'white','blue','red','green','yellow'})} = 'white' FontColor {mustBeMember(FontColor, ... {'black','white'})} = 'black' Text (1,:) char = 'Button'; end | Define the For more information on defining properties, see Manage Properties of Custom UI Components Programmatically. |
properties (Access = private, Transient, NonCopyable) HTMLComponent matlab.ui.control.HTML end | Define the |
events (HasCallbackProperty, NotifyAccess = protected) % Generate ButtonPushedFcn callback property ButtonPushed end | Define a |
methods (Access=protected) | Create a methods block. |
function setup(comp) % Set the initial position of this component comp.Position = [100 100 80 40]; % Create the HTML component comp.HTMLComponent = uihtml(comp); comp.HTMLComponent.Position = [1 1 comp.Position(3:4)]; comp.HTMLComponent.HTMLSource = fullfile(pwd,"RoundButton.html"); comp.HTMLComponent.HTMLEventReceivedFcn = @(src,event) notify(comp,"ButtonPushed"); end | Define the Then, create an HTML component by
calling the
|
function update(comp) % Update the HTML component data comp.HTMLComponent.Data.Color = comp.Color; comp.HTMLComponent.Data.FontColor = comp.FontColor; comp.HTMLComponent.Data.Text = comp.Text; comp.HTMLComponent.Position = [1 1 comp.Position(3:4)]; end | Define the update method for your class.
Within the method, store the values of the
Color, FontColor, and
Text properties as fields in the
Data property of the HTML component. This
enables you to update the attributes of the HTML button element,
and lets the HTML component listen for when these properties are
changed. |
end end | Close the |
RoundButton.html Source Definition
| HTML Source | Discussion |
|---|---|
<!DOCTYPE html> <html> <head> | Open the |
<style>
html, body {
  height: 100%;
  text-align: center;
}

button {
  width: 100%;
  height: 100%;
  border-radius: 2em;
  font-size: 1em;
  cursor: pointer;
  border: none;
}

button:focus {
  outline: 0;
}
</style> | Define the style for the HTML content using CSS markup:
|
  <script type="text/javascript">
    function setup(htmlComponent) {
| Write a setup function inside of a
<script> tag to connect your
JavaScript object, called htmlComponent,
to the HTML UI component you created in MATLAB. |
    htmlComponent.addEventListener("DataChanged", function(event) {
      buttonElement = document.getElementById("roundButton");
      buttonElement.style.backgroundColor = htmlComponent.Data.Color;
      buttonElement.innerHTML = htmlComponent.Data.Text;
      buttonElement.style.color = htmlComponent.Data.FontColor;
}); | Add an event listener to the
|
    button = document.getElementById("roundButton");
    button.addEventListener("click", function(event) {
      htmlComponent.sendEventToMATLAB("ButtonClicked");
}); | Add an event listener to the HTML button. This event listener listens for the button element to be clicked. When a user clicks the button, the function sends an event to MATLAB to notify the MATLAB HTML object that the interaction occurred. |
} </script> </head> | Close the setup function and the
<script> and
<head> tags. |
  <body>
    <button id="roundButton"></button><br/>
</body> | Create a button element in the body of the HTML document. |
</html> | Close the <html> tag. |
Create a RoundButton Instance
After creating and saving RoundButton.m and RoundButton.html, create an instance of the RoundButton class in a UI figure.
Specify the Color, FontColor, and the ButtonPushedFcn callback properties as name-value arguments.
fig = uifigure("Position",[200 200 300 300]);
btn = RoundButton(fig, ...
    "Color","red", ...
    "FontColor","white", ...
    "ButtonPushedFcn",@(src,event) disp("Clicked"));
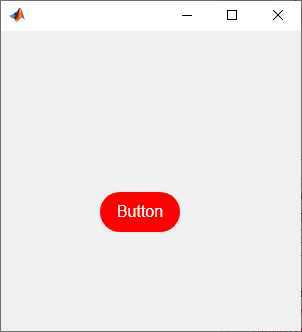
Click the button. The Command Window displays Clicked.