Display the Model or Feature
Use Display Options
The Plot Type drop-down menu gives the options on how to display the model or feature.
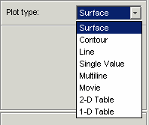
Use the options in this menu to display the model or feature as described in the following sections.
When plotting multiple models or features, it is useful to link axes rotation or use common Y- or Z- ranges. Use the display options (toolbar button or View menu).
In any of these views you can select View > Statistics, or click the equivalent toolbar button. This opens a dialog box with a list of the summary statistics (mean, standard deviation, maximum, or minimum) of your currently selected model, strategy, or error for the current display.
For the plots (not movie, single value or tables) you can use the File menu or toolbar to print, copy to clipboard or print to figure. You can also export plot values to CSV file.
You can alter display options for all plots (not value or tables) with the View menu or toolbar button.
Surface
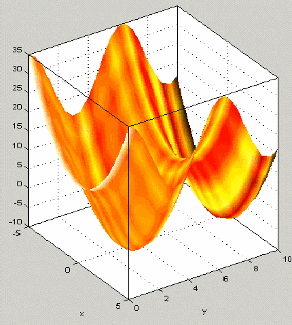
You can rotate the surface plots by left-clicking and dragging.
If you are using the surface viewer to view a feature, you can choose the following options to display:
Model
Strategy
Prediction Error
Error (between the model and the strategy)
When viewing models, there are no strategy options. You can choose these options from the drop-down menus for Surface 1 Height, Surface 1 Shading, and Surface 2 Height.
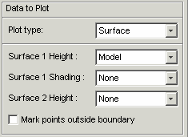
You can view any of these options alone as a primary surface (by leaving the last two options set to None). You can add a second option to shade the primary surface, for example to color your model surface with the error between the model and the strategy, to highlight problem areas.
When you choose to shade a primary surface, a color bar appears to the right of the plot to show you the scale. You can change the maximum and minimum values of the shading factor by typing in the edit boxes above and below the color bar.
You can add a second surface to display any two of the options simultaneously, for example, your model and your strategy.
If you have a boundary model, you can display the boundary by selecting the check box.
Select the Inputs to plot from the X-axis and Y-axis drop-down lists, and specify the ranges of inputs in Value controls.
Contour
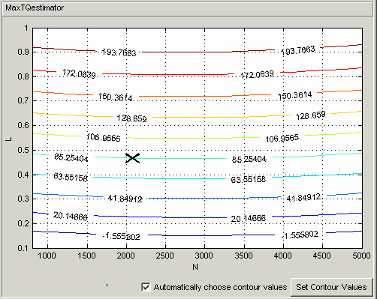
You can specify where you want contours by clicking Set Contour Values. Use the check box to return to automatic contour value selection. You can also control number of contours, filling, and labels in the display options (toolbar or View menu).
You can enable Cursor Mode (use the View menu or toolbar button) and then click the plot lines to display the values at a point (plotted with an X). The values are shown in the status bar.
Line
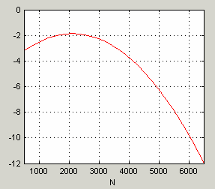
A line plot - you can display up to three different lines (strategy, model, prediction error, and error between the model and strategy). Use the Line drop-down lists to select what to plot. You can select the check box to clip to a boundary if available.
You can enable Cursor Mode (use the View menu or toolbar button) and then click the plot lines to display the values at a point (plotted with an X). The values are shown in the status bar.
Single Value
This displays the value of the model, strategy, prediction error, or error at the point you have specified in the variable value boxes.
Multiline
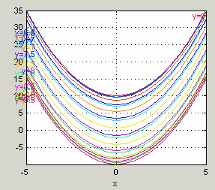
Select the variables to plot from the X-axis and Line colors drop-down menus. Control the number of lines by altering the Values. You can use the check box to clip to a boundary if available.
You can enable Cursor Mode (use the View menu or toolbar button) and then click the plot lines to display the values at a point (plotted with an X). The values are shown in the status bar.
Table
Data table from Project/Branch 1/Fn_Feature displaying X and Y values with corresponding numeric outputs for columns 0.000, 0.500, and 1.000. Table includes rows from X=-5.000 to X=0.500 with values ranging from 35.000 to 5.653.
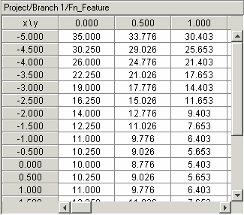
You can select a 2-D or 1-D table to display. Select the check box to mark cells outside the boundary.
Choose variables for the axes of your table and set the range and number of points. Set single values for any other variables.
For 2–D tables, you can use the Cell values drop-down menu to select whether to display the model output or the prediction error.
For 1-D tables you can select what to display in columns 1, 2 and 3:
Model, Prediction error,
Strategy or Error (strategy –
model) (for features), or choose None
for 2 and 3 to display only a single column. When viewing models, there are no
strategy options.