Set Up Models for Calibration
Introducing the Models View
CAGE generally calibrates lookup tables by reference to models.
To import models, see Import Models and Calibration Items.
The Models view is a storage place for all the models in your session.
To view and edit the models in your session, select Models by clicking the button shown in the Data Objects pane.
![]()
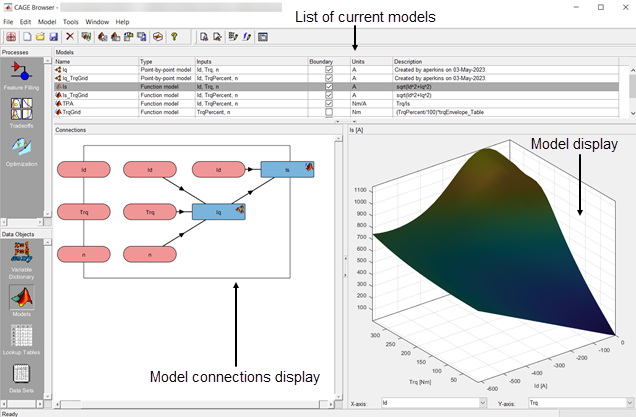
The Models view displays the following:
A list of all the models in the current project.
The model connections. That is, which constants, variables, and models are inputs to the selected model. You can use the View menu or the right-click context menu on the graph to zoom in and out, zoom to fit, and reset.
An image of the response surface of the selected model; you can select factors to display. Use the View menu to choose between:
No Constraint Display — Shows entire model surface.
Show Constraint — Areas outside the boundary constraint model (if any) are yellow.
Clip to Constraint — The surface is only shown within the boundary constraint model.
View > Edit Input Set Points opens a dialog box where you can edit the set points of your model variables. This setting alters the model display and also any calculations involving the set points throughout CAGE.
Following is an example of the Models display.
The icons in the Models list indicate the type of model, as listed in the Type column. As shown in the following illustration, a model can be a Model Browser statistical model, the boundary of a model, the prediction error variance (PEV) of a model, a user-defined function model, or a feature model (converted from a feature).
Use the Model Properties dialog box to switch a model output between the model value and the boundary or PEV of the model. For function models see Adding New Function Models. You can convert a feature to a model by selecting Feature > Convert to Model.
Importing Models
CAGE enables you to calibrate lookup tables by referring to models constructed in the Model Browser.
CAGE can only open Model-Based Calibration Toolbox™ model files. You can import models from project files
(.mat, .cag).
Import Models From Project
You can use the CAGE Import Tool to select models to import from any
Model-Based Calibration Toolbox project file produced in CAGE or the Model Browser
(.mat or .cag). You can replace
suitable models in your current CAGE project (note that Model Browser models
must have exactly the same input names as the CAGE model you are
replacing).
Adding New Function Models
A function model is a model that is expressed algebraically. The function can be any MATLAB® function (including user-defined functions). The only restriction is that the function must be vectorized, that is, take in column vectors and return a column vector of the same size, as in this example:
function y = foo(x1, x2)
y = x1 .* x2;
Once you have a function like this, you can create a function model applying it to any models or variables in your session, like the following example.
foo(NOX, SPK)
For example, you might want to view the behavior of torque per ampere. So you create a function model of torque per ampere = torque/peak current.
To add a function model to your session,
Select File > New > Function Model.
This opens the Function Model Wizard.
In the dialog box, enter the formula and units for your function model. For example, enter
TPA=Trq/IsandNm/A.
Click Next. If the function is incorrectly entered, the Function Model Error dialog box will appear.
By default, the Function Model Wizard will match an Assigned Input to an existing Model Input, such as variables, models, tables, and features. New variables will be created for other inputs. Click Finish to proceed with the default assignment and close the wizard to return to the Models view, or you can manually associate the model factors with the available inputs as follows:
Highlight a Model Input, e.g.,
Is, in the list on the left and the corresponding model,Is, in the Available Inputs list on the right.Click the Assign input button.
Repeat a and b for all the model inputs. Click Finish to close the wizard and return you to the Models view.
You can now see a display of the model and its connections (inputs).
Renaming and Editing Models
Renaming Models
To rename a model,
Highlight the model that you want to rename.
Select Edit > Rename.
Enter the new name for the model and press Enter.
You can also rename the model by selecting a model and clicking the name, or pressing F2.
Editing Model Inputs
You can adjust a model so that variables, formulas, or other models are the factors of the model. For example, a model of torque per ampere depends on the torque. In place of the torque variable, you can use a function model calculating torque from torque percent and the maximum torque specified by the table TrqEnvelope.
To edit the inputs of a model,
Highlight the model.
Select Model > Edit Inputs.
This opens the Edit Inputs dialog box, shown.
Highlight the Model Input that you want to edit, in the list on the left.
Highlight the new input for that model, in the Available Inputs list on the right.
Click the Assign Input button.
The top panel of the Edit Inputs dialog box displays dependencies and models that have the same type and inputs. To prevent changing existing optimizations select the Duplicate models checkbox to create a copy of the model.
To close the dialog box, click Ok. After clicking Ok, if any models have the same type and inputs, you will be asked if you want to apply the new inputs to these models as well.
Note
If you want to change the range of a variable in the session, change the range in the variable dictionary.