Use Solver-Based Optimize Live Editor Task Effectively
Organize the Task Effectively
Place the Optimize Live Editor task in a live script with a section above and two or more sections below the task. To open the Optimize task in the Live Editor, click the Insert tab and then select Task > Optimize. Use the Section Break button on the Insert tab to insert a new section.
By default, the Output on right button is selected to the right of the task window.
This selection places the output to the right of the task. To place the output below the task, select the Output inline button.
Above the task, include a section for the data that you need for the optimization. For example, the initial point
x0
, any constraint matrices such asAeq
orbeq
, and extra parameters for objective or nonlinear constraint functions belong in the section above the task. The data must be included in a section above the task so that you can run the entire script successfully, for example, after saving and reloading it. The data loads into the workspace before the script needs to access it.Place outputs of the task in a section below the task. For example, display the
solution
andobjectiveValue
outputs in this section, after the task writes them to the workspace. You can include multiple sections below the task to view and work with the results of the task.The final section contains any local functions for the problem. Local functions must be included at the end of the live script. However, if you have functions that you access from more than one script, including them as separate files on the MATLAB® path can be more convenient.
Place Optimization Variables in One Vector and Data in Other Variables
Optimize is a front end for solver-based optimization and equation solving. As such, it requires all variables to be placed in one vector, as documented in Writing Scalar Objective Functions. For example, suppose that your objective function is
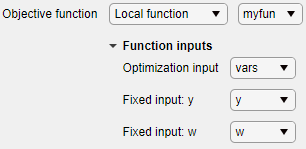
In this example, the variables x and z are the optimization variables, and the variables y and w are fixed data. You can represent your function in a section below the Optimize task as follows.
function f = myfun(vars,y,w) x = vars(1); z = vars(2); f = (x^2 + y^4)*exp(-z/(1 + x^2))*w*exp(-z); end
Define the values of the variables y and w in a section above the task.
y = log(pi); w = 2/3;
Run the section above the task by pressing Ctrl+Enter to put y and w into the workspace. Then select the appropriate inputs in the Select problem data section of the task.
Specify Problem Type to Obtain Recommended Solver
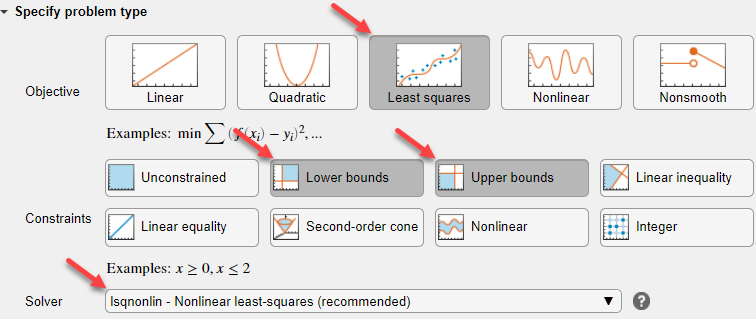
The Specify problem type section of the task provides buttons
for choosing the objective function type and the constraint types. After you select
these items, Optimize reduces the number of
available solvers and shows one solver as recommended. For example, for a problem
with a least-squares objective and upper and lower bounds,
Optimize shows that the
lsqnonlin
solver is recommended.
To use a solver that is not available with the current selections, deselect all of the problem type buttons by clicking each selected button.
Ways to Run the Task
You can run the Optimize Live Editor task in various ways:
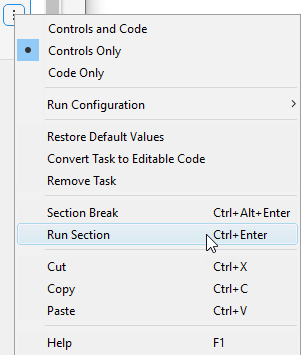
Click the options button ⁝ at the top right of the task window, and select Run Section.
Click in the task and then press Ctrl+Enter.
Set the task to autorun after any change by selecting the Autorun checkbox (next to the options button at the top right of the task window). If your task is time consuming, do not choose this setting.
Run the section containing the task by clicking the striped bar to the left of the task.
Run the entire live script from the Live Editor tab by clicking the Run button, or by pressing F5.
View Solver Progress
The Live Editor task enables you to monitor the solver progress easily. To ensure that the solver is performing properly, view at least the objective function value plot. Also, by using a plot function you can stop the solver without losing any data.
View Equivalent Code
Optimize internally creates code to match the visual selections. You can view the code by clicking the options button ⁝ and selecting Controls and Code or Code Only.
The code appears below the task.
You can select and copy this code to modify it for use in other contexts.
To convert the task from a visual interface to usable code, choose Convert to Code. This choice removes the visual Optimize interface and allows you to proceed using code.