Modelscape Review Editor and Validation Templates
This example shows how to create reusable code snippets in Modelscape Review Editor using custom Live Editor tasks.
You can reuse code when validating models, for example, to compute and visualize certain validation metrics across different models. Modelscape Review Editor supports this through Live Editor tasks.
In this example, create a custom Live Task and configure MATLAB® so that your Live Task appears, appropriately categorized, in the Review Editor Task gallery.
Create Custom Live Editor Task
MATLAB Live Editor tasks are simple point-and-click interfaces that you can embed in a live script. For example, in a model validation task the interface can contain drop-down menus and sliders for selecting a hypothesis testing technique and the associated confidence level.
You can create custom Live Editor tasks in two ways. In most cases, the convenient way is to select the live script segment you want to convert and click Convert to Task in the Live Editor Task gallery. This creates the source code and the registration point for your Live Task automatically. For details, see Create Live Editor Task from Selection. Alternatively, implement the task from scratch as a sub-class of matlab.task.LiveTask base class. For details, see Develop Live Editor Tasks. This method is appropriate for more complex Live Editor tasks.
The Live Editor task definition consists of these two files:
MATLAB source code
.mfile, which contains the task implementationresources/liveTasks.jsonfile, which contains the task metadata that the MATLAB Editor uses
Keep both files on the MATLAB path to make your Live Task available in MATLAB.
In this example, select the code between the comments in the following snippet, go to the Live Editor tab, and in the Code section, select Task > Convert to Task.
load('CreditCardData.mat', 'data') % Select code below this line inputData =data; sc = creditscorecard(data, "BinMissingData", true); if
true sc = autobinning(sc); end varSelectionMethod =
"stepwise"; sc = fitmodel(sc, "VariableSelection", varSelectionMethod);
1. Adding CustIncome, Deviance = 1490.8527, Chi2Stat = 32.588614, PValue = 1.1387992e-08
2. Adding TmWBank, Deviance = 1467.1415, Chi2Stat = 23.711203, PValue = 1.1192909e-06
3. Adding AMBalance, Deviance = 1455.5715, Chi2Stat = 11.569967, PValue = 0.00067025601
4. Adding EmpStatus, Deviance = 1447.3451, Chi2Stat = 8.2264038, PValue = 0.0041285257
5. Adding CustAge, Deviance = 1441.994, Chi2Stat = 5.3511754, PValue = 0.020708306
6. Adding ResStatus, Deviance = 1437.8756, Chi2Stat = 4.118404, PValue = 0.042419078
7. Adding OtherCC, Deviance = 1433.707, Chi2Stat = 4.1686018, PValue = 0.041179769

Generalized linear regression model:
    logit(status) ~ 1 + CustAge + ResStatus + EmpStatus + CustIncome + TmWBank + OtherCC + AMBalance
    Distribution = Binomial

Estimated Coefficients:
                   Estimate       SE       tStat       pValue
                   ________    ________    ______    __________

    (Intercept)    0.70239     0.064001    10.975    5.0538e-28
    CustAge        0.60833      0.24932      2.44      0.014687
    ResStatus        1.377      0.65272    2.1097      0.034888
    EmpStatus      0.88565        0.293    3.0227     0.0025055
    CustIncome     0.70164      0.21844    3.2121     0.0013179
    TmWBank         1.1074      0.23271    4.7589    1.9464e-06
    OtherCC         1.0883      0.52912    2.0569      0.039696
    AMBalance        1.045      0.32214    3.2439     0.0011792


1200 observations, 1192 error degrees of freedom
Dispersion: 1
Chi^2-statistic vs. constant model: 89.7, p-value = 1.4e-16
% Select code above this line
sc
sc =
creditscorecard with properties:
GoodLabel: 0
ResponseVar: 'status'
WeightsVar: ''
VarNames: {'CustID' 'CustAge' 'TmAtAddress' 'ResStatus' 'EmpStatus' 'CustIncome' 'TmWBank' 'OtherCC' 'AMBalance' 'UtilRate' 'status'}
NumericPredictors: {'CustID' 'CustAge' 'TmAtAddress' 'CustIncome' 'TmWBank' 'AMBalance' 'UtilRate'}
CategoricalPredictors: {'ResStatus' 'EmpStatus' 'OtherCC'}
BinMissingData: 1
IDVar: ''
PredictorVars: {'CustID' 'CustAge' 'TmAtAddress' 'ResStatus' 'EmpStatus' 'CustIncome' 'TmWBank' 'OtherCC' 'AMBalance' 'UtilRate'}
Data: [1200×11 table]
Fill in the pop-up form with the following values:
Name: Create Credit Scorecard
Description: Build and fit credit scorecard model
Keywords: pd, scorecard, credit, fit, build, autobinning
This creates a file called Create_Credit_Scorecard.m in your working folder as well as the resources/liveTasks.json metadata file.
Register Tasks for Modelscape Live Task Gallery
Modelscape Review Editor has a gallery with bespoke categories for custom Live Editor tasks.
To make your Live Editor task visible in this gallery, create a resources/extensions.json file anywhere on your MATLAB path. Store this file in the same folder as your liveTasks.json file. To illustrate, continue with the Live Editor task you created in the previous section, and copy the following content into a blank resources/extensions.json file:
{
	"mw.modelscape.liveTaskGallery.categories": [
		{
			"type": "Category",
			"name": "ModelFitting",
			"title": "Model Fitting",
			"items": [
            		        "Create_Credit_Scorecard"
                        ]
		}
	]
}
Here name is used as a tag and title is the text that will appear as the category header in the Task gallery. You can use different strings for these fields, but type should remain Category, as shown above. Finally, items must contain the class names of the tasks to display in this category. For packaged class definitions, use the fully qualified name. For example, if your class definition is in +modelscape/MyCustomTask.m, then the corresponding items string should be modelscape.MyCustomTask.
You can register multiple categories, and each category can have multiple custom tasks in it.
You then have two options to distribute your custom task:
To make the custom task available in an individual review project, you must add the task files to the repository containing the MATLAB project associated with your model. Include the task definition .m file in the project root and the associated json files in the
resources/folder, then add the project root to the MATLAB path. For more information on adding folders to the project path, see Specify Project Path.To make the custom task available to all reviews, package your Live Editor task definitions and the json files into toolboxes and deploy them with Modelscape when you set up the Review Environment.
Use Custom Live Editor Tasks in Review Editor
To find your custom Live Editor task, click Task in Review Editor.
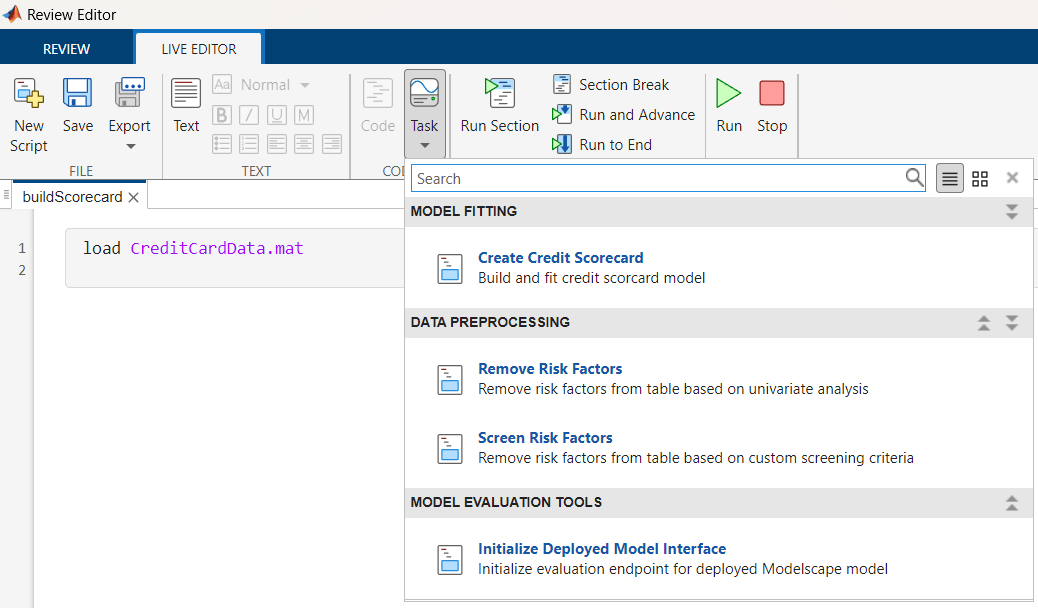
Click on the desired task to add it to your live script.