Main Content

Include Model Requirements and Coverage Data in Web Views

You can include these optional views in a model web view:

  • Model requirements (requires Requirements Toolbox™)

  • Model coverage (requires Simulink® Coverage™)

Prepare Models for Optional Web Views

Before you can include an optional view in a web view, the model must contain requirements or coverage data:

  • To add requirements to a model, see Author and Validate Requirements (Requirements Toolbox).

  • To add coverage data to a model, simulate the model with coverage enabled and save the results of the last coverage run. To enable saving the results:

    1. Open the Configuration Parameters window. In the Modeling tab, click Model Settings.

    2. Click Coverage.

    3. Select Enable coverage analysis.

    4. In the Results section, select Save last run in workspace variable.

    For more information, see Specify Code Coverage Options (Simulink Coverage).

Add Optional Views to Web Views Using Web View Window

If you export a model web view from the Simulink Toolstrip, to include requirements or coverage data:

  1. Open the Web View window. In the Simulink Toolstrip, in the Simulation tab, in the File section, click Save . Under Export Model To, select Web View.

  2. Open the Optional Views tab and select the views. By default, both the requirements and coverage views are selected.

    Optional Views tab with "Include Requirements view" and "Include Coverage view" selected

  3. Click Export.

Add Optional Web Views Using slwebview

If you export a web view by using slwebview, specify the optional views by using the 'OptionalViews' argument. Specify one or both of these values in a cell array:

  • 'requirements'

  • 'coverage'

For example:

htmlFileName = slwebview(gcs,'OptionalViews', {'requirements' 'coverage'});

Open Optional Web Views

Open the web view in a web browser. See Display and Navigate Through Web Views. In the lower-left palette of the web view, there is a button for each optional view that you selected.

  • To access the requirements view, click the icon of pencil checking a box button. This view highlights model elements that have requirements and outlines model elements that contain elements that have requirements.

  • To access the coverage data view, click the icon showing a red x and a green checkmark button. Click model elements for coverage information.

View Requirement and Links in a Web View Pane

You can also create a web view that lists the requirements and links. To create a web view that organizes the requirements and links in their own section:

  1. Open the Requirements tab. In the Apps tab, click Requirements Manager.

  2. Click Share > Export Model to Web View.

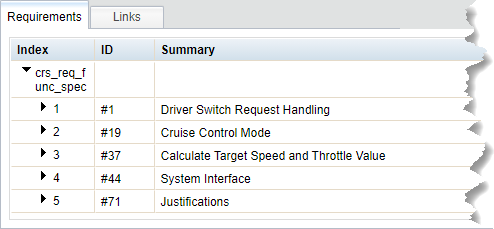
The web view displays the requirements and links in a pane below the model view. When you select a requirement or link, the Properties pane displays the properties. If the requirement is linked to a model artifact, selecting the requirement highlights the linked model artifact.

For example, if you export the model used in the Link Test Cases to Requirements (Requirements Toolbox) example to a web view, the web view includes this pane.

The requirements pane after exporting the example to web view. The Requirements Tab in the pane is selected, and the requirement set is expanded. The set displays five requirements that include an ID and a summary.

See Also

Functions

Related Topics