Configure Model to Generate C API Code for Signals
This example shows how to configure the model to include the C API for signals in the generated code.
Open the model CapiConfigDemo.
capiMdl = "CapiConfigDemo";
open_system(capiMdl)
Enable C API Generation for Signals
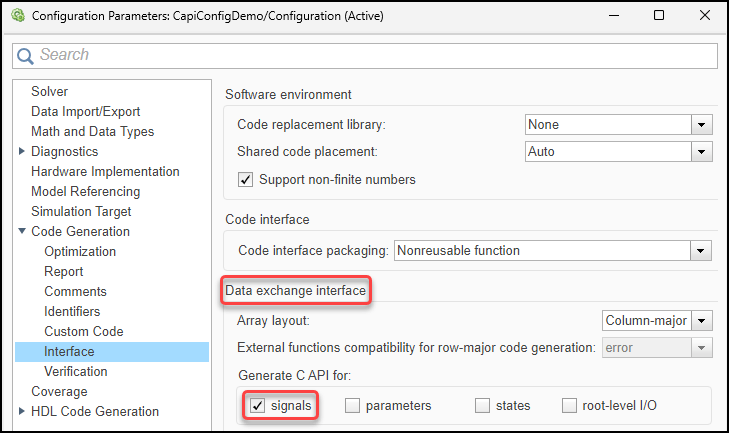
To enable C API code generation for model signals:
Open the Configuration Parameters dialog box.
Navigate to the Code Generation > Interface pane.
In the Data exchange interface > Generate C API for, select signals.
Click OK.
Alternatively, enter this in the Command Window:
set_param(capiMdl,RTWCAPISignals=true)
Add Signals to Model Mappings and Specify Signal Storage Classes
To prevent the code generator from optimizing the signals away, you need to add them to the code mappings and specify their storage class as different from Auto.
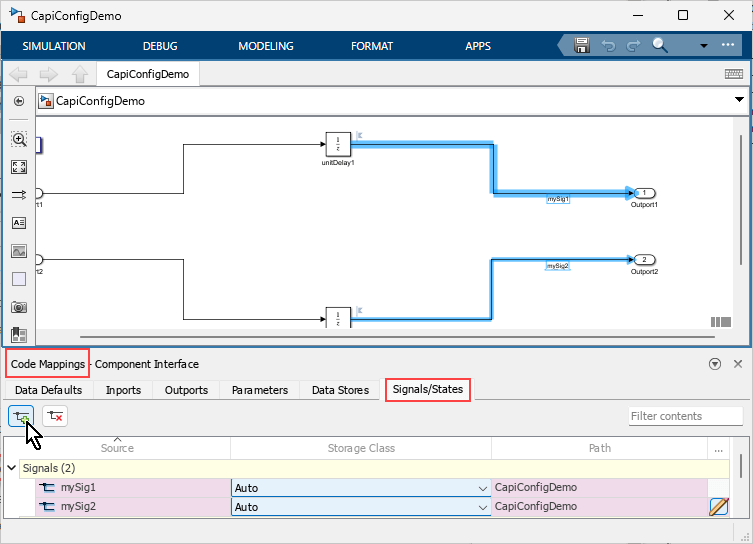
Use the Code Mappings editor to add the signals to the code mappings:
Open the Code Mappings editor (see Open the Code Mappings Editor — C) and select the Signals/States tab.
Select the signals in the model and then click the Add Selected Signals button
 .
.
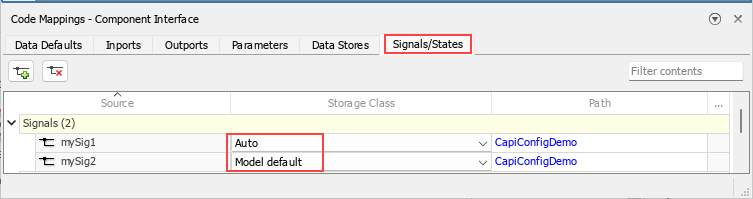
The C API is not generated for signals with storage class set to Auto. To demonstrate this, specify, in the Code Mappings editor, Storage Class for the first signal as Auto, and for the second signals as Model default.
Alternatively, to programmatically add the signals to the code mappings and specify their storage classes, use the capiConfigSignalHelper MATLAB® program.
capiConfigSignalHelper("mappings")You expect the C API to be generated for the second mySig2, but not for mySig1.
Generate Model Code
Use the slbuild command to generate code from your model. Use evalc to suppress the output of the slbuild command.
evalc("slbuild(capiMdl,GenerateCodeOnly=true)");Verify That Signal Is Included in C API
The C API structure array that corresponds to model signals is rtBlockSignals. To view the instantiation code for this structure, examine the generated C API source file CapiConfigDemo_capi.c (located in the folder CapiConfigDemo_grt_rtw).
This is the instantiation code for the structure in this file:
/* Block output signal information */
static const rtwCAPI_Signals rtBlockSignals[] = {
  /* addrMapIndex, sysNum, blockPath,
   * signalName, portNumber, dataTypeIndex, dimIndex, fxpIndex, sTimeIndex
   */
  { 0, 0, TARGET_STRING("CapiConfigDemo/unitDelay2"),
    TARGET_STRING("mySig2"), 0, 0, 0, 0, 0 },

  {
    0, 0, (NULL), (NULL), 0, 0, 0, 0, 0
  }
};
The C API is generated for the second signal, which is configured with storage class specified as Model default, but not for the first signal, which is configured with storage class specified as Auto.
Configure Signal as Test Points
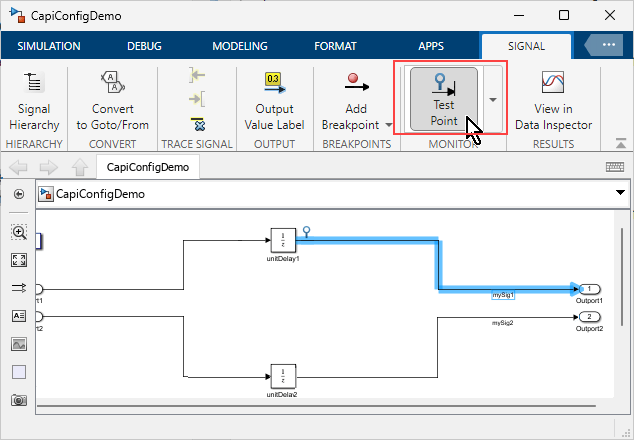
Another way to prevent the code generator from optimizing signals away, is to configure them as test points (see Configure Signals as Test Points). Configure the first signal as a test point:
In the model, select the first signal.
Open the Signal tab of the Simulink® canvas.
In the Monitor group, click Test Point.
Alternatively, use the capiConfigSignalHelper MATLAB® program to programmatically configure the signal as a test point.
capiConfigSignalHelper("testPoint")Use the slbuild command to regenerate code from your model.
evalc("slbuild(capiMdl,GenerateCodeOnly=true)");Examine the generated C API source file CapiConfigDemo_capi.c again and verify that rtBlockSignals now contains instantiation code for both signals.
/* Block output signal information */
static const rtwCAPI_Signals rtBlockSignals[] = {
  /* addrMapIndex, sysNum, blockPath,
   * signalName, portNumber, dataTypeIndex, dimIndex, fxpIndex, sTimeIndex
   */
  { 0, 0, TARGET_STRING("CapiConfigDemo/unitDelay1"),
    TARGET_STRING("mySig1"), 0, 0, 0, 0, 0 },

  { 1, 0, TARGET_STRING("CapiConfigDemo/unitDelay2"),
    TARGET_STRING("mySig2"), 0, 0, 0, 0, 0 },

  {
    0, 0, (NULL), (NULL), 0, 0, 0, 0, 0
  }
};