Use Custom Monitor to Measure and Tune Model Elements in Real Time
In this step of the example, you use a custom monitor to monitor model signals and tune model parameters. The monitor is a simple graphical window that displays each measured signal in a scope and has a slider for tuning each model parameter. While using such a simple monitor may not always be the best way to actually monitor and tune your model, it is useful for demonstrating how it can be done.
Open the model CapiSigsParams.
capiMdl = "CapiSigsParams";
open_system(capiMdl)
The function setCapiSigsParamsExampleStep configures the model as it would be after running the previous steps of the example.
setCapiSigsParamsExampleStep(6)
Update Definition of realTimeCapiFcn
The functions you use for interacting with the generated C API code and with the monitor are defined in the file CapiSigsParams_06.c (located in the folder CapiSigsParamsFiles). These are the functions:
Function Name | Invocation Time | Invoking Function | Function Description |
|---|---|---|---|
| During the initialization of the model execution | Model initialization function | 1. Initializes data structures used by your external code to interact with the generated C API code. 2. Initializes the connection to the monitor and registers the callback function, 3. Registers the model signals with the monitor. 4. Registers the model parameters with the monitor. |
| In each step of model execution | Model step function | Updates the monitor with the model signal values in the current step. |
| Every time the user uses a monitor slider | Monitor (see Run Generated MEX file) | Updates the value of the model parameter with the new value. |
| During the termination of the model execution | Model termination function | 1. Disconnects from the monitor. 2. Cleans up memory used by your external code. |
| During model execution | Monitor (see Run Generated MEX file) | 1. Invokes the model initialization function. 2. In a loop, invokes the model step function. 3. Invokes the model termination function. |
To view the function definitions, examine the file CapiSigsParams_06.c.
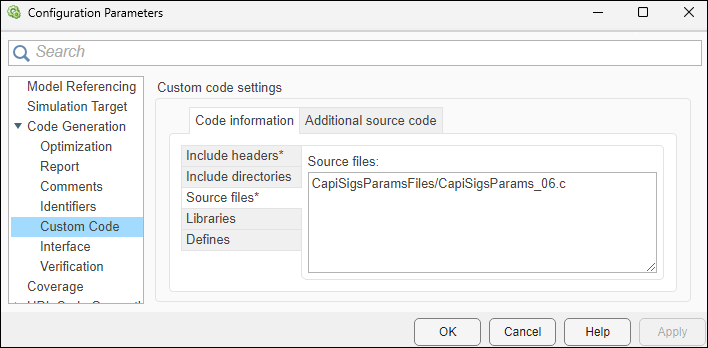
In the same way you did in previous steps of the example, update the Source files in the Code Generation > Custom Code pane of the Configuration Parameters dialog box with the path to the source file CapiSigsParams_06.c.
Alternatively, you can update the parameter programmatically by entering this command in the Command Window:
set_param(capiMdl,CustomSource="CapiSigsParamsFiles/CapiSigsParams_06.c")Generate Model Code
The monitor is a C language object file that contains a main MEX function, mexFunction (C). You generate a static library from the model and then link it to the monitor object file to generate a MEX file executable. For more information about MEX functions, see Call MEX Functions.
Generate a static library from the model.
evalc("slbuild(capiMdl,BuildOutputType='StaticLibrary')");Store the path to the generated static library file in the staticLib variable and store the path to the monitor object file in the monitorObjFile variable. The paths to the static library and to the object file depend on the machine you are running the example on.
switch(string(computer))
  case("PCWIN64")
    staticLib = "CapiSigsParams_grt_rtw/CapiSigsParams.lib";
    monitorObjFile = "CapiSigsParamsFiles/capiMonitor_pcwin64.obj";
  case("GLNXA64")
    staticLib = "CapiSigsParams_grt_rtw/CapiSigsParams.a";
    monitorObjFile = "CapiSigsParamsFiles/capiMonitor_mexa64.o";
  case("MACA64")
    staticLib = "CapiSigsParams_grt_rtw/CapiSigsParams.a";
    monitorObjFile = "CapiSigsParamsFiles/capiMonitor_maca64.o";
  case("MACI64")
    staticLib = "CapiSigsParams_grt_rtw/CapiSigsParams.a";
    monitorObjFile = "CapiSigsParamsFiles/capiMonitor_maci64.o";
  otherwise
    warning("Unknown CPU type '%s'",computer)
    return
end
Link the static library with the monitor object file to generate the MEX file. The generated MEX file has the base name capiMonitorDemo.
mexCMD = sprintf("mex -R2018a %s %s -output capiMonitorDemo",monitorObjFile,staticLib);
eval(mexCMD);
Building with 'gcc'. MEX completed successfully.
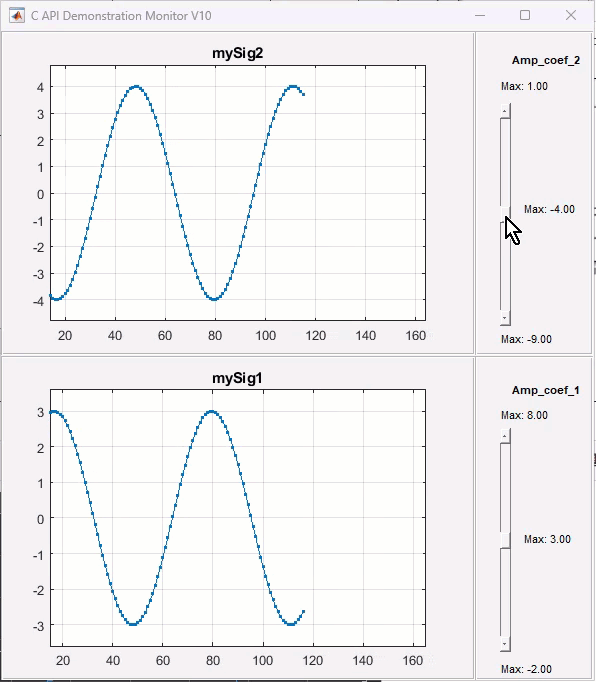
Run Generated MEX file
Run the generated MEX file capiMonitorDemo to start the monitor and to invoke the main function defined in CapiSigsParams_06.c. Notifications appear in the Command Window reporting the progress of the model code together with the monitor.
When you use the sliders to adjust the parameter values, the monitor invokes the capiTuneVarCB function. Observe how this affects the signal values.
capiMonitorDemo()