Control Brightness of Arduino Onboard LED from Android Device
This example shows how to use the Simulink® Support Package for Arduino® Hardware to control brightness of a LED on an Arduino board using an Android® device.
Introduction
Android devices provide wireless access and a user interface. Arduino is an open-source platform used for building electronics projects. Arduino consists of both a hardware board with a microcontroller and a software Integrated Development Environment (IDE) that runs on your computer. Using these two, you can control the Arduino hardware from an Android device by connecting them wirelessly.
This example provides two Simulink models:
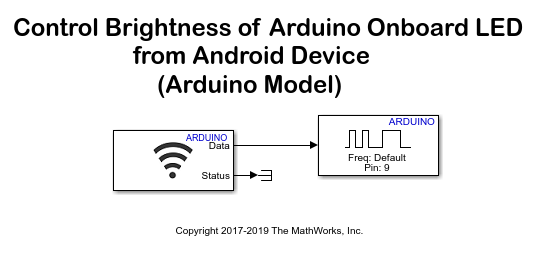
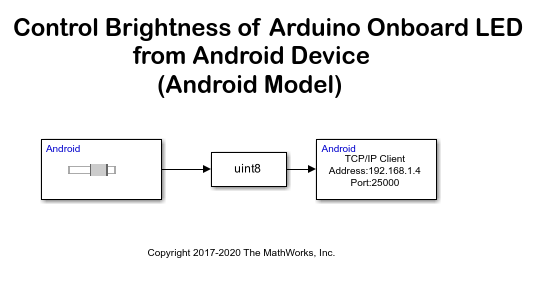
androidarduinoledcontrol— In this model, the slider block present on Android is used to control the brightness of Arduino on board LED.arduino_android_ledcontrol— In this model, data received from your Android device is sent as an input to the PWM block of Arduino, to control the brightness of LED.
With these models, you will:
Set up a network connection between an Android device and Arduino.
Configure and run Simulink models for Android device and Arduino to remotely control the brightness of the LED on the Arduino.
Prerequisites
Before you start with this example, you must:
Download and Install Simulink Support Package for Android Devices
Download and Install Simulink Support Package for Arduino Hardware
Complete the Getting Started with Android Devices example
Complete the Get Started with Arduino Hardware example
Complete the Get Started with Wi-Fi on Arduino Hardware example
Required Hardware
Arduino Mega 2560/Mega ADK/Due/Leonardo/MKR1000/MKR WiFi 1010
Android phone or tablet
Arduino WiFi Shield/ ESP8266
Task 1 - Configure Simulink Model for Supported Arduino Hardware
You can skip this task if you are using the Arduino Mega ADK board.
In this task, you will configure the model for the supported Arduino board.
1. In the Modeling tab, select Model Settings.
2. Select the Hardware Implementation pane and select your required Arduino hardware from the Hardware board parameter list. Do not change any other settings.
3. Click OK.
Task 2 - Configure Network Connection
Set up a network connection between an Android device and an Arduino. The communication protocol used in this example is TCP/IP.
1. Connect the Wi-Fi® hardware to the Arduino board.
For more details on connecting the Arduino to WiFi Shield, see Connect Arduino WiFi Shield to Arduino Hardware.
For more details on connecting the Arduino to ESP8266, see Connect ESP8266 to Arduino Hardware.
The Arduino MKR1000 has an on-board Wi-Fi chip. It can be used directly without any additional Wi-Fi hardware.
2. In the arduino_android_ledcontrol Simulink model, to configure the network settings, go to Configuration Parameters > Hardware Implementation > Target hardware resources > WiFi properties.
3. Specify the SSID of your Wi-Fi network in the Service set identifier (SSID) parameter.
4. Select the WiFi encryption parameter based on your Wi-Fi network encryption settings.
For more details on configuring the network settings for Arduino WiFi Hardware, see Configure Network Settings for Wi-Fi.
5. Connect your Android device to the same Wi-Fi network to which the Arduino is connected.
Task 3 - Configure and Run Simulink Models on Android Device and Arduino Hardware
1. Open the arduino_android_ledcontrol Simulink model.

2. On the Hardware tab of the Simulink model, in the Mode section, select Run on board and then click Build, Deploy & Start to run this model on your Arduino hardware.
3. In the Diagnostic viewer, find the dynamically assigned IP address of Arduino below the memory usage information. Alternatively, a MATLAB® base workspace variable with the name modelname_IPaddress is created with the value of the IP address.
4. Open the androidarduinoledcontrol Simulink model.

5. Double-click on the TCP/IP Send block and change the Remote address to the IP address of the Arduino hardware.
6. On the Hardware tab of the Simulink model, in the Mode section, select Run on board and then click Build, Deploy & Start to run this model on Android device.
7. In the Android device, change the Slider value on Android device to control the brightness of LED.
For more information on configuring Simulink models on Android devices and EV3 Hardware, see Run Model on Android Devices and Run Model on Arduino Hardware.
Other Things to Try
Replace WiFi Block in Arduino model with Ethernet block.
Connect the Arduino hardware to the electronic appliances using relays and with the help of button Block on Android, control them.