Keyboard Control of Parrot Minidrones
Simulink® Support Package for Parrot® Minidrones helps you to remotely control the behavior of the drone. This is achieved by forwarding the key presses on the keyboard of the host computer to the drone.
The workflow for implementing keyboard control of Parrot minidrone includes the following steps:
Preparing Simulink model for keyboard control of drone
Deploying the Simulink model to the drone
Using the Keyboard Control Panel after the drone has started
Preparing Simulink Model for Keyboard Control
Simulink Support Package for Parrot Minidrones contains the Keyboard Read block that can be used to receive key presses from the host computer. This block outputs the ASCII code of the key that was pressed on the keyboard of the host computer, which can be used to perform actions on the drone.
Note
Keyboard keys can be used for controlling the drone only after the Simulink model has started running in the drone (you still need to press the START button on the Flight Control Interface to start the drone).
To prepare the Simulink model for keyboard control of drone, follow these steps:
Add the Keyboard Read block in the Simulink model.
Note
Only one Keyboard Read block is allowed in the entire Simulink model. Any number of connections can be derived from the output signal of this block.
Identify the action that you would like to trigger by pressing a key on the keyboard. For example:
Changing the pitch and yaw values to reach to a desired position
Changing the speed of the motors on the drone
Landing the drone
Emergency shutdown of the drone
Identify a character on the keyboard to trigger this action.
Note
The identified characters can include all the printable characters – letters, numbers, punctuation marks, and common symbols present on the keyboard. Do not consider any key that does not have the corresponding ASCII character code available (for example – do not use arrow keys, Function keys, OS-specific keys and so on).
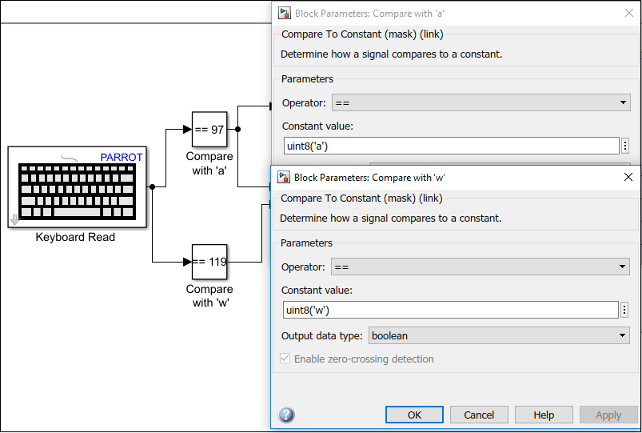
Use the output of the Keyboard Read block to trigger a particular action. For example, add a Compare to Constant block to check for a particular key press (based on the ASCII code of the key pressed).

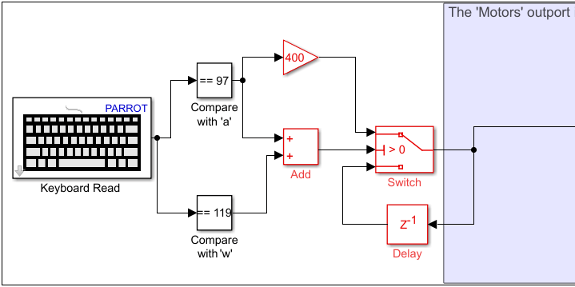
Design the logic for executing the action. For example, you can add additional blocks like Add and Switch to control the motors of the drone based on key presses.
Example of Keyboard Read block used in a modified Code Generation Template

Using Keyboard Control Panel
After the Simulink model is successfully deployed on the Parrot minidrone, you need to start the model by clicking the START button on the Flight Control Interface.
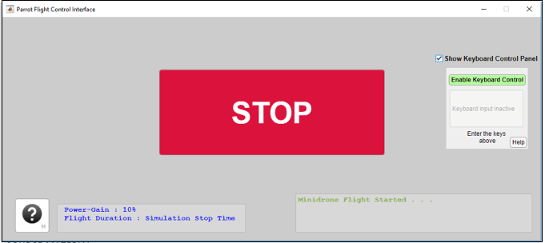
The Keyboard Control Panel appears as part of the Flight Control Interface after the Simulink model has started running on the drone.
To use the Keyboard Control Panel while the model is running on the drone, follow these steps:
On the Flight Control Interface, click the Show Keyboard Control Panel checkbox.
Click Enable Keyboard Control.

Place the cursor in the field below the Enable Keyboard Control button, and press the required key on the keyboard.
The drone executes the action that you have mapped to the pressed key.
Using MATLAB Scripts for Keyboard Control
The keyboard control of the Parrot minidrone using the Flight Control Interface can be extended to a
MATLAB® script also. The Keyboard Control interface uses a TCP/IP interface to
send the key presses to the Keyboard Read block in the Simulink model. The Keyboard Read block listens to the port
26061 for any incoming connections. The Flight Control
Interface opens up a TCP client and connects to this port.
Once a model having a Keyboard Read block is running on the drone, run the MATLAB script to send characters to the drone. The script needs to:
Open a TCP/IP handle to the IP address
192.168.3.1, and connect to the port26061.Note
The Keyboard Read block listens at the port 26061 ONLY.
Write a single byte to the TCP socket.
For example, to send the ASCII a to the Keyboard Read block in
the model running on the drone, use the MATLAB script as below (the IP address 192.168.3.1
corresponds to Parrot Mambo; for Parrot Rolling Spider the IP address is
192.168.3.5):
tcpHandle = tcpclient('192.168.3.1',26061);
write(tcpHandle, uint8('a'));