Build Surveillance Camera Using Android and Raspberry Pi
This example shows how to use Raspberry Pi® hardware and an Android® device to build a surveillance camera.
Introduction
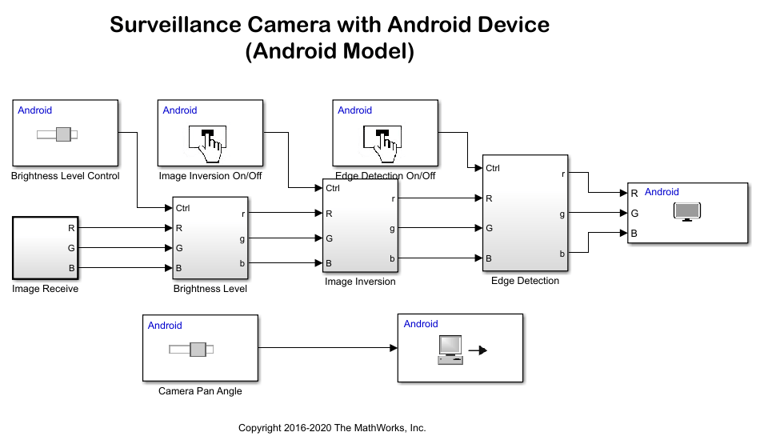
In this example you will learn how to create Simulink® models that stream video captured on a Raspberry Pi hardware board to an Android device. A USB camera attached to servo motor connected to the Raspberry Pi board captures the raw video. The generated Android App displays the video captured from Raspberry Pi board. In the Android App, you also have a slider to control the camera angle, a button to invert the video image, a button to detect the edge, and a slider to adjust the brightness of the video image.
Prerequisites
Complete the Control Status of LED on Raspberry Pi from Android Device example.
Required Hardware
To run this example you will need the following hardware:
Raspberry Pi board
Android smartphone/tablet
(Optional) Servo motor (tested with TowerPro SG-5010)
(Optional) Battery pack (4 AA Battery pack for TowerPro SG-5010)
(Optional) Breadboard and jumper wires
Task 1 - Set Up Hardware
In this task, you will set up servo motor (optional) and USB web camera with Raspberry Pi board.
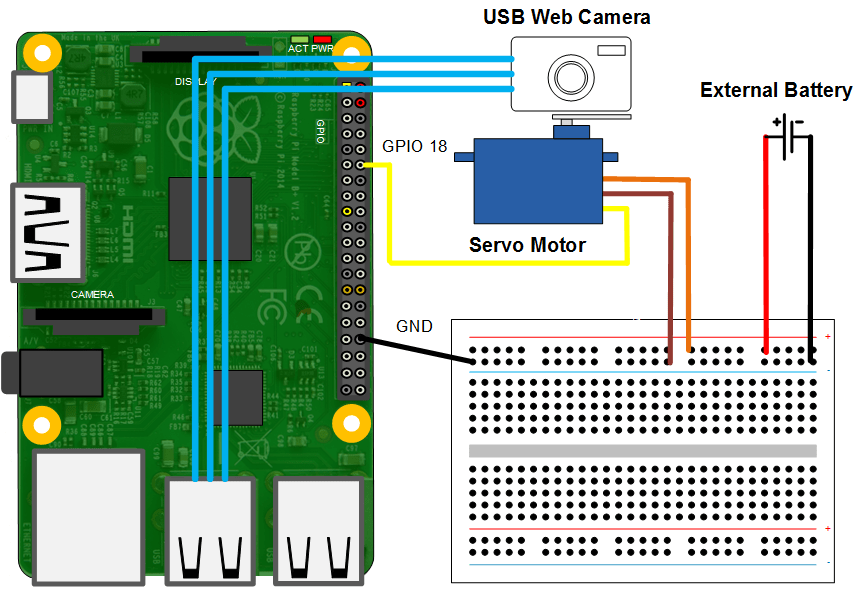
1. (If you don't have a servo motor, skip this step) Secure USB camera on the shaft of the servo motor and secure the servo motor on a surface.
2. Plug the USB interface of USB web camera into the USB port of Raspberry Pi board.
3. (If you don't have a servo motor, skip this step) Wire the servo motor as shown in the simplified circuit diagram below. For the servo motor and battery pack, read the specification of your servo motor and install battery pack properly. Make sure to connect the ground of battery pack to the ground of Raspberry Pi board. Improper installation of the servo motor and battery pack will damage Raspberry Pi board. In the circuit schematic below, the servo motor control line is connected to GPIO 18 pin.

Task 2 - Configure Simulink Models
In this task you will configure models for Raspberry Pi hardware and Android device.
1. Open the androidraspberrypicamera Simulink model.

Double click the UDP Send block and update the Remote IP address parameter with your Raspberry Pi IP address.
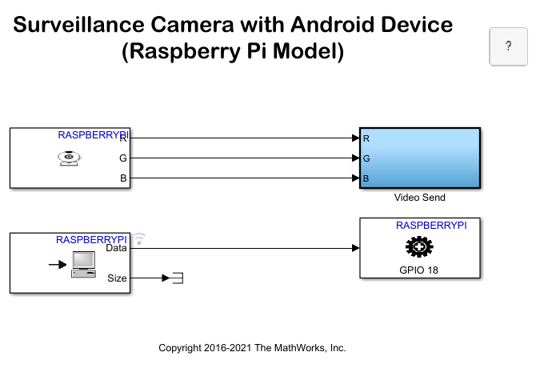
2. Open the raspberrypiandroidcamera Simulink model.

Double-click Video Send Subsystem, update UDP Send Red, UDP Send Blue and UDP Send Green blocks with the IP address of your Android device. If you have a servo motor, double click Standard Servo Write and update Minimum pulse duration and Maximum pulse duration based on your servo motor.
Task 3 - Run Simulink Models on Raspberry Pi Hardware and Android device
1. On the Hardware tab of the Raspberry Pi Simulink model, in the Mode section, select Run on board and then click Build, Deploy & Start to run this model on Raspberry Pi hardware.
2. On the Hardware tab of the Android Simulink model, in the Mode section, select Run on board and then click Build, Deploy & Start to run this model on your Android device.
3. Observe the image captured from Raspberry Pi board display on the screen. Slide the Camera Pan Angle and observe the change of camera angle. Slide the Brightness Level and observe the brightness change. Press Image Inversion button to invert image color. Press Edge Detection button to detect edges.
Other Things to Try
Add more functionalities to surveillance camera such as, add motion sensor in Raspberry Pi hardware to trigger video only when motion detected.